How to Screen Record on PS4 in 4 Top Picks Procedures
 Posted by Lisa Ou / June 19, 2023 16:00
When playing games, you surely want to record the highlights of your gameplay. You may post the videos on different social media platforms. In this case, you will be popular in specific or some games. In addition, you can make a profit or income through your video views if you upload them on the internet. But how to screen record PS4?
You are on the right page if you want to know how to record on PS4! We prepare 4 proven ways to record your gameplay stress-free. Are you ready to learn the methods that you can use? Please read this entire informative article wholeheartedly.

Guide List
Part 1. How to Screen Record on PS4 Using Share Button
If you want to know how to record on PS4, it is easy. It has a built-in recorder that you may use for only 2 presses on your game controller! It can capture your screen in high quality. Also, it will not cause lag while you are playing. But this feature of PS4 limits you to record only from 30 seconds to 60 minutes. Once you exceed that limit, the recording will stop automatically.
Below is the tutorial on using the share button to record your PS4. Also, we prepared the recommended settings or customization for the built-in recorder. Scroll down to discover how to screen record on PS4 with the Share button.
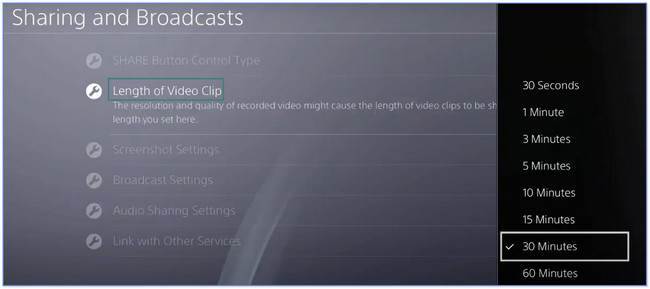
Step 1Launch the Settings on your screen. There will be a lot of options on the main interface. Please choose the Sharing and Broadcasts button. You will be directed to a new screen. Click the second option, which is the Length of Video Clip button. Please choose the length of the recording you prefer. The minimum interval is 30 seconds, and the maximum is 60 minutes.
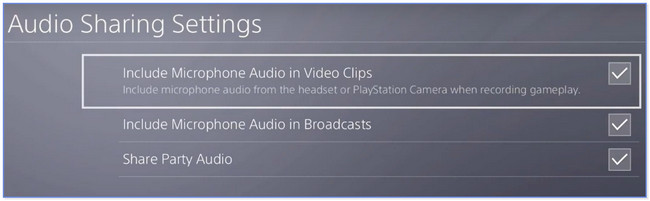
Step 2It is also recommended to choose the Audio Sharing Settings button. After that, please customize the audio on the recording. You can return to the previous screen to customize more on the recording. To start the recording, double-click the Share button on the game controller.
Part 2. How to Screen Record on PS4 with Capture Card
A capture card gives a signal and connection to your PS4 from other devices. Do you know that you can also use it to record your PS4? If not, this is your chance you familiarize yourself with it! Please scroll down and follow the instruction carefully.
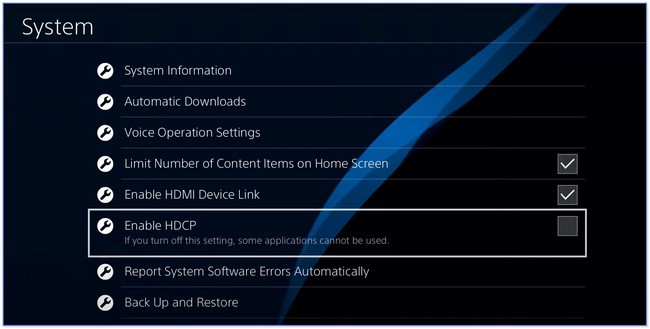
Step 1Ensure that you allow a capture card to access your screen. To do that, do the PS4 settings. Scroll down and choose the System button. Ensure that the Enable HDCP section is left unchecked.
Step 2Connect the capture card to your PS4. After that, launch the game you want to record. Choose the Record button on the left side to start the recording.
Part 3. How to Screen Record on PS4 via FoneLab Screen Recorder
What if you want to screen record PS4 exceeding 60 minutes with good quality? You should first consider FoneLab Screen Recorder! It does not have limits in recording, only your computer's storage space. In addition, this software will not also cause lag while you are playing.
FoneLab Screen Recorder allows you to capture video, audio, online tutorial, etc on Windows/Mac, and you can easily customize size, edit the video or audio, and more.
- Record video, audio, webcam and take screenshots on Windows/Mac.
- Preview data before saving.
- It is safe and easy to use.
Furthermore, this tool lets you edit your video before saving it. You can add text, arrows, or other drawing panels to the video, depending on your preference. Another fun thing is that you can utilize the recording software offline! To explore this software more, see and imitate the steps below about gameplay recording on PS4.
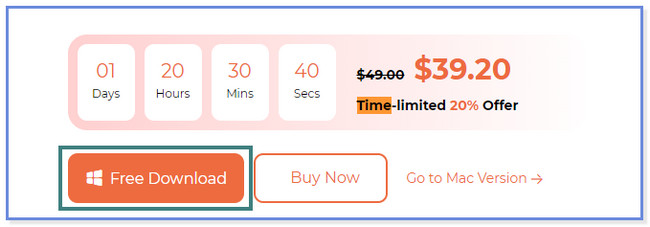
Step 1Download FoneLab Screen Recorder on your computer. You only need to click the Free Download button. Set it up afterward, install, and launch it immediately.
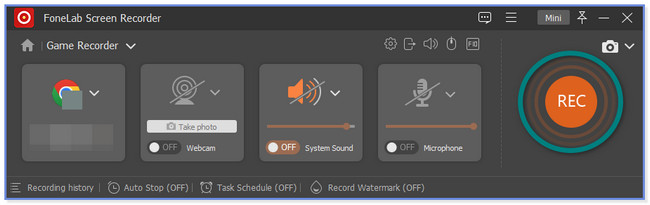
Step 2Click the Game Recorder button on the right side. Select the Game Arrow-Down button. After that, choose the Window you want to record.
Step 3The software will go directly to the screen you choose. Afterward, you can turn on the Webcam, System Sound, and Microphone features while recording. Click the REC button or icon to start the recording.
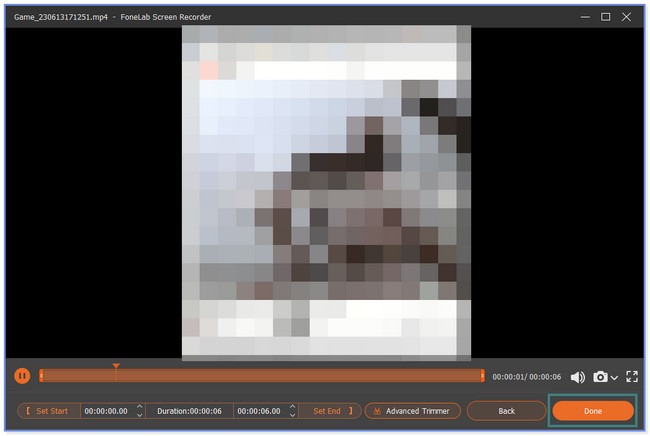
Step 4Before saving, you can edit the recorded video using the editing tools below. Click the Done button or icon to save the video on your computer.
Aside from FoneLab Screen Recorder, there are other tools that you may use to screen record on PS4. OBS is one of them. But, you will have difficulty managing if it is your first time using it because its buttons have no names or labels. Do you want to discover the tool? Move on.
FoneLab Screen Recorder allows you to capture video, audio, online tutorial, etc on Windows/Mac, and you can easily customize size, edit the video or audio, and more.
- Record video, audio, webcam and take screenshots on Windows/Mac.
- Preview data before saving.
- It is safe and easy to use.
Part 4. How to Screen Record on PS4 with OBS Studio
OBS can help you record on PS4. It has complex features that can record your PS4 screen. But you will have difficulty using it if you are a novice. Also, the tool may confuse you if the recording has started. It does not have any sign or time stamp on its main interface as a sign that the recording began.
Anyway, we will guide you on how to use this tool. Please proceed with the detailed steps below.
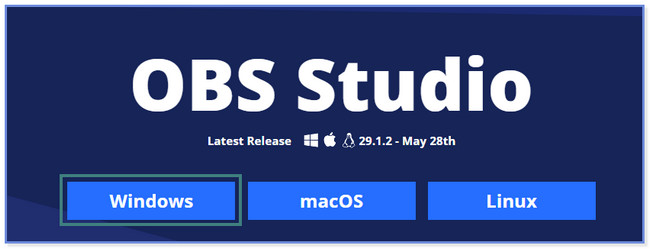
Step 1Please visit the official webpage of OBS Studio to see the full description of it. After that, you will see the operating system it supports. To download it, click the Windows, macOS, or Linux button. After that, set up its downloaded file. Click the Finish button to launch it on your computer afterward.
Step 2Click the Plus icon or button under the Sources section. Choose the screen or game that you want to record, and you may paste the link to it. After that, you may customize the recording by using the tools under the software. Afterward, click the Start Recording button on the right side of the software to start the recording. Click the Stop Recording button or icon to save the video.

Part 5. FAQs about How to Screen Record on PS4
1. Can dust damage PS4?
When your PS4 is running, it attracts dust and other tiny debris. It may cause the game console to overheat. In this case, your PS4 is prone to minor and major damages. It is better and recommended to clean the exterior of the PS4 once a week. The cleaning also depends on how often you use your PS4. You can use compressed air or dry clothes to clean it.
2. Which PS4 is better 500GB or 1TB?
500GB and 1TB are both amounts of storage that your PS4 carries. If you will compare the two storage, 1TB is better than 500GB. It can store and hold more space for your games. The more you have a massive storage space, the smoother your game will be.
We hope we have helped you learn how to record PS4 gameplay for YouTube and other social media platforms. FoneLab Screen Recorder stands out because it can unlimitedly record your screen. But if you only have enough computer storage space. Also, it supports famous video formats. It includes MOV, MP4, and more. Download the software now!
FoneLab Screen Recorder allows you to capture video, audio, online tutorial, etc on Windows/Mac, and you can easily customize size, edit the video or audio, and more.
- Record video, audio, webcam and take screenshots on Windows/Mac.
- Preview data before saving.
- It is safe and easy to use.