Capture video, audio, online tutorial, etc on Windows/Mac, and you can easily customize size, edit the video or audio, and more.
Excellent Guide on How to Use AirServer on Mac and PC Efficiently
 Updated by Valyn Hua / Oct 26, 2022 11:40
Do you want to watch the movie on your phone with a bigger screen? A tool called AirServer makes it easy to do that. This software is known to be the most progressive screen mirroring receiver that is available on Mac and PC. It lets you stream media using Airplay, Google Cast, and more services or devices. AirServer is used to play the media on your Android or iPhone using your bigger devices, including Windows and Mac computers.
Knowing about this tool is a huge advantage, as screen mirroring lets you experience great possibilities. Like the one mentioned above, which enables you to play a movie on a larger screen. Not only will you enjoy watching more, but you can also invite your family or friends to watch with you instead of watching alone on a small screen. Another thing you can enjoy when using AirServer is gaming. Isn't it much better if you see your game on a widescreen? You will surely improve in playing because you will see the game much bigger and more clearer.
In the article below, you will learn more about AirServer and its safety. There will also be guidelines on how to use AirServer on PC and Mac to help you operate the software on your device. As a bonus, we will introduce a tool that you will surely love if you like saving media you watch or the gameplay you complete to re-watch them later.

Guide List
Part 1. Is AirServer Safe
One of the services that AirServer offers is its security feature, Encrypted Airplay. It means that AirServer protects your media files while they are transmitting over the network. Hence, it’s no doubt that this software is completely safe. Plus, it is one of the most trusted screen mirroring programs all around the world. Not only because it is safe but also because of its flexible features.
AirServer is compatible with several devices, such as Windows, Chromebook, Android, iOS, and more. You may also use it to live stream your gameplay on YouTube. On the other hand, you may use this technology in your class as instructional material if you are a teacher. Those are only some of the software that can offer.
FoneLab Screen Recorder allows you to capture video, audio, online tutorial, etc on Windows/Mac, and you can easily customize size, edit the video or audio, and more.
- Record video, audio, webcam and take screenshots on Windows/Mac.
- Preview data before saving.
- It is safe and easy to use.
Part 2. How to Use AirServer on PC and Mac
Now that you better understand the AirServer, you can finally start using it on your PC or Mac from your iPhone. AirServer is compatible with Windows 10, thanks to its “Project to a wireless display” built-in feature. Or you may also try it on Windows 7 by using the Google Chrome browser. The process of screen mirroring using AirServer on PC and Mac is just the same. You only need to download and install the proper AirServer software that is compatible with your computer, then start following the screen mirroring method.
Comply with the directions below to figure out how to use AirServer on PC and Mac:
Step 1Link your iPhone to the same Wi-Fi network as your PC or Mac that runs the AirServer. Then on your iPhone, slide up to the bottom of the screen to access the Control Center.
Step 2Choose the Screen Mirroring icon from the Control center. You will then see the list of available Airplay receivers on the same network.
Step 3Tap the Airplay receiver, which is your computer’s name on the list, to start screen mirroring your iPhone’s screen to your PC or Mac.

If you are using an Android phone, you can use AirServer using similar steps with the iPhone. Link your Android phone to the same Wi-Fi as your PC. Go to your Notification Panel and tap the Cast icon. Connect it to your computer to mirror your Android phone’s screen to the computer. And aside from PC and Mac, you can also download AirServer for other platforms, such as Xbox and Surface Hub.
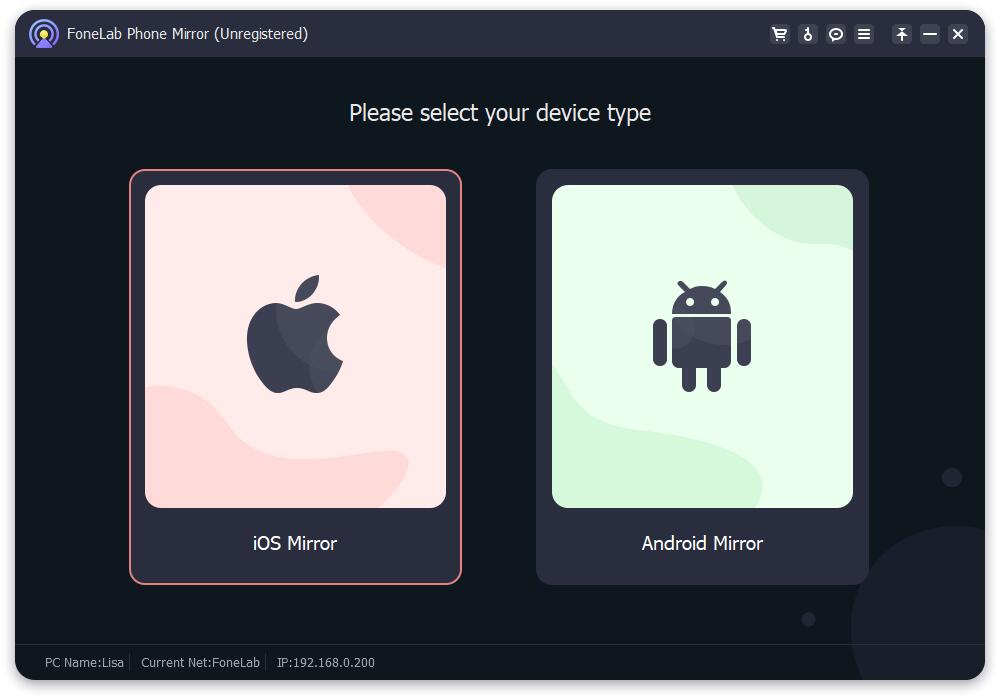
Part 3. Best AirServer Alternative - FoneLab Phone Mirror
However, if you want to get some alternatives, FoneLab Phone Mirror is what you should not miss.
It is a professional tool on computer to help you mirror iPhone or Android screen to computer within a few clicks. With its clear interface, you can cast your mobile phone screen with USB cable, PIN code, QR code, and more. Moreover, you can use it to record screen, takes screenshots accordingly.
With FoneLab Phone Mirror, you will mirror iPhone or Android to computer efficiently.
- Allows you to mirror iPhone or Android screen to a PC.
- Connect your devices through Wi-Fi, QR code, PIN code or USB cable connection.
- Take screenshots and record screen activities with ease.
Below is the demonstration on how to use it to mirror iPhone to computer, for example.
Step 1Go to the official site and download the program. Then follow the instructions to install it on computer. After that, it will be launched automatically. Choose iOS Mirror.
Step 2Connect iPhone to the network that your computer is connected.
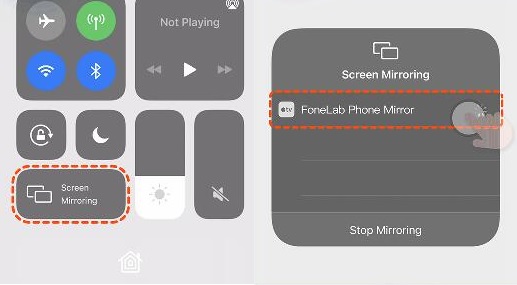
Step 3Swipe your iPhone screen down and access Control Center. Tap the AirServer icon and choose FoneLab Phone Mirror.
Step 4Wait for a while, you can see your iPhone screen on computer now.
Part 4. Screen Record While Mirroring with FoneLab Screen Recorder
AirServer has a screen record feature you can use while mirroring. It is a good feature. However, its functions are only limited. Therefore, we suggest that if you want to replay the video, movie, or gameplay you viewed in screen mirroring, try using the FoneLab Screen Recorder instead. This software professionally records videos, movies, shows, video calls, and more on your computer. It produces high-quality outputs that equal the quality of the original video. In addition, it supports various video and audio formats.
FoneLab Screen Recorder allows you to capture video, audio, online tutorial, etc on Windows/Mac, and you can easily customize size, edit the video or audio, and more.
- Record video, audio, webcam and take screenshots on Windows/Mac.
- Preview data before saving.
- It is safe and easy to use.
Comply with the directions below to figure out how to screen record while mirroring using FoneLab Screen Recorder:
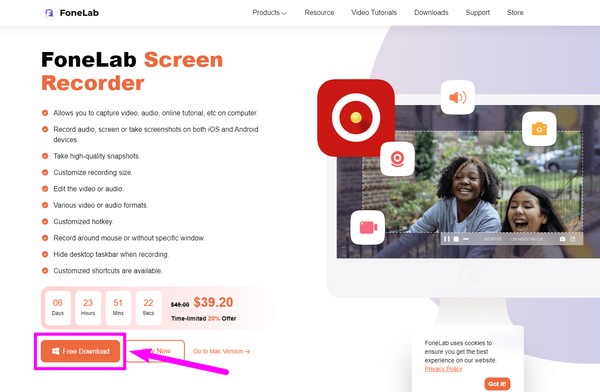
Step 1To begin, visit the FoneLab Screen Recorder official website. Click the Free Download tab to download the software for free. Afterward, click the file to open it. Before clicking the Install button, select the language you prefer, and you may also customize the installation by choosing where to store the software’s data. Then once the installation begins, wait a bit to start the program and run it on your computer.
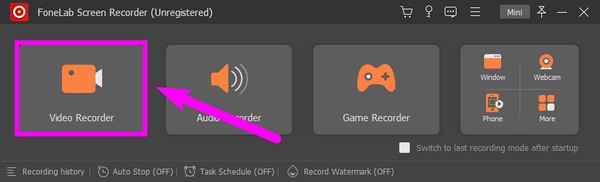
Step 2On the FoneLab Screen Recorder main interface, you will see the features Video Recorder, Audio Recorder, Game Recorder, and more of its additional features on the right side. Select the Video Recorder function on the left side of the interface.
Step 3To record, make sure to turn on the System Sound, Microphone, or website, depending on what you need for your video. You also have the option to screen record the whole screen or customize it based on what you will record. After adjusting the options, Click the REC button on the right side of the interface.

Step 4Once you are done, hit the red stop button to stop the recording. The preview will then show up. Click the Done tab at the bottom-right corner of the FoneLab Screen Recorder interface.

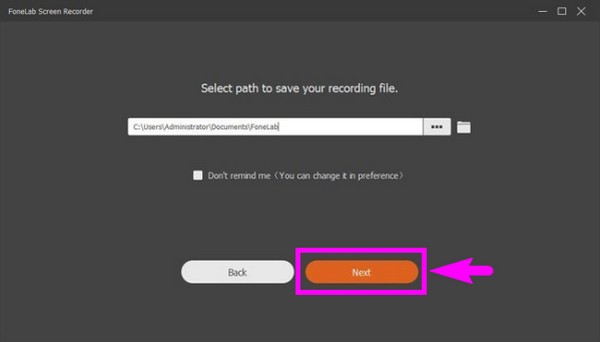
Step 5Select the path or location where you want to save your recording file on the following interface. Then lastly, hit the Next tab below to save your video.
FoneLab Screen Recorder allows you to capture video, audio, online tutorial, etc on Windows/Mac, and you can easily customize size, edit the video or audio, and more.
- Record video, audio, webcam and take screenshots on Windows/Mac.
- Preview data before saving.
- It is safe and easy to use.
Part 5. FAQs about Using AirServer and Screen Recording
Is there another way to mirror the iPhone screen without Wi-Fi?
Yes, there is. You may use the Apple Lightning cable to link your iPhone's port at the bottom to an HDMI cable. This one is an easy method as it does not require Apple TV. Your TV only needs to have an HDMI port for it to work well.
Do FoneLab Screen Recorder outputs have a watermark?
No. FoneLab Screen Recorder does not put watermarks on the video outputs whether you use the free trial or registered version of the software. You can freely enjoy its features without worrying about unwanted logos or watermarks attached to your video.
What are the advantages of screen recording on FoneLab Screen Recorder instead of AirServer?
While AirServer's screen recording feature is good, it is only a basic recorder. On the other hand, FoneLab Screen Recorder specializes in this field, containing several functions. Aside from the high-quality screen records, this software lets you clip video or audio before saving. It also has a microphone noise-cancellation feature that makes your recordings sound excellent.
FoneLab Screen Recorder allows you to capture video, audio, online tutorial, etc on Windows/Mac, and you can easily customize size, edit the video or audio, and more.
- Record video, audio, webcam and take screenshots on Windows/Mac.
- Preview data before saving.
- It is safe and easy to use.
If you are looking for more guides to help you understand and operate a tool, visit the FoneLab Screen Recorder website. It will provide you with easy guidelines on different topics and reliable tools.