- Quick Answer
- Part 1. Quick Reference Table
- Part 2. Button Combinations by Model
- Part 3. Screenshot Without Buttons
- Part 4. Full-Page Screenshots
- Part 5. Edit, Annotate & Find Screenshots
- Part 6. Take Screenshots on PC via Mirroring
- Part 7. Troubleshooting & System Repair
- Part 8. Comparison Table
- Part 9. FAQ
How to Take Screenshots on iPhone: The Ultimate Guide
 Posted by
 Quick Answer: How to Take a Screenshot on Any iPhone
Taking a screenshot on an iPhone is simple. The method depends on your iPhone model:
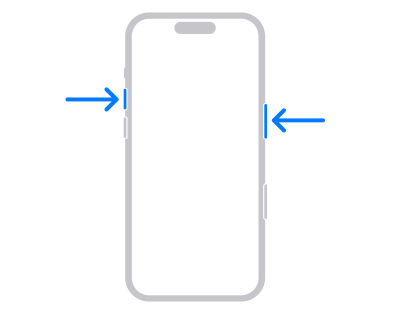
- iPhone with Face ID (iPhone X and later, including iPhone 16/15/14/13/12/11/X): Press the Side Button and Volume Up Button simultaneously, then release.
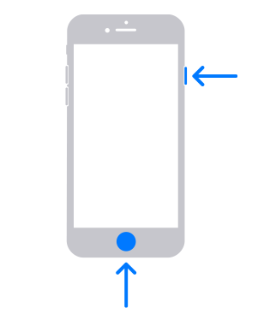
- iPhone with Home Button (iPhone SE, 8, 7, 6s, and earlier): Press the Home Button and Side Button (or Top Button on older models) simultaneously, then release.
- iPhone 15 Pro / 16 Pro with Action Button: Go to Settings > Action Button > select Screenshot. Then press and hold the Action Button to capture.
- No physical buttons working? Use AssistiveTouch (Settings > Accessibility > Touch > AssistiveTouch) or Back Tap (Settings > Accessibility > Touch > Back Tap), or mirror your iPhone to PC with FoneLab Screen Recorder.
- Screenshot not working due to system glitches? Use FoneLab iOS System Recovery to fix iOS issues without data loss.
Once you take a screenshot, a thumbnail appears in the bottom-left corner. Tap it to edit and annotate, or swipe left to dismiss. All screenshots are automatically saved to the Photos app > Albums > Screenshots folder.
Taking a screenshot on your iPhone is one of the most useful features for capturing exactly what's on your screen — from memorable conversations and important receipts to game achievements and error messages for tech support.
Whether you have the latest iPhone 16 with Action Button, a Face ID model like iPhone 14 or 12, or a classic Home button iPhone like the SE or 8, this guide covers every possible method. You'll learn:
- The standard button combinations for every iPhone model
- How to take screenshots without using physical buttons (AssistiveTouch, Back Tap, Siri)
- How to take full-page scrolling screenshots (Safari and supported apps)
- How to mirror your iPhone to PC and take screenshots on a bigger screen with FoneLab Screen Recorder
- How to fix system glitches that prevent screenshots with FoneLab iOS System Recovery
- How to edit, annotate, and find your screenshots
- How to fix common issues when screenshot not working
Part 1. Quick Reference Table
Use this table to quickly find the screenshot method for your specific iPhone model.
| iPhone Model | Button Combination | Screenshot Location |
|---|---|---|
| iPhone 16 Pro / 15 Pro | Action Button + Volume Up (or customize via Settings) | Photos App → Screenshots album |
| iPhone 16 / 15 / 14 / 13 / 12 / 11 / X (Face ID) | Side Button + Volume Up | Photos App → Screenshots album |
| iPhone SE (all generations) / 8 / 7 / 6s (Home button) | Home Button + Side Button | Photos App → Screenshots album |
| iPhone 6 / 5 / 4 / 3G (older) | Home Button + Top Button | Photos App → Camera Roll |
Pro Tip: After taking a screenshot, a thumbnail appears in the bottom-left corner for 5 seconds. Tap it to edit and annotate immediately, or swipe left to dismiss.
FoneLab Screen Recorder allows you to capture video, audio, online tutorial, etc on Windows/Mac, and you can easily customize size, edit the video or audio, and more.
- Record video, audio, webcam and take screenshots on Windows/Mac.
- Preview data before saving.
- It is safe and easy to use.
Part 2. Method by Method — Button Combinations
How to Take Screenshot on iPhone with Face ID (iPhone X and Later)
Compatible models: iPhone X, XS, XR, 11, 12, 13, 14, 15, 16, and all subsequent Face ID models
Step-by-step instructions:
Step 1Press the Side Button and Volume Up Button at the exact same time
Step 2Quickly release both buttons
Step 3You'll hear a camera shutter sound (if your iPhone sound is on)
Step 4The screen flashes white briefly — screenshot captured
Step 5A screenshot thumbnail appears in the bottom-left corner
Note: If the screenshot doesn't capture, try pressing both buttons simultaneously without any delay between them. If your iPhone is frozen, see Part 7 for solutions.
How to Screenshot on iPhone with Home Button (iPhone SE, 8, 7, 6s)
Compatible models: iPhone SE (1st, 2nd, and 3rd generation), iPhone 8, 8 Plus, 7, 7 Plus, 6s, 6s Plus
Step 1Press the Side Button (right side) and Home Button (front bottom) at the same time
Step 2Quickly release both buttons
Step 3The screen flashes white — screenshot captured
How to Screenshot on iPhone 15/16 Pro with Action Button
New Feature: The Action Button on iPhone 15 Pro, iPhone 15 Pro Max, iPhone 16 series, and later replaces the traditional mute switch. You can customize it to take screenshots with a single press.
How to set up Action Button for screenshots:
Step 1Go to Settings > Action Button
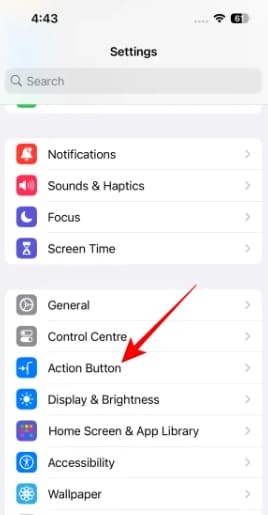
Step 2Swipe left or right through the available options until you see Screenshot
Step 3Press and hold the Action Button to confirm your selection
How to use: Simply press and hold the Action Button to take a screenshot instantly.
FoneLab Screen Recorder allows you to capture video, audio, online tutorial, etc on Windows/Mac, and you can easily customize size, edit the video or audio, and more.
- Record video, audio, webcam and take screenshots on Windows/Mac.
- Preview data before saving.
- It is safe and easy to use.
Part 3. Screenshot Without Buttons
Sometimes you may not want to use physical buttons — perhaps they're broken, or you prefer a hands-free approach. Here are five button-free methods.
| Method | Setup Location | Best For | Difficulty |
|---|---|---|---|
| AssistiveTouch | Settings > Accessibility > Touch > AssistiveTouch | Broken buttons | Easy |
| Back Tap | Settings > Accessibility > Touch > Back Tap | One-handed use | Easy |
| Siri | "Hey Siri, take a screenshot" | Hands-free | Easiest |
| FoneLab Screen Recorder | Download from fonelab.com | Mirroring + PC screenshots | Moderate |
1. AssistiveTouch Screenshot
AssistiveTouch creates a virtual button on your screen that can perform various actions, including taking screenshots.
Setup instructions:
Step 1Go to Settings > Accessibility > Touch > AssistiveTouch
Step 2Toggle AssistiveTouch ON
Step 3Under Custom Actions, choose a gesture (Single-Tap, Double-Tap, or Long Press) and select Screenshot
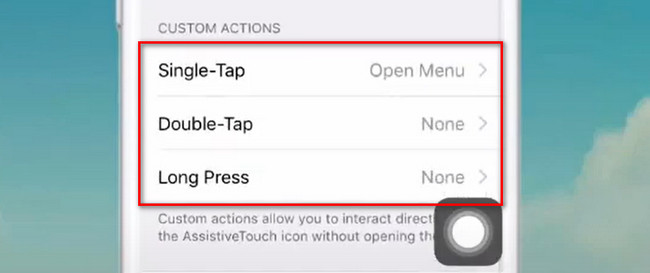
Step 4Tap the virtual button according to your chosen gesture to take a screenshot
2. Back Tap Screenshot (iOS 14 and later)
Back Tap uses the iPhone's accelerometer to detect when you tap the back of your device — no buttons required.
Step 1Go to Settings > Accessibility > Touch > Back Tap
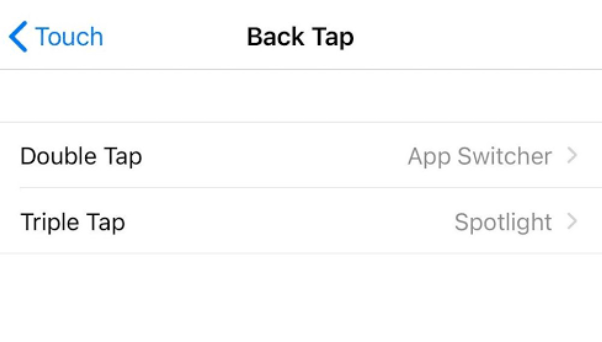
Step 2Choose Double Tap or Triple Tap
Step 3Scroll down and select Screenshot
Step 4Tap the back of your iPhone twice (or three times) to take a screenshot
3. Siri Screenshot
The easiest hands-free method — just use your voice.
Step 1Activate Siri (hold Side Button or say "Hey Siri")
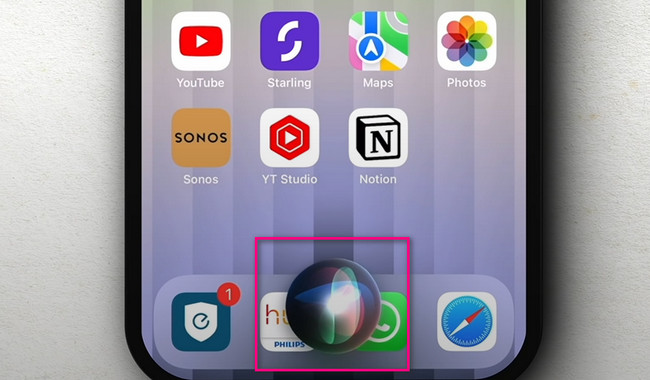
Step 2Say "Take a screenshot"
Step 3Siri captures and saves the screenshot immediately
Part 4. Full-Page Screenshots (Scrolling Screenshots)
What it does: Captures an entire webpage, email, or document that extends beyond your screen — perfect for saving articles, receipts, or long conversations.
Supported apps: Safari browser, Apple Mail, Apple Notes, Files app. Not supported in most third-party apps (Instagram, Twitter, WhatsApp, etc.).
Step-by-step instructions for full page screenshot on iPhone:
Step 1Take a regular screenshot using your iPhone's button combination
Step 2Tap the thumbnail that appears in the bottom-left corner (within 5 seconds)
Step 3Tap "Full Page" at the top of the screen
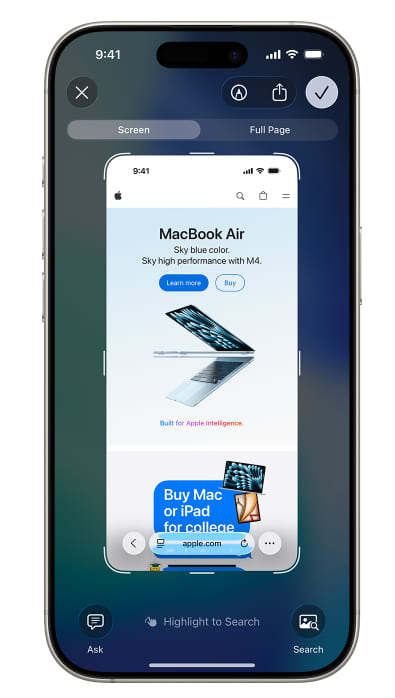
Step 4Use the scroll bar on the right side to preview the entire page
Step 5Tap "Done" in the top-left corner
Step 6Choose "Save PDF to Files"
Important: Full-page or scrolling screenshots are saved as PDF files in the Files app, not as images in the Photos app.
FoneLab Screen Recorder allows you to capture video, audio, online tutorial, etc on Windows/Mac, and you can easily customize size, edit the video or audio, and more.
- Record video, audio, webcam and take screenshots on Windows/Mac.
- Preview data before saving.
- It is safe and easy to use.
Part 5. Edit, Annotate, and Find Screenshots
Right after taking a screenshot, you have a few seconds to act on the thumbnail:
- Tap the thumbnail — Opens the full editing and markup screen
- Swipe left — Dismisses the thumbnail and saves the screenshot automatically
- Long press the thumbnail — Opens the share sheet directly for quick sharing
Where Do Screenshots Go on iPhone?
All screenshots are automatically saved to: Photos App → Albums → Media Types → Screenshots
Part 6. Take iPhone Screenshots on PC via Mirroring
What if you want to capture your iPhone screen while working on your computer — for a tutorial, presentation, remote support, or online course? FoneLab Screen Recorder allows you to mirror your iPhone to PC and take screenshots with one click, all on your computer screen.
FoneLab Screen Recorder allows you to capture video, audio, online tutorial, etc on Windows/Mac, and you can easily customize size, edit the video or audio, and more.
- Record video, audio, webcam and take screenshots on Windows/Mac.
- Preview data before saving.
- It is safe and easy to use.
Why Use FoneLab Screen Recorder for Screenshots?
- One-click screenshot — Click the camera/snapshot icon to capture instantly — no phone buttons needed
- Wireless mirroring — Connect via Wi-Fi or USB cable
- Annotation tools — Add text, arrows, shapes, and highlights after capture
- PC storage — Screenshots save directly to your computer — no need to transfer
Step-by-Step Guide:
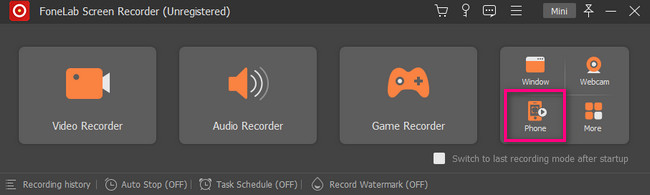
Step 1Download and install FoneLab Screen Recorder.
Step 2Launch and select Phone Recorder Mode — Click the arrow-down button and select Phone Recorder > iOS Recorder.
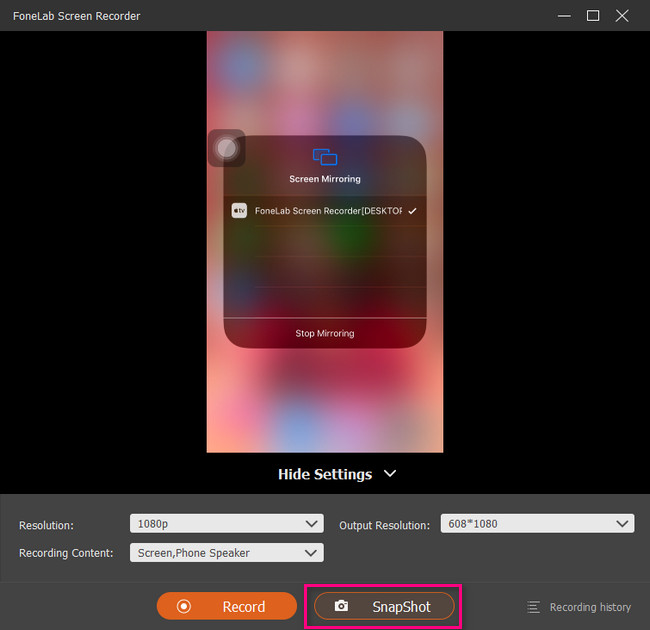
Step 3Connect your iPhone via Wi-Fi (same network) or USB cable. For Wi-Fi, swipe down on iPhone to open Control Center, tap Screen Mirroring, and select your computer.

Step 4Take screenshots — Click the Camera icon or Snapshot button to capture. The screenshot saves instantly to your computer.
Step 5Edit and save — Use built-in annotation tools to crop, add text, arrows, and highlights.
Part 7. Troubleshooting — iPhone Screenshot Not Working?
| Problem | Possible Cause | Solution |
|---|---|---|
| Screenshot not capturing | Buttons not pressed simultaneously | Press both buttons at exactly the same time |
| No screenshot saved | Storage full | Check Settings > General > iPhone Storage |
| Screenshot appears black | App blocks screenshots (banking apps, DRM) | Cannot bypass — app restriction |
| iPhone frozen / unresponsive | iOS system crash | Use FoneLab iOS System Recovery (Standard Mode) |
| Screen stuck on Apple logo | System boot loop | Use FoneLab iOS System Recovery |
Fix iPhone System Issues Affecting Screenshots with FoneLab iOS System Recovery
If your iPhone's screenshot function isn't working due to system-level problems — such as a frozen screen, unresponsive buttons, being stuck in a boot loop — you need a more powerful solution, like FoneLab iOS System Recovery.
FoneLab enables you to fix iPhone/iPad/iPod from DFU mode, recovery mode, Apple logo, headphone mode, etc. to normal state without data loss.
- Fix disabled iOS system problems.
- Extract data from disabled iOS devices without data loss.
- It is safe and easy to use.
Step-by-step guide:
Step 1Download and install FoneLab iOS System Recovery on your Windows or Mac computer.
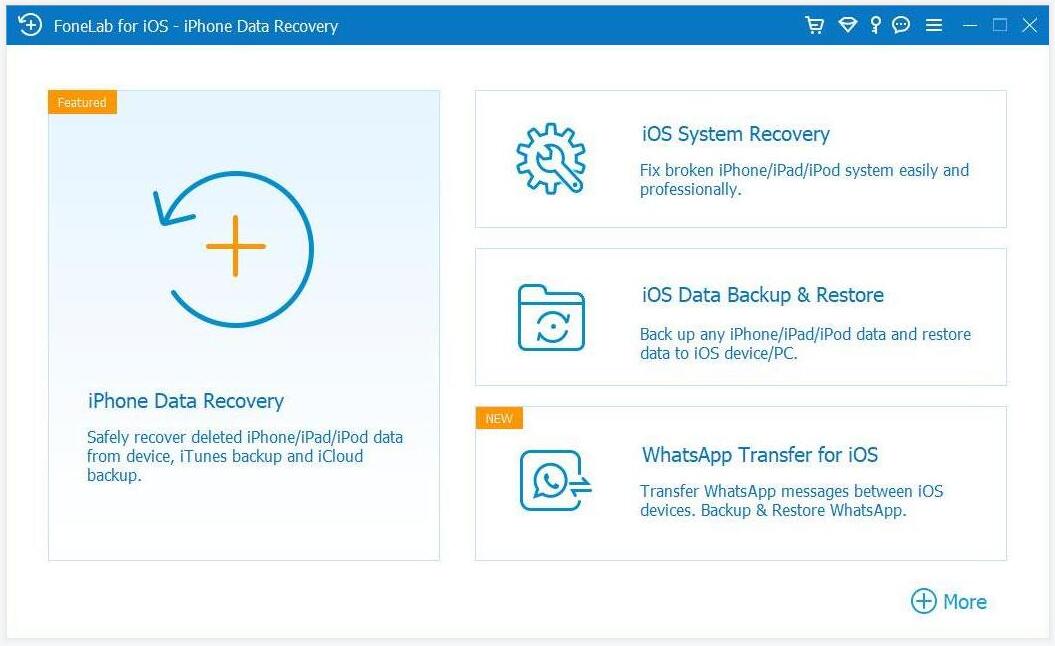
Step 2Launch and select iOS System Recovery from the main interface. Click Start.
Step 3Connect your iPhone using a USB Lightning cable.
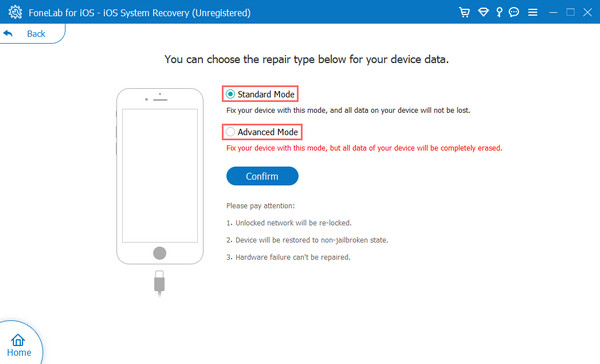
Step 4Choose Standard Mode (No data loss) — this is recommended for most screenshot-related issues.
Step 5Download firmware and click Repair. Wait 10-15 minutes for the process to complete.
Step 6Verify screenshot function — after the iPhone restarts, test the screenshot button combination.
FoneLab enables you to fix iPhone/iPad/iPod from DFU mode, recovery mode, Apple logo, headphone mode, etc. to normal state without data loss.
- Fix disabled iOS system problems.
- Extract data from disabled iOS devices without data loss.
- It is safe and easy to use.
Part 8. Comparison Table of All Screenshot Methods
| Method | Button-Free | Requires Computer | Speed | Data Loss Risk | Best For |
|---|---|---|---|---|---|
| Hardware Buttons | ❌ | ❌ | Fastest | None | All users (default) |
| Action Button (15/16 Pro) | ✅ | ❌ | Fast | None | Quick, customizable access |
| AssistiveTouch | ✅ | ❌ | Moderate | None | Broken physical buttons |
| Back Tap | ✅ | ❌ | Fast | None | One-handed operation |
| Siri Voice | ✅ | ❌ | Moderate | None | Hands-free |
| FoneLab Screen Recorder | ✅ | ✅ | Fast | None | Mirroring + PC screenshots |
| FoneLab iOS System Recovery | N/A | ✅ | 10-15 min | None (Standard Mode) | Fix system glitches |
Part 9. FAQs About iPhone Screenshots
How do I take a screenshot on iPhone without the power button?
Use AssistiveTouch (Settings > Accessibility > Touch > AssistiveTouch) or Back Tap (Settings > Accessibility > Touch > Back Tap). Both methods work without using physical buttons. You can also use Siri or mirror your iPhone to PC with FoneLab Screen Recorder.
What format are iPhone screenshots?
Regular screenshots are saved as PNG files. Full-page screenshots (from Safari using "Full Page") save as PDF in the Files app.
Where do screenshots go on iPhone?
All regular screenshots are saved to the Photos app > Albums > Media Types > Screenshots folder.
How to take a scrolling screenshot on iPhone?
Take a regular screenshot, tap the thumbnail, then select "Full Page" at the top. This only works in Safari and a few Apple apps (Mail, Notes, Files).
Will FoneLab iOS System Recovery delete my photos or data?
No — Standard Mode repairs system issues without deleting any personal data. The software warns you before using Advanced Mode, which does erase data.
Is FoneLab Screen Recorder safe to use?
Yes — it is a trusted tool that connects via secure protocols and does not collect your personal data.
My final takeaway: Taking screenshots on your iPhone is easier than you think once you know the right method for your device. From button combinations to hands-free options, there's a method for every situation. For those who need to capture iPhone screenshots while working on a computer, FoneLab Screen Recorder offers a seamless mirroring and capture solution. If your iPhone's screenshot function isn't working due to system problems, FoneLab iOS System Recovery can fix the issue without data loss.
Download FoneLab Screen Recorder today to experience the easiest way to capture your iPhone screen on your computer.
Download FoneLab iOS System Recovery to fix iPhone system issues that prevent screenshots and keep your device running smoothly.
FoneLab enables you to fix iPhone/iPad/iPod from DFU mode, recovery mode, Apple logo, headphone mode, etc. to normal state without data loss.
- Fix disabled iOS system problems.
- Extract data from disabled iOS devices without data loss.
- It is safe and easy to use.