How to Record Voice Messages on iPhone [3 Stress-Free Ways to Perform]
 Posted by Lisa Ou / Nov 08, 2023 16:00
Good day! I suddenly wanted to learn how to record a voice message on iPhone. Funny voice messages from my friends are the cause. I would love to record these voice messages to make fun of them once we gather again. Can you please teach me how to record voice messages on an iPhone? Thank you so much!
Unlike all other brands of phones, you are lucky to have iPhones. They have built-in recorders that you can use to record voice messages on iPhone. Know them by scrolling down on this post. Move on.
![How to Record Voice Messages on iPhone [3 Stress-Free Ways to Perform]](/images/screen-recorder/how-to-record-voice-message-on-iphone/how-to-record-voice-message-on-iphone.jpg)

Guide List
Part 1. How to Record Voice Message on iPhone through Voice Memos
For recording personal notes, musical ideas, classroom lectures, and other voice recordings, Voice Memos take place. The built-in tool is responsible for doing that. So, it indicates that you can also use it to learn how to record a voice message on iPhone.
FoneLab Screen Recorder allows you to capture video, audio, online tutorial, etc on Windows/Mac, and you can easily customize size, edit the video or audio, and more.
- Record video, audio, webcam and take screenshots on Windows/Mac.
- Preview data before saving.
- It is safe and easy to use.
What’s more, is that Voice Memos contains a high-quality built-in microphone that has a noise reduction feature. In this case, it records clear audio compared to the other apps or tools that do not have the feature.
If you want to use Voice Memos on iPhone, see the detailed steps below. Please proceed.
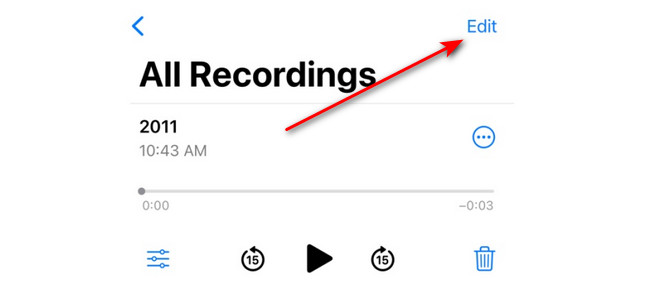
Step 1Find the location of the Voice Memos app first. After that, tap it to launch it on your iPhone. Later, you will see a white interface. All you have to do is tap the Red icon at the bottom of the screen and go to the voice message you want to record.
Step 2Keep the recording until you record the voice messages you want to capture. Later, please go back to the Voice Memos app. Later, tap the Red Box icon at the bottom to stop the recording. The app will save the recordings automatically. Rename it if you prefer by tapping the Edit icon at the top right corner of the screen.
Part 2. How to Record Voice Message on iPhone via Built-in Screen Recorder
iPhones also have a built-in screen recorder to help you learn how to record a voice message on iPhone. However, since it is a screen recorder, you will also capture the screen of your iPhone. Not only the voice messages. You can use its Microphone feature in the process. The built-in screen recorder can be found in the Control Center section. If you cannot access the built-in recorder, see the instructions below. You will see the steps on how to use it afterward. Please proceed.
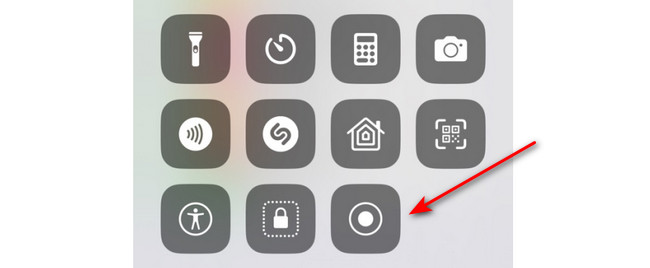
Step 1Open the Settings app that’s on the list of iPhones. After that, please swipe down the screen and choose the Control Center button on the list. Later, swipe down until you reach the bottom of the screen. Please tap the Plus icon on the side of the Screen Recording feature. Later, you will be able to access it in the Control Center.
Step 2Please go to the voice message that you want to capture. After that, swipe down the screen on the Control Center section. Tap the Screen Recorder icon at the bottom to start the recording. After that, you only need to press the icon long to see the Microphone feature. Tap its icon to have access to the feature.
Step 3If you like to end the recording, tap the Red icon at the top left corner of the screen. The recording session will stop. Later, the iPhone will save the recording automatically afterward.
Part 3. How to Record Voice Message on iPhone with FoneLab Screen Recorder
Do you know that you can also record your iPhone on a computer? That’s with the help of Fonelab Screen Recorder. It allows you to use its Phone feature. The feature will allow you to mirror your iPhone screen wirelessly, which you can use to record it. It includes the system sound and microphone.
Furthermore, the tool allows you to take screenshots while the recording is ongoing. The pictures will be saved in high quality. Additionally, the recording will not cause lag on iPhone and computer. If so, you will have a smooth process for recording.
FoneLab Screen Recorder allows you to capture video, audio, online tutorial, etc on Windows/Mac, and you can easily customize size, edit the video or audio, and more.
- Record video, audio, webcam and take screenshots on Windows/Mac.
- Preview data before saving.
- It is safe and easy to use.
Do you want to test Fonelab Screen Recorder? Please see the detailed steps below that will serve as your guide for using this software. Please proceed.
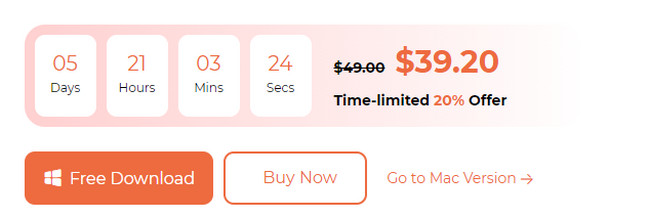
Step 1Please download the tool on your computer. If you use the Windows operating system, click the Free Download button with a Window icon on the left. But if you are using a Mac, click the button with an Apple icon on the left. Later, wait for the downloading process to end. Set it up afterward, and the computer will launch it automatically.
Step 2The software will load for a few seconds. Once the tool appears on your computer screen, click the Phone icon on the right of the main interface.
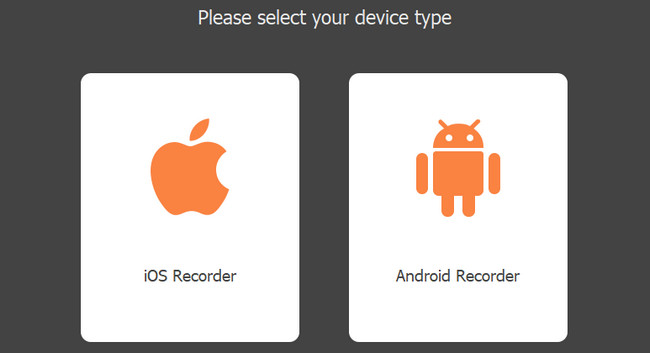
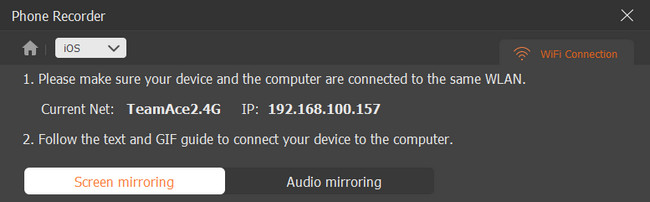
Step 3Click the iOS Recorder button on the left. Connect the iPhone to the same network as the computer where you have downloaded the software.
Step 4Click the Screen Mirroring button on the left. On your iPhone, go to Control Center and tap the Mirror icon. Choose FoneLab Screen Recorder. You will see the iPhone screen on the computer afterward. Please click the Record button to start capturing your iPhone screen.
FoneLab Screen Recorder allows you to capture video, audio, online tutorial, etc on Windows/Mac, and you can easily customize size, edit the video or audio, and more.
- Record video, audio, webcam and take screenshots on Windows/Mac.
- Preview data before saving.
- It is safe and easy to use.
Part 4. FAQs about How to Record Voice Messages on iPhone
1. Why is my recording not working on my iPhone?
Enabled restrictions may be the main cause of why the recording on the iPhone is not working. It restricts some of the permissions that the built-in recording needs. Fixing it will be the solution to that issue. So, go to the Settings app of your iPhone. After that, tap the Screen Time button upon scrolling down. Inside it, choose the Content & Privacy Restrictions icon. At the top, please ensure the Slider of the Content & Privacy Restrictions section will be green. It only means that it is turned on.
2. How do I add a screen recording icon to the Control Center?
Go straight to the Settings app of your iPhone. After that, please swipe down the screen and choose the Control Center button. The active tiles will be listed at the top. All you have to do is swipe down and find the Screen Recording icon. After that, tap the Plus icon on the left of the button. You will access the built-in screen recording on the Control Center afterward.
3. How to record voicemail on iPhone?
Launch the Phone icon. Tap Voicemail at the bottom right corner. Tap the Custom button among all the choices. Tap Record at the bottom right. Tap Save to keep the recording.
That's all about learning how to record voice message on iPhones! We hope that you had fun using the methods of this post that we have prepared for you. It would be great if you also test our tool, Fonelab Screen Recorder. Do you have more queries? Comment them below and join our discussion. Thank you!
FoneLab Screen Recorder allows you to capture video, audio, online tutorial, etc on Windows/Mac, and you can easily customize size, edit the video or audio, and more.
- Record video, audio, webcam and take screenshots on Windows/Mac.
- Preview data before saving.
- It is safe and easy to use.