How to Record Voice Memo on iPhone [Reliable Methods to Use]
 Posted by Lisa Ou / Nov 16, 2023 16:00
When utilizing Voice Memos, you may want to record your notes, musical ideas, classroom notes, etc. It captures high-quality recordings on your iPhone. The good thing about this built-in tool is that you can save multiple recordings without limits of numbers.
However, can you record a voice memo on iPhone? Of course! See more pieces of information below about the topic. Move on.
![How to Record Voice Memo on iPhone [Reliable Methods to Use]](/images/screen-recorder/how-to-record-a-voice-memo-on-iphone/how-to-record-a-voice-memo-on-iphone.jpg)

Guide List
Part 1. How to Record A Voice Memo on iPhone through Built-in Ways
Before downloading apps on your iPhone, there’s good news you should know! There are built-in ways to learn how to record voice memos on iPhone. See them below.
Method 1. Voice Memo
Before anything else, learning how to record on Voice Memo is recommended. It will serve as your future reference. Please give the method below some minutes to learn how Voice Memos functions. Move on.
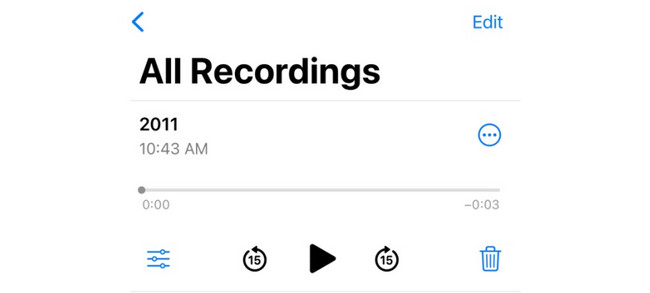
Step 1Locate the Voice Memo app on your iPhone. After that, please prepare the voice memos you want to record on your phone. Later, please tap the Circle icon at the bottom of the iPhone screen's main interface to start recording. Please keep silent when you start capturing.
Step 2You will see the loudness of your voice at the bottom of the app. After recording the voice memos, please tap the Box button at the bottom of the main screen. The capturing process will end immediately. The app will save the video afterward. If you want to rename the recording, please tap the Edit icon at the top right corner.
Method 2. Built-in Screen Recorder
A built-in screen recorder exists on the iPhone. You can use it to learn how to record voice notes on iPhones. However, if you only want to record the audio of your iPhone, there’s no such option for using this built-in tool. Even though it has a Microphone feature, the recording will still capture the iPhone screen. Also, if the feature is deactivated, you must first activate it on the iPhone Settings. Don’t worry. We also have a tutorial for that below. Move on.
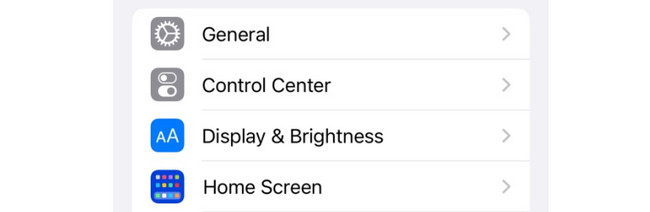
Step 1First, you need to access the Screen Recorder on the iPhone Control Center for a faster process. So, go to the Settings app of your iPhone. After that, swipe down on the screen and choose the Control Center button.
Step 2Locate the Screen Recording button on the inactive tiles section. After that, tap the Plus button to add it to the active tiles section to make it appear in the Control Center. Later, go to the voice memos that you want to record.
Step 3It is time to start the recording. Swipe down the Control Center at the top. After that, locate the Screen Recording icon to begin the process. Once done, tapping the icon again will stop the recording. Later, your iPhone will save the recording automatically.
FoneLab Screen Recorder allows you to capture video, audio, online tutorial, etc on Windows/Mac, and you can easily customize size, edit the video or audio, and more.
- Record video, audio, webcam and take screenshots on Windows/Mac.
- Preview data before saving.
- It is safe and easy to use.
Part 2. How to Record A Voice Memo on iPhone via Third-Party App
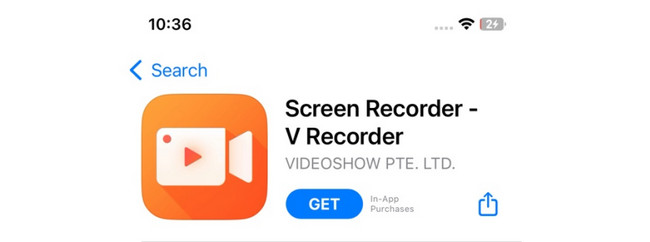
Screen Recorder - V Recorder can be the alternative for the built-in way above. However, the app contains annoying ads. They may be added to the recording you want to perform. Also, you need to set up many buttons and permissions before you can start the process. In addition, you cannot access all of its features. You need to purchase its plan first. Anyway, see its detailed steps below if you want to try it. Please proceed.
Step 1Download the application on the iPhone App Store. To do that, search for the name of the application. You can refer to the icon below if you cannot locate it. Later, please tap the Get button to start downloading it. Later, tap the Open button to launch the app on your iPhone.
Step 2The first interface that you will see is the recording section. Tap the Circle icon at the center and the Microphone icon at the bottom of the main interface. Later, tap the Start Broadcast button at the center. Go to the voice memos that you want to record afterward.
Step 3You will see the progress of the screen recording at the top left corner of the main interface. Tap it to go back to the app. After that, tap the Box icon at the center to stop the recording process. Later, the application will save the video on your iPhone.
Part 3. How to Record Screen on iPhone with FoneLab Screen Recorder
If you are searching for a further way with ultimate features to record your iPhone on-screen activities, you can use the FoneLab Screen Recorder on your computer. This tool is infused with various recording capabilities. One is recording your screen on full-screen or customized size with a high-quality output.
Moreover, it is also equipped with a Snapshot feature that enables you to take screenshots of your iPhone’s screen. Another good thing about it is that it captures high-quality screenshots. Also, it can record your iPhone screen with or without a watermark.
FoneLab Screen Recorder allows you to capture video, audio, online tutorial, etc on Windows/Mac, and you can easily customize size, edit the video or audio, and more.
- Record video, audio, webcam and take screenshots on Windows/Mac.
- Preview data before saving.
- It is safe and easy to use.
There’s more you need to know about FoneLab Screen Recorder. But we have to understand how it functions below. Move on.
Step 1Click the Free Download button to get the tool. Set it up and launch it afterward on your computer.

Step 2You will view the main functions of the software. Among all of them, please select the Phone icon on the right side of the main interface.
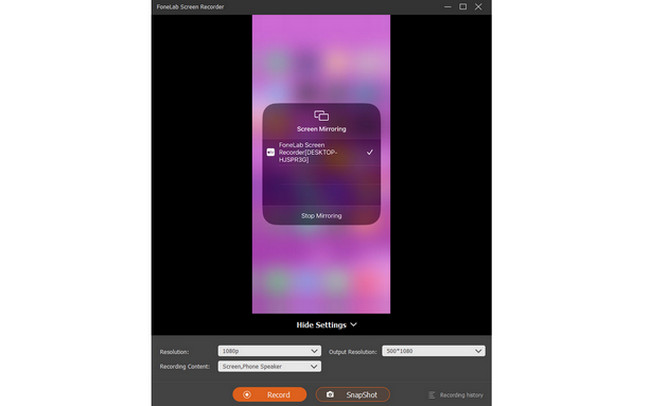
Step 3Choose the iOS Recorder icon on the left. Connect your iPhone to the Wi-Fi network your computer is connected with. After that, tick the Screen Mirroring button on the left.
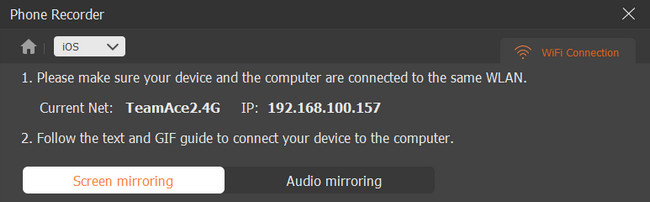
Step 4On your iPhone, swipe down Control Center and choose the Mirror icon. Choose FoneLab Screen Recorder afterward. You will notice your iPhone screen on the computer. Tick the Record button to start the capturing.
FoneLab Screen Recorder allows you to capture video, audio, online tutorial, etc on Windows/Mac, and you can easily customize size, edit the video or audio, and more.
- Record video, audio, webcam and take screenshots on Windows/Mac.
- Preview data before saving.
- It is safe and easy to use.
Part 4. FAQs about How to Record A Voice Memo on iPhone
1. How long can iPhone record voice memos?
The length of the recording of the iPhone using its built-in tools is one of their strengths. When you record on an iPhone, you can capture your screen unlimitedly. You only need to ensure enough storage for them because it is the only limitation. Besides, if you think that your iPhone doesn't have enough storage to save the recordings, you can try FoneLab Screen Recorder instead on computer.
2. Why does Voice Memos stop recording?
When Voice Memos stop recording, you probably receive a phone call from someone. The action will interrupt the Voice Memo recording, especially if your iPhone is turned off during the call. In this case, the call session will not be added to the recording.
In conclusion, there are multiple ways to record a voice memo on iPhones. It can be using the iPhone built-in tool or third-party apps and tools. If you have more questions, let us know. Thank you!
FoneLab Screen Recorder allows you to capture video, audio, online tutorial, etc on Windows/Mac, and you can easily customize size, edit the video or audio, and more.
- Record video, audio, webcam and take screenshots on Windows/Mac.
- Preview data before saving.
- It is safe and easy to use.