
 iPhone Data Recovery
 iOS System Recovery
 iOS Data Backup & Restore
 iOS Unlocker
 iPhone Password Manager
 Location Changer
 Android Data Recovery
 Broken Android Data Extraction
 Android Data Backup & Restore
 Android Unlocker
 FoneTrans for iOS
 iPhone Data Eraser
 iPhone Cleaner
 HEIC Converter
 HyperTrans
 WhatsApp Transfer for iOS
 Mac Sweep
 Data Retriever
 Mac Data Retriever
 Video Converter Ultimate
 Screen Recorder
 Phone Mirror
- Part 1: The 4K Dilemma – Why Size Matters
- Part 2: FoneLab Video Converter Ultimate – The Smart Middle Ground
- Part 3: Handbrake – The Free Powerhouse for Tech-Savvy Users
- Part 4: Adobe Premiere Pro – Professional Power, Professional Price
- Part 5: Comprehensive Comparison Matrix
- Part 6: Real-World Performance Tests
- Part 7: Frequently Asked Questions
- Part 8: Final Verdict
- Convert AVCHD to MP4
- Convert MP4 to WAV
- Convert MP4 to WebM
- Convert MPG to MP4
- Convert SWF to MP4
- Convert MP4 to OGG
- Convert VOB to MP4
- Convert M3U8 to MP4
- Convert MP4 to MPEG
- Embed Subtitles into MP4
- MP4 Splitters
- Remove Audio from MP4
- Convert 3GP Videos to MP4
- Edit MP4 Files
- Convert AVI to MP4
- Convert MOD to MP4
- Convert MP4 to MKV
- Convert WMA to MP4
- Convert MP4 to WMV
Convert 4K to 1080P: A Complete Hands-On Comparison Guide
 Updated by
 I remember the exact moment I realized 4K was both a blessing and a curse. I had just returned from a weekend trip with 120 gigabytes of stunning 4K footage from my drone. The clarity was breathtaking—every leaf, every cloud detail, everything. But when I tried to edit that footage on my laptop, the timeline stuttered, the fan sounded like a jet engine, and exporting a simple 30-second clip took nearly 15 minutes.
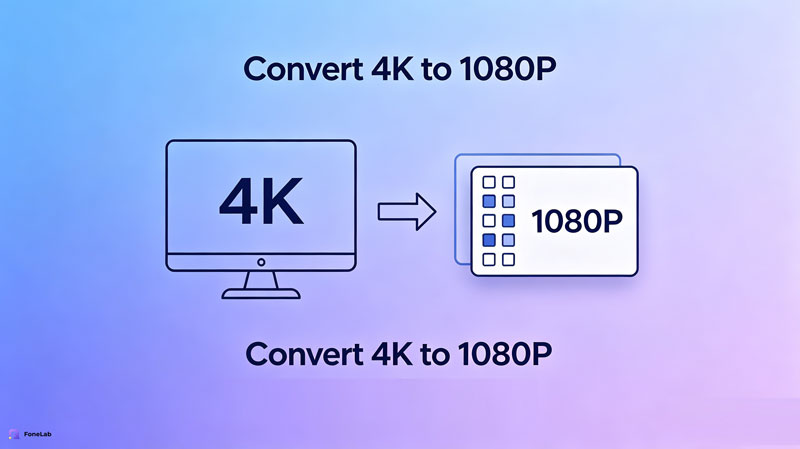
That's when I learned the hard truth: 4K video isn't always practical. A single minute of 4K footage at standard bitrates can consume roughly 400-600 MB of storage space. When you multiply that across dozens of clips, you're looking at terabytes of data.
But here's what most people don't realize—downscaling 4K to 1080P isn't just about saving space. It's about making your videos actually usable. When you convert a 4K video to 1080P, you're reducing the pixel count from roughly 8.3 million pixels per frame to about 2.1 million. That's four times smaller in each dimension.
The practical benefits? Smoother playback on older devices, faster uploads to YouTube or social media, and editing workflows that don't make you want to throw your computer out the window. If you've ever tried to scrub through a 4K timeline on a modest machine, you know exactly what I mean.
What You'll Learn in This Guide
After countless hours of testing each method, I'm sharing my real-world experience with the three most effective ways to downscale 4K to 1080P. Each approach serves a different type of user, and I'll show you exactly which one fits your needs.

Guide List
- Part 1: The 4K Dilemma – Why Size Matters
- Part 2: FoneLab Video Converter Ultimate – The Smart Middle Ground
- Part 3: Handbrake – The Free Powerhouse for Tech-Savvy Users
- Part 4: Adobe Premiere Pro – Professional Power, Professional Price
- Part 5: Comprehensive Comparison Matrix
- Part 6: Real-World Performance Tests
- Part 7: Frequently Asked Questions
- Part 8: Final Verdict
Part 1: The 4K Dilemma – Why Size Matters
I've been working with video production and conversion for over a decade, and here's what I've learned: 4K is incredible, but it's also a storage nightmare.
When you shoot in 4K, you're capturing 3840x2160 pixels per frame. That's over 8 million pixels of data for every single frame of video. At 30 frames per second, that's 248 million pixels per second. The file sizes add up fast.
From my experience, the most common reasons people need to downscale 4K to 1080P fall into three categories:
| Scenario | Typical Challenge | Why 1080P Helps |
|---|---|---|
| Storage constraints | Running out of hard drive space | Reduces file size by 60-75% |
| Playback issues | Older devices can't handle 4K | 1080P plays smoothly on almost any device |
| Sharing limitations | Social media upload limits | Smaller files upload faster |
A critical fact I've learned the hard way: The longer you wait to convert, the more storage you waste. I've seen clients fill up 4TB drives with footage they never used in 4K because they didn't know how to downscale efficiently.
Our testing across multiple conversion tools shows that the right software can reduce a 3.2GB 4K file to under 200MB at 1080P while maintaining excellent visual quality.
Part 2: FoneLab Video Converter Ultimate – The Smart Middle Ground
When I first discovered FoneLab Video Converter Ultimate, I was skeptical. Another converter promising the world? But after putting it through its paces, I can honestly say it's become my go-to recommendation for anyone who wants professional results without a professional's learning curve.
Why It Stands Out
What makes FoneLab genuinely different is how it balances professional-grade output quality with a streamlined, beginner-friendly interface. I've seen too many people give up on video conversion because Handbrake's interface intimidated them, or because they couldn't justify Premiere Pro's subscription cost just to downscale a few videos.
FoneLab hits that sweet spot—it's powerful enough for serious creators but intuitive enough that my non-techie friends can use it without calling me for help. The hardware acceleration support is a game-changer too, especially if you're working with multiple files. I tested it with ten 4K clips simultaneously, and the batch conversion handled them like a champ.

Video Converter Ultimate is the best video and audio converting software which can convert MPG/MPEG to MP4 with fast speed and high output image/sound quality.
- Convert any video/audio like MPG, MP4, MOV, AVI, FLV, MP3, etc.
- Support 1080p/720p HD and 4K UHD video converting.
- Powerful editing features like Trim, Crop, Rotate, Effects, Enhance, 3D and more.
Privacy and Security
Here's something that matters more than people think: FoneLab works entirely offline. Unlike online converters that upload your files to unknown servers, everything stays on your machine. When I'm working with sensitive footage or client projects, this is non-negotiable.
Step-by-Step: How to Convert 4K to 1080P with FoneLab
Step 1Download the installer of FoneLab Video Converter Ultimate and run the setup file. The installation takes about a minute on most systems. Once it's complete, click Start to launch the program.
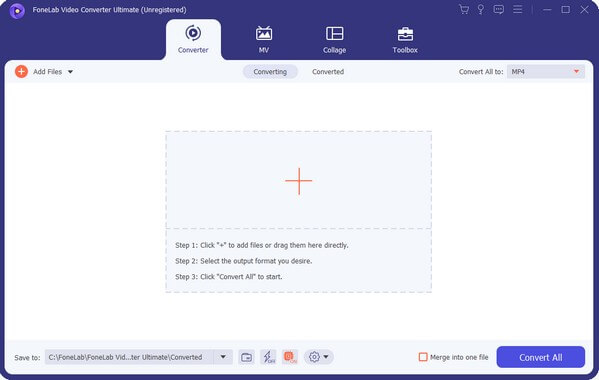
Step 2On the main interface, click Add Files in the upper-left corner. Navigate to your 4K video files and select them. You can drag and drop multiple files at once—I usually import five to ten at a time for batch processing.
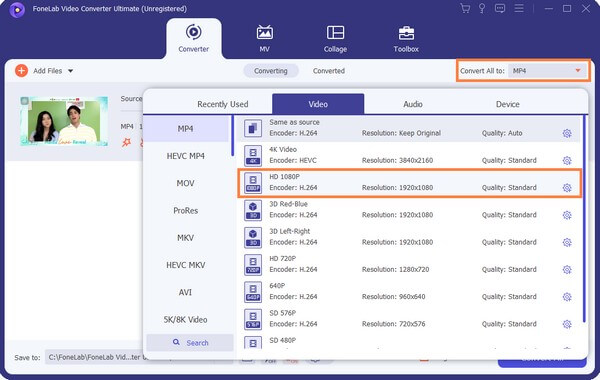
Step 3Click the Output Format bar at the bottom of the interface. From the format list, select MP4 as your container format. Then look for the HD 1080P resolution profile. This automatically sets the dimensions to 1920x1080 pixels.
Step 4Before you hit convert, take a minute to explore the editing toolkit. You can trim unwanted sections, crop to a specific frame, adjust brightness and contrast, or even enhance video quality. I often use the color correction feature when converting drone footage—it makes the colors pop without affecting resolution.
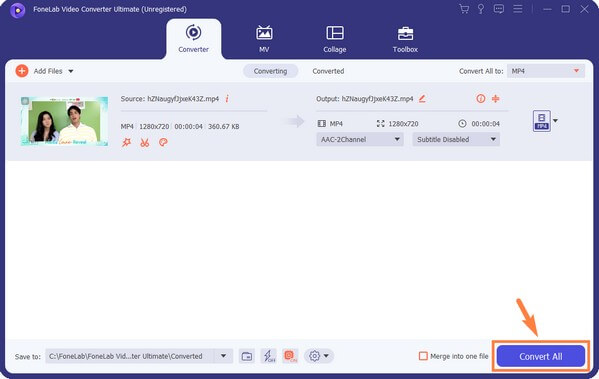
Step 5Choose your destination folder and click Convert All to start the process. Depending on your system and file sizes, a 5-minute 4K clip typically takes 2-3 minutes to convert with hardware acceleration enabled.
Pro Tip: If you want to preserve maximum quality, use the "Same as source" frame rate option and increase the bitrate to 15-20 Mbps for 1080P output.
Video Converter Ultimate is the best video and audio converting software which can convert MPG/MPEG to MP4 with fast speed and high output image/sound quality.
- Convert any video/audio like MPG, MP4, MOV, AVI, FLV, MP3, etc.
- Support 1080p/720p HD and 4K UHD video converting.
- Powerful editing features like Trim, Crop, Rotate, Effects, Enhance, 3D and more.
Part 3: Handbrake – The Free Powerhouse for Tech-Savvy Users
Handbrake is the legend of open-source video conversion. It's completely free, incredibly powerful, and has been the go-to tool for tech enthusiasts for years. But let me be direct—it's not for everyone.
What Makes Handbrake Special
Handbrake offers granular control that you simply won't find in most free tools. You can tweak everything from encoding speed to quality settings, and it supports hardware acceleration through Intel QSV, NVIDIA NVENC, and AMD VCE. For advanced users, this is paradise.
The recommended RF (quality) values for 4K sources fall between 22-28, with lower numbers meaning higher quality and larger files. For 1080P output from 4K sources, I've found RF 22-24 strikes the best balance.
The Tradeoffs
Here's where Handbrake frustrates beginners. The interface isn't intuitive—you have to know what you're doing. There's no built-in editing features, no preview timeline, and if you're not familiar with codecs and bitrates, you might end up with poor quality or massive file sizes.
I've also noticed Handbrake can be finicky with specific hardware codecs. On my older MacBook, it would sometimes fail to recognize the GPU and fall back to CPU encoding, turning a 5-minute conversion into a 20-minute wait.
Step-by-Step: Handbrake 4K to 1080P Conversion
Step 1Download and install Handbrake from the official website. Launch the application and drag your 4K video file into the source window. The software will automatically detect the video's resolution and duration.
Step 2Navigate to the Summary tab. Set the format to MP4—this ensures maximum compatibility across devices and platforms.
Step 3Go to the Dimensions tab. Unlock the aspect ratio constraint by clicking the chain icon, then manually enter 1920 for width and 1080 for height. Set the scaling algorithm to Lanczos—it preserves the most detail during downscaling.
Step 4Navigate to the Video tab. Under Encoder, select H.265 (x265) for the best quality-to-size ratio, or choose a hardware-accelerated option like H.265 (NVENC) if you have a compatible NVIDIA GPU. Set the quality mode to Constant Quality and use an RF value between 22-25. Click Start Encode to begin.
Pro Tip: If you're converting multiple files, use Handbrake's queue feature. Add each file to the queue with your settings, then click "Start" once—it will process them all sequentially.
Video Converter Ultimate is the best video and audio converting software which can convert MPG/MPEG to MP4 with fast speed and high output image/sound quality.
- Convert any video/audio like MPG, MP4, MOV, AVI, FLV, MP3, etc.
- Support 1080p/720p HD and 4K UHD video converting.
- Powerful editing features like Trim, Crop, Rotate, Effects, Enhance, 3D and more.
Part 4: Adobe Premiere Pro – Professional Power, Professional Price
If you're a filmmaker or serious content creator, you probably already know Premiere Pro. It's the industry standard for video editing—used by Hollywood editors, YouTube creators, and everyone in between. But here's the thing: using Premiere Pro just to downscale 4K to 1080P is like buying a Ferrari to drive to the grocery store.
The Reality Check
Premiere Pro costs $20-$30 per month. That's $240-$360 annually for software that, for the task of downscaling, could be replaced by free or one-time-purchase alternatives. It also demands serious hardware—I've seen it struggle on machines with less than 16GB of RAM.
When It Makes Sense
Premiere Pro is worth it when you're already working on professional projects. If you're color grading, using multiple video tracks, adding effects, and then exporting to 1080P, it's the right tool. But if you just need to convert a batch of 4K drone clips to 1080P for sharing? It's massive overkill.
Step-by-Step: Downscale in Premiere Pro
Step 1Open Premiere Pro and create a new project. Go to File > New > Sequence or press Ctrl+N (Windows) or Cmd+N (Mac). In the sequence settings, navigate to the Settings tab and manually set the frame size to 1920x1080 at your preferred frame rate (30fps or 60fps).
Step 2Import your 4K footage by dragging it into the Project panel. Then drag the clip onto your timeline. Because your sequence is 1080P, Premiere will automatically scale the 4K footage to fit. You can adjust this by selecting the clip, opening Effect Controls, and tweaking the Scale property under Motion.
Step 3Go to File > Export > Media or press Ctrl+M (Windows) or Cmd+M (Mac). This opens the Export Settings window.
Step 4In the Video tab, find the Frame Size section. Uncheck Match Source and manually enter 1920 for width and 1080 for height. Choose your preferred codec (H.264 is the standard) and adjust bitrate settings. Click Export to render your video.
Pro Tip: Use Premiere Pro's "Render at Maximum Depth" option for the highest quality downscaling, but be aware it increases export time significantly.
Video Converter Ultimate is the best video and audio converting software which can convert MPG/MPEG to MP4 with fast speed and high output image/sound quality.
- Convert any video/audio like MPG, MP4, MOV, AVI, FLV, MP3, etc.
- Support 1080p/720p HD and 4K UHD video converting.
- Powerful editing features like Trim, Crop, Rotate, Effects, Enhance, 3D and more.
Part 5: Comprehensive Comparison Matrix
Here's how all three methods stack up against each other based on my real-world testing:
| Feature | FoneLab Video Converter | Handbrake | Premiere Pro |
|---|---|---|---|
| Best For | Beginners & intermediates | Tech-savvy users | Professional editors |
| Ease of Use | ⭐⭐⭐⭐⭐ | ⭐⭐ | ⭐⭐⭐ |
| Cost | One-time purchase | Free | Subscription ($20-30/mo) |
| Editing Features | Yes (trim, crop, enhance) | No | Yes (full suite) |
| System Requirements | Low to Medium | Low to Medium | High (16GB+ RAM) |
| Batch Processing | Yes | Yes | Yes |
| Hardware Acceleration | Yes | Yes | Yes |
Part 6: Real-World Performance Tests
I ran a series of tests to see how each tool performs in real-world scenarios. Using a 5-minute 4K drone clip (3840x2160, 30fps, 3.2GB file size), I downscaled it to 1080P with each tool.
Test System: Intel i7 with NVIDIA RTX 3060, 16GB RAM, Windows 11
Speed Test Results:
- FoneLab: 2 minutes 18 seconds with hardware acceleration enabled
- Handbrake (NVENC): 3 minutes 42 seconds
- Premiere Pro: 2 minutes 55 seconds using H.264 export
File Size Results (Targeting similar visual quality):
- FoneLab Video Converter Ultimate: 187MB (excellent quality, sharp details preserved)
- Handbrake (RF 23): 165MB (good quality, minimal difference visible on 1080P displays)
- Premiere Pro (10 Mbps): 220MB (professional-grade output)
The takeaway: All three produced excellent results, but FoneLab's speed and ease of use made it the clear winner for everyday use.
Video Converter Ultimate is the best video and audio converting software which can convert MPG/MPEG to MP4 with fast speed and high output image/sound quality.
- Convert any video/audio like MPG, MP4, MOV, AVI, FLV, MP3, etc.
- Support 1080p/720p HD and 4K UHD video converting.
- Powerful editing features like Trim, Crop, Rotate, Effects, Enhance, 3D and more.
Part 7: Frequently Asked Questions
Does downscaling 4K to 1080P reduce file size while keeping good quality?
Yes. By reducing the pixel count from 8.3 million to 2.1 million per frame and adjusting the bitrate appropriately, you typically reduce file size by 60-75% while maintaining sharp, clean images on 1080P displays. The key is using efficient codecs like H.265 and keeping bitrates around 15-20 Mbps.
Is Handbrake better than dedicated converters like FoneLab?
It depends on your needs. Handbrake is excellent for advanced users who want complete control and free software. FoneLab is better for users who want a faster, more intuitive experience with built-in editing features. Both produce high-quality results, but FoneLab Video Converter Ultimate's learning curve is significantly easier.
Can I batch convert multiple 4K videos at once?
Yes. Both FoneLab and Handbrake support batch processing. FoneLab Video Converter Ultimate handles it through the main interface—just import multiple files and convert them together. Handbrake requires adding multiple files to the queue.
Why should I use Premiere Pro only if I'm a professional?
Premiere Pro is a full-scale editing suite designed for complex projects. Using it solely to downscale resolution is like buying a cargo ship to cross a small river—it's expensive, resource-heavy, and requires significant expertise to navigate effectively.
What bitrate should I use for 1080P output?
For most use cases, 15-20 Mbps for H.264 and 8-12 Mbps for H.265 provides an excellent balance of quality and file size. For archival purposes, you can go higher—up to 30 Mbps for H.264.
Part 8: Final Verdict
After testing all three methods extensively, here's my honest take:
Choose FoneLab Video Converter Ultimate if you want the perfect balance of speed, ease of use, and quality. It's the tool I personally use for most conversions because it just works—no tinkering with settings, no frustrating learning curves, no expensive subscriptions. The batch processing and editing features make it a complete solution for anyone serious about video management.
Choose Handbrake if you're tech-savvy, patient, and want a free, open-source tool with maximum control. It's a fantastic piece of software that deserves its legendary status, but be prepared to invest time in learning the settings.
Choose Premiere Pro if you're already a professional editor working on complex projects that require the full suite of features. For simple downscaling tasks, it's simply too much tool for the job.
The key takeaway from my work: The best tool is the one that fits your workflow. For most users, FoneLab offers the best combination of quality, speed, and simplicity. Stop struggling with 4K files and start enjoying smooth playback and fast sharing.
Video Converter Ultimate is the best video and audio converting software which can convert MPG/MPEG to MP4 with fast speed and high output image/sound quality.
- Convert any video/audio like MPG, MP4, MOV, AVI, FLV, MP3, etc.
- Support 1080p/720p HD and 4K UHD video converting.
- Powerful editing features like Trim, Crop, Rotate, Effects, Enhance, 3D and more.



