iPad Photo Backup - How to Backup iPad Photos
 Updated by Somei Liam / Jan 11, 2021 13:30
Backing up iPad is easy to do and it's also incredibly important. Backing up the photos from iPad to somewhere is an effective way to avoid photo loss against theft, damage or leave iPad behind on the back seat of the taxi.


Guide List
1. How to Backup iPad Photos to Computer via iCloud
The easiest way to backup iPad Photos is to use iCloud. To turn on iCloud backup feature, go to Settings on your device, tap on [your name] > iCloud > iCloud Backup towards the bottom.
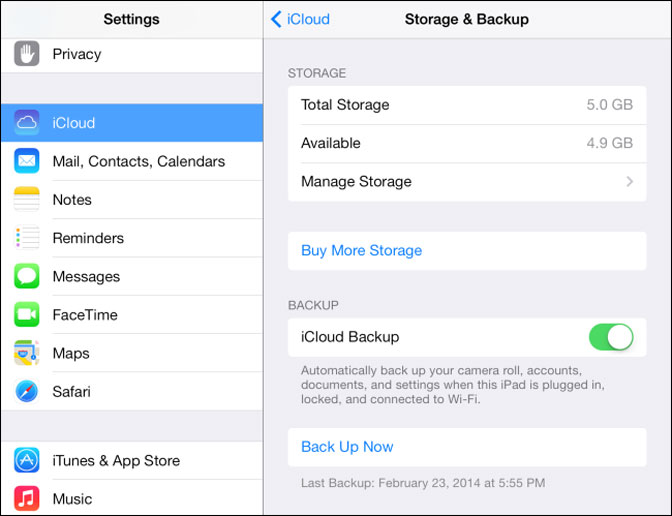
Turn it on and then either let the device backup on its own or you can manually perform a backup to iCloud if you don't want to wait. Make sure your device is connected to a power source and WiFi before starting the backup.
Note: The only thing about backing your devices up this way is that if you delete a single video, for example, and want to restore that, you have to do a complete restore of the device. Now it's great if your device gets wiped completely, then you can restore the whole thing from backup and you'll have all your photos and videos plus everything else.
After turning on the iCloud backup, we can open our iCloud and download the back-up images.
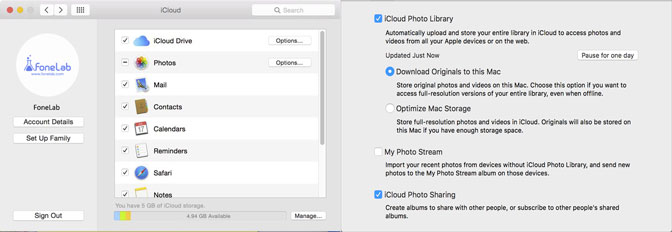
To download your Photos and Videos from iCloud to your PC/Mac, for Mac users, open File Explorer window (on the Menu bar at the top of the screen) > iCloud. Click Options next to Photos, check iCloud Photo Library, select Download Originals to this Mac.
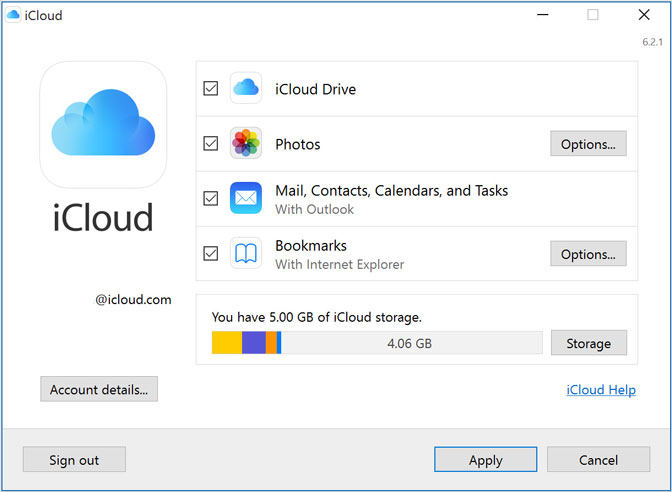
For Windows users, launch iCloud which you can download from iCloud.com, click Options next to Photos. Check iCloud Photo Library and then check Download Photos and Videos to my PC. After that click Done to finish.

No matter what system you use, you can log in to iCloud.com to upload or download images. Just login you iCloud account, then you can go to Photos to download or upload your photos.
Tips: If you want to know how to access iCloud, you can refer to how to view iCloud backup.
FoneLab enables you to backup and restore iPhone/iPad/iPod without data loss.
- Backup and restore iOS data to your PC/Mac easily.
- Preview data in detail before you restore data from backups.
- Backup and restore iPhone, iPad and iPod touch data Selectively.
2. How to Copy Photo to iPhoto Library/iCloud Photos on Mac
If you are using a Mac computer, there is a free backup option for you known as iPhoto. It can be set up to automatically backup/import iOS device pictures whenever you are connected to your device.
iPhoto is free and offers a good way to organize your photos and videos on your Mac. However, for Mac owners with OS X Yosemite 10.10.3, your Mac will support Photos and not iPhoto app. You may need to update your iPhoto Library to Photos app to keep enjoying its features. However, if you're still using other versions of macOS, then follow these steps to manually backup iPad pictures on your Mac.
Steps of using iPhoto Library
Step 1Connect your iPad to your Mac using a USB cable.
Step 2Launch the iPhoto Library app, and select your iPad in the sidebar under device list.
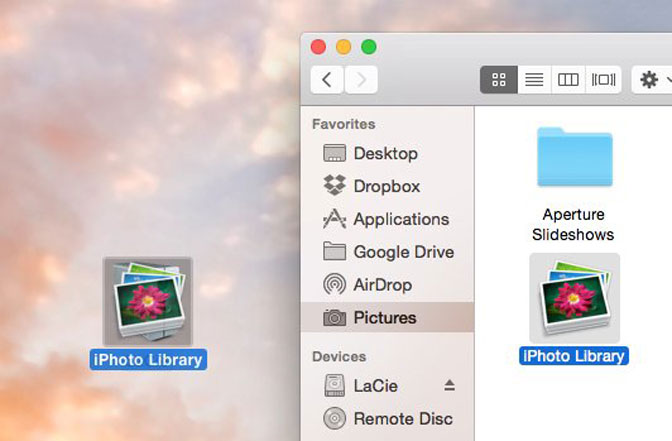
Step 3Click Import Photos button. You can choose to erase the photos from your iPad after importing by clicking Delete.
Steps of using iCloud Photos
For Mac owners with OS X Yosemite 10.10.3, you can just use the iCloud Photos app. The steps of the operation are also the same as following.
Step 1Connect your iPad to your Mac using a USB cable. Go to System Preferences > iCloud.
Step 2Click Options next to Photos, then select iCloud Photos. Check iCloud Photo Library and click Done, then click Apply.
Step 3When you turn on iCloud Photos, your photos and videos automatically upload to iCloud. They're not duplicated in your iCloud backup, so you should keep backup copies of your library.
You can download your photos and videos from iCloud.com to your computer and store them as a separate library, transfer them to another computer with Image Capture or Photos, or store them on a separate drive.
Step 4After the steps above, navigate to iCloud.com and log in with your Apple ID and password.
Step 5Click on Photos. If this is your first time viewing your Photos on iCloud.com, it may take some time to prepare your iCloud Photos.
Step 6Then we can press on the icon Upload in grey in the upper right hand corner and select the photos you want to upload and press the word Choose in blue in the lower right hand corner. Or drag and drop the photos onto iCloud.com to upload them.
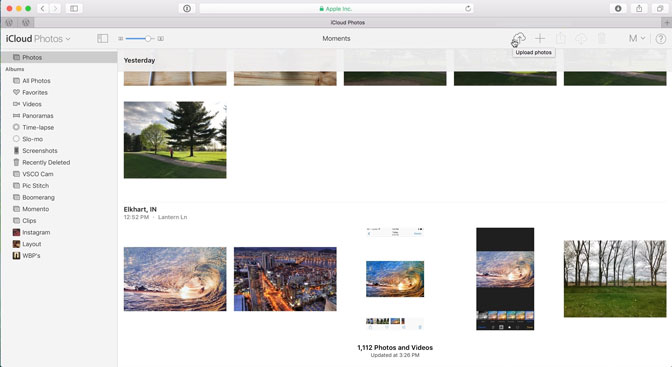
Tips: How many pictuers you are uploading at a time will determine how long it will take to upload to iCloud Photos. You can keep an eye on the status in the bottom center of the browser window.
To know more about Photos app, you can refer to Set up and use Photos.
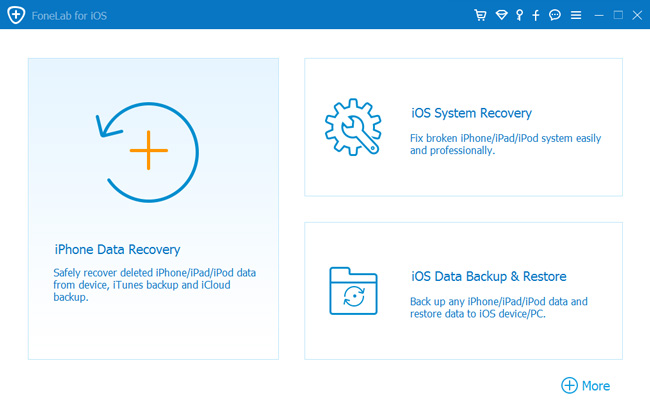
3. Use FoneLab iOS Data Backup & Restore to Backup iPad Photos
iOS Data Backup & Restore is a convenient and effective tool, which can help you backup and restore your iOS Data selectively.
- More easy to backup and restore iOS data to your PC/Mac.
- We can preview your data before backup or restore your data or preview data in detail before you restore data from backups.
- Backup & Restore your data selectively and we can select iPhone, iPad and iPod touch data to backup and restore
FoneLab enables you to backup and restore iPhone/iPad/iPod without data loss.
- Backup and restore iOS data to your PC/Mac easily.
- Preview data in detail before you restore data from backups.
- Backup and restore iPhone, iPad and iPod touch data Selectively.
Step 1Download and install iOS Data Backup & Restore to your computer with the above link accordingly. The software will launch automatically once the process complete. Choose iOS Data Backup & Restore from the interface.
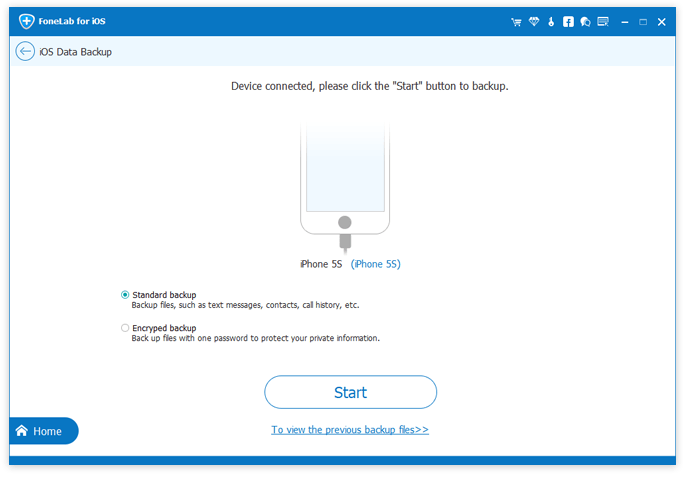
Step 2Connect your iPad to the computer. Then tap Trust on your device home screen if it pops up.
Step 3Choose iOS Data Backup, and then choose Encrypted backup if you want to protect your backup files with password. Or just select Standard backup to move on. Then click Start.
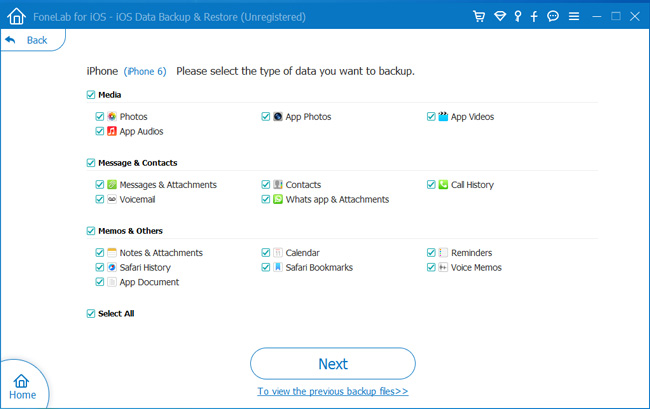
Step 4It allows you to select the type of data you want to backup. If you want to backup all data, just tick the box next to the Select All option on the bottom-left. To backup photos, only tick the box in front of Photos. Then click Next to begin.
Tips: If you want to backup your iPhone photo, you can refer to iPhone photo backup.
4. How to Backup iPad Photos to PC with iTunes
iTunes is a common program which iPad users installed on computer to manage iPad data when they connect iPad to computer with USB cable.
It won't store iPad data on iCloud service but the computer local folder.
Let us walk through the process of backing up iPad photos with iTunes.
Step 1Download and install iTunes on your computer.
Step 2Launch iTunes and connect iPad to computer with USB cable. Tap Trust on iPad screen if it is the first connection with computer.
Step 3Click device icon and then Summary in the left pane.
Step 4Click Back Up Now in the Backups section.

5. Backup iPad Photos to Mac with AirDrop
With AirDrop, we can instantly share your photos, videos, documents and more with other Apple devices that are nearby. It also can share a photo from iPad to Mac for backing up photos.
We can use AirDrop to share content from apps like Photos, Safari, Contacts and more.
Step 1Choose Go > AirDrop from the menu bar in the Finder. Or select AirDrop in the sidebar of a Finder window on your Mac. On iPad, swipe upward from the bottom of any screen to open the Control Center and turn on Bluetooth and Wi-Fi. Then enable AirDrop and select Everyone.

Step 2Open the file that you want to send, tap Share or Share icon. Or control-click the file in the Finder, then choose Share from the shortcut menu. To share more photo from the Photos app, we can swipe left or right and select multiple photos.
Step 3Tap Share button, choose AirDrop. Tap the intended recipient's avatar when it appears in the AirDrop row. The content is automatically sent to that device.

If you AirDrop content to other people, they will see an option to Accept or Decline. After they have accepted and the file has been sent, click Done.
Tips:
These 5 methods can help you backup iPad photos, if you want to backup other files such as audios, videos, documents, you can use iOS Data Backup & Restore.
To know more iPhone or other iOS devices data backup methods, you can refer to how to backup iPhone.
FoneLab enables you to backup and restore iPhone/iPad/iPod without data loss.
- Backup and restore iOS data to your PC/Mac easily.
- Preview data in detail before you restore data from backups.
- Backup and restore iPhone, iPad and iPod touch data Selectively.