Ultimate Methods on How to Record Voice on Mac Easily
 Posted by Lisa Ou / Nov 03, 2022 16:00
Do you like singing? If yes, you must be looking for a great strategy to record voice on Mac. Not every voice recorder you can download provides excellent quality when it comes to recording. With the background noise and all, recording yourself might not go smoothly, especially if you do it in an open environment. That's why professional singers record their music in a specialized studio. But certainly, not everyone can afford that. Thus, installing decent tools and software is the only option.
Aside from singing, there are countless things you can do from the voice recording. You may record lectures from school, events, work, etc., so you can review them later, just in case. You may also record phone calls from a loved one. This way, you can look back at it in the future and remember the good memories. Important agreements could also be recorded as proof that two or more people have truly agreed. On the other hand, voice recorders can be used as simple reminders in your everyday life.
We tried several recording methods from different sites and platforms with these thoughts in mind. We found out that there are various tools you can try to record screen and voice on Mac, but only some really stand out. Thus, the best tools and methods to record are listed in the article below. Read further to learn more.

Guide List
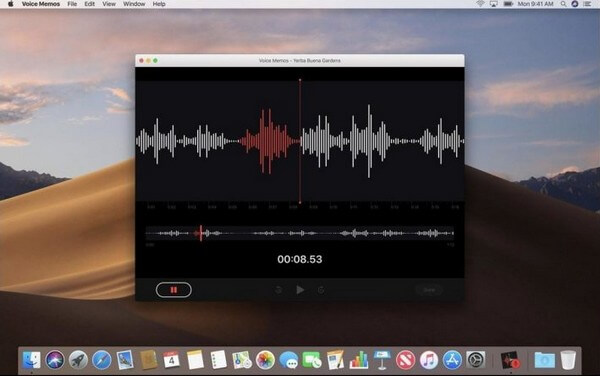
Part 1. How to Voice Record on A Mac with Voice Memo
If you want to record your voice on Mac, the first program you may try is its built-in recording feature, Voice Memo. You can use this tool to record your song ideas, musical notes, classroom lectures, conversation, and more. And these are all made possible by using your Mac’s built-in or external microphone or a compatible headset. What makes this even better is that you can edit your voice memos using its editing feature. However, the drawback of this tool is that the quality may not be as excellent as the other recorders out there.
Adhere to the steps below to acquire skills on how to record your voice on Mac with Voice Memo:
Step 1Press Command + Space on your Mac’s keyboard, then search for the Voice Memos feature on the search bar. Once you see the tool, click it to launch Voice Memos.
Step 2To begin voice recording, click the red button on the bottom-left part of the Voice Memos interface.
Step 3You can hit the pause button, then listen to it using the play button if you want. After that, you have the option to replace it or resume the recording. Once you finish recording, hit the Done button on the right-bottom of the interface. You will then see it saved as a New Recording on the main interface.
Part 2. How to Voice Record on A Mac with FoneLab Screen Recorder
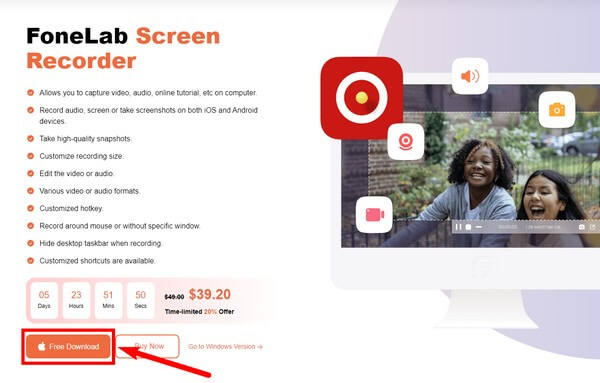
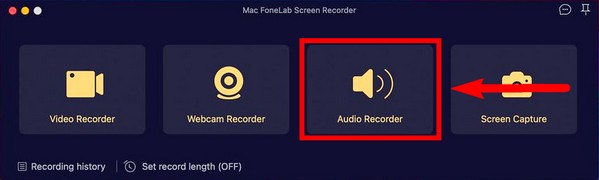
If you are looking for an excellent voice recorder that produces high-quality recordings, then FoneLab Screen Recorder is strongly recommended. This tool is acclaimed for its flexible and superior-quality features. Its Audio Recorder function has a background noise remover that eliminates all unnecessary sounds that are annoying to hear in the background. In addition, it has a microphone enhancer that improves the value of your voice recordings. And whether you are a professional or a beginner, you can efficiently utilize this tool because of its straightforward interface. It is indeed the best voice recorder for Macs.
FoneLab Data Retriever - recover the lost/deleted data from computer, hard drive, flash drive, memory card, digital camera and more.
- Recover photos, videos, contacts, WhatsApp, and more data with ease.
- Preview data before recovery.
Adhere to the steps below to acquire skills in voice recordings on Mac with the FoneLab Screen Recorder:
Step 1Explore the official website of the FoneLab Screen Recorder. You will see the Free Download button with a Windows logo on its left side. Click the Go to Mac version near it, and the Windows will automatically become an Apple logo. That’s the time you will click it. Afterward, start the config installation and run the program on your Mac computer.
Step 2On the main interface are the FoneLab Screen Recorder’s key features. And aside from them are the other options. After some time using the software, you will see your outputs in the Recording History on the bottom-left of the interface. Beside it is the Set record length option, where you can set how lengthy you want your recording.
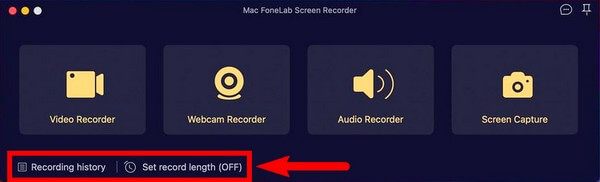
Step 3Once you are done setting up, proceed to the Audio Recorder feature. You can also use the other features depending on your recording needs.
Step 4Set up the Audio Recorder according to your liking. Disable both Webcam and Screen options if you don’t need them by clicking the check icon and turning them to x. After adjusting your audio recording settings, hit the REC button to start the recording.
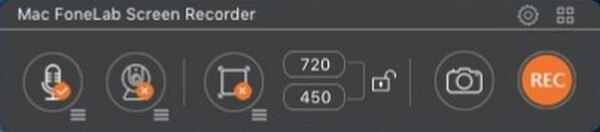
Step 5Lastly, hit the stop button to finalize the recording. Then you can save it in your preferred destination folder.
FoneLab Data Retriever - recover the lost/deleted data from computer, hard drive, flash drive, memory card, digital camera and more.
- Recover photos, videos, contacts, WhatsApp, and more data with ease.
- Preview data before recovery.
Part 3. How to Voice Record on A Mac with QuickTime
QuickTime is a multimedia player that is pre-installed on Mac. You can use it if you don’t want to install other third-party tools. However, it involves some technical processes to use this as a recorder. Plus, it doesn’t have a pause option when you record voice on Mac
Adhere to the steps below to record your voice on your Mac computer:
Step 1Launch QuickTime on your computer. Click the File at the top, then choose New Audio Recording.
Step 2Select the record button at the center to start recording.
Step 3Click it again to stop. Then save the recording as an M4A file on your Mac.
Part 4. How to Voice Record on A Mac with GarageBand
Garageband is a music creation studio developed by Apple. It lets you record audio, such as voice and musical instruments, through a microphone. However, it has multiple drawbacks, including problems with AUSampler, some functions being too basic, and more.
Adhere to the steps below to acquire skills on how to record your voice on Mac with GarageBand:
Step 1Open GarageBand and select the audio where you want to record your voice.
Step 2Click the record button at the top to record your voice.
Step 3Click the stop button to finish the process and save your recording.
FoneLab Screen Recorder allows you to capture video, audio, online tutorial, etc on Windows/Mac, and you can easily customize size, edit the video or audio, and more.
- Record video, audio, webcam and take screenshots on Windows/Mac.
- Preview data before saving.
- It is safe and easy to use.
Part 5. FAQs about Voice Recorders on A Mac
1. Is GarageBand okay to use for beginners?
Yes, it is. GarageBand is a good tool for beginners as it is easy to use. However, you might need to change to another tool when the time comes because, as mentioned above, some of its features are too basic to let you improve. Hence, it is suggested to pick another good software as early as now instead of this.
2. Do iPhones also have Voice Memos?
Yes, they have. The Voice Memo app is available on iPhone, iPad, and other iOS devices.
3. Is FoneLab Screen Recorder compatible with Windows?
Yes, it is. FoneLab Screen Recorder is available on both Mac and Windows. And the Windows version is a little more flexible with its functions and has additional features.
There is no doubt that FoneLab Screen Recorder is at the top regarding video, screen, or audio recording. Install it now.
FoneLab Data Retriever - recover the lost/deleted data from computer, hard drive, flash drive, memory card, digital camera and more.
- Recover photos, videos, contacts, WhatsApp, and more data with ease.
- Preview data before recovery.