How to Screenshot on ThinkPad: 3 Stress-Free Methods
 Posted by Lisa Ou / April 24, 2023 16:00
You can use screenshots to have the exact copy of your device screen. You may use this technique to take references, save pictures, etc. Taking screenshots can happen in one click. But each device has different ways of taking snapshots. What if you are using ThinkPad?

You are on the right page if that's the case. This post will focus on the easiest ways to take a screenshot on TinkPad. For more information, browse the parts of this article.
FoneLab Screen Recorder allows you to capture video, audio, online tutorial, etc on Windows/Mac, and you can easily customize size, edit the video or audio, and more.
- Record video, audio, webcam and take screenshots on Windows/Mac.
- Preview data before saving.
- It is safe and easy to use.

Guide List
Part 1. How to Screenshot on ThinkPad with Keyboard
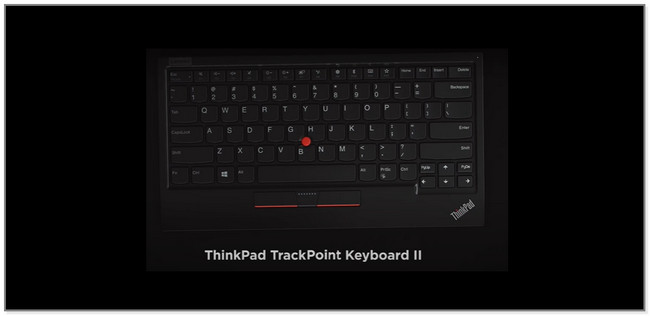
Keyboards are often used for typing on your devices like laptops. You can also use them for commands to perform actions on your computers. Each laptop has many different commands, like screenshots. So, it is one of the easiest ways to take screenshots on ThinkPad. In this part, we will show you combinations of keys on the ThinkPad keyboard to take snapshots. But wrong keys can lead to other commands affecting your laptop. To screenshot on Lenovo ThinkPad safely, follow the screenshot list below. You will also discover the location of the screenshots on this laptop.
- Windows + PrtSc is a combination of keyboard keys to take a screenshot. The computer automatically saves the image or picture on the C:\Users\[Your Username]\Pictures\Screenshots folder. Please note that you can also use the Cntrl + PrtSc key combination. They only have the same function.
- PrtSc key is a single key command that can capture the entire screen of your ThinkPad. The laptop will store the image on its clipboard. You can use third-party image editing tools, like Paint or Photoshop.
If you seek a tool that can also screenshot, you can proceed with the following method. It is the quickest software to perform how to take screenshots on ThinkPad next to keyboard shortcuts. Scroll down.
Part 2. How to Screenshot on ThinkPad with FoneLab Snapshot Tool
Consider FoneLab Screen Recorder if you want a tool to capture high-quality screenshots. There’s more! It offers 3 snapshot modes for your screen. Upon reading this part, you will discover how to use them. Aside from that, you can also use its screenshot tool while you are recording your screen. Besides, it supports various image file formats. It includes PNG, JPG, JPEG, BMP, GIF, TIFF, and PNG file formats. This tool also uses shortcut keys to navigate when to start or stop recording and open or close the webcam while recording. Scroll down to discover how to screenshot on a ThinkPad laptop using this tool.
FoneLab Screen Recorder allows you to capture video, audio, online tutorial, etc on Windows/Mac, and you can easily customize size, edit the video or audio, and more.
- Record video, audio, webcam and take screenshots on Windows/Mac.
- Preview data before saving.
- It is safe and easy to use.
Step 1Download the FoneLab Screen Recorder on your computer. To do that, please click its Free Download button on the left side of the main interface. Later, the downloading procedure will immediately take place. Please wait for it to stop and set up the downloaded file on your computer. Afterward, launch it to start locating its snapshot tool.
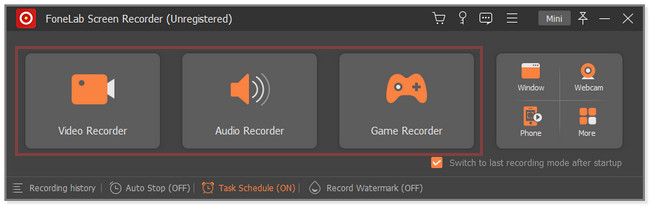
Step 2You will see the 3 recording modes of the software. Please choose one of them to see the Snapshot feature of the tool. You can select the Video Recorder, Audio Recorder, and Game Recorder tools.
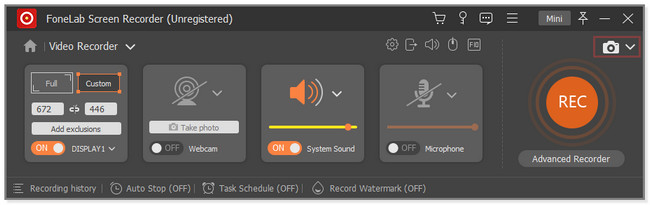
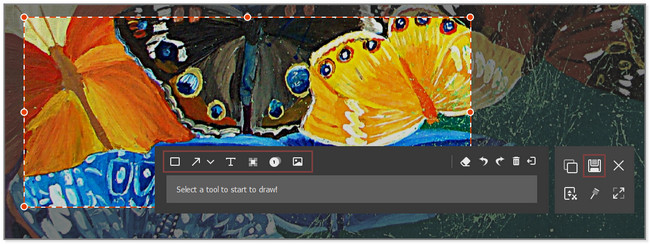
Step 3Locate the screen you want to screenshot. You will find the Snapshot tool at the top right corner of the software. Click the Arrow Down button to see more options for its screenshot modes. You can choose Screen Capture, Scrolling Window, and Popup Menu Capture. Trace the screen you want to screenshot and use its Adjustable Frame to trace it. Once you release the mouse, you will see the options for the image you capture.
Step 4You can use the Editing tools of the software to edit the screenshot. You can also click the Copy icon to have a copy of it. If you are ready to save the image on your computer, click the Save icon or button on the right side of the software. Later, choose a path or location for your file and click the Save button on the File Explorer or Computer Album.
FoneLab Screen Recorder allows you to capture video, audio, online tutorial, etc on Windows/Mac, and you can easily customize size, edit the video or audio, and more.
- Record video, audio, webcam and take screenshots on Windows/Mac.
- Preview data before saving.
- It is safe and easy to use.
Part 3. How to Screenshot on ThinkPad with Snipping Tool on PC
Snipping Tool is a feature of Windows computers that has 4 screenshot modes. You can take Rectangular, Free-Form, Window, and Full-Screen snips. Aside from that, you can set up the countdown of the tool. It will prepare your screen, and you may delay it for at least 5 seconds. You can also directly send the screenshot through email. You can copy or duplicate the image and paste it wherever possible. But unlike the software above, this tool does not support scrolling windows. Print screen Lenovo ThinkPad using the Snipping tool by following the steps below.
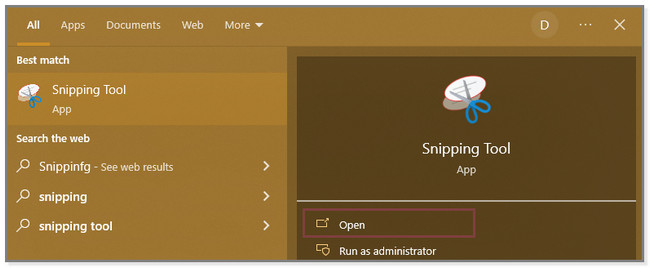
Step 1On the Windows Search Bar of your computer, type in Snipping Tool. The results will pop up on the left side of the tool. On the right side, click the Open button. It is also placed under the Snipping Tool icon.
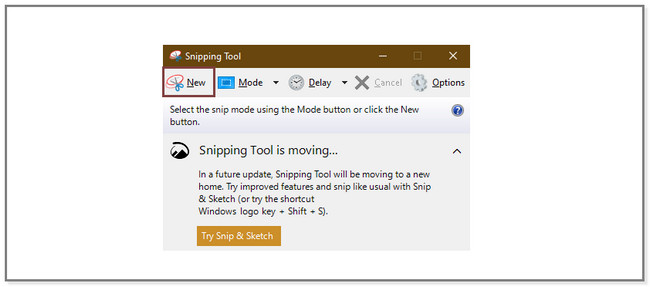
Step 2You will see the main interface of the Snipping Tool. At the top of the tool, you will see its features on how to use it. You can set its timer by clicking the Delay button. You can also choose the screenshot modes you will use by clicking the Mode button. Later, locate the screen you want to take a screenshot on your ThinkPad.
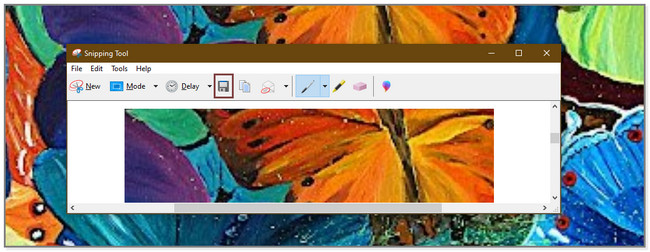
Step 3Upon releasing the mouse click, the image will pop up on the screen with the Snipping Tool. Please click the Save icon to save the picture to your laptop. If you only want to copy the image to the clipboard, click the Copy icon beside the Save icon.
FoneLab Screen Recorder allows you to capture video, audio, online tutorial, etc on Windows/Mac, and you can easily customize size, edit the video or audio, and more.
- Record video, audio, webcam and take screenshots on Windows/Mac.
- Preview data before saving.
- It is safe and easy to use.
Part 4. FAQs on How to Screenshot on ThinkPad
1. Why is the PrtSc of ThinkPad can't screenshot?
There are tendencies wherein you accidentally forget to enable the print screen shortcut. To activate it, press the Windows + U key on your keyboard. After that, type in Keyboard on its search bar and click the Keyboard icon on the left side of the main interface. Please go to the Use the PrtScn Button to Open Screen Snipping section on the right. Later, click the Slider to enable the feature.
2. Does F5 take a screenshot?
No. F5 is not a screenshot key on your keyboard on your Lenovo ThinkPad laptop. It is a command or key wherein the current window or web page will reload after you press it. Only the commands mentioned above are available for taking screenshots on ThinkPad.
Taking screenshots on ThinkPad is easy. You can use its keyboard to perform it. But FoneLab Screen Recorder stands out because it offers 3 screenshot modes. Download it on your computer to learn more about this software. Enjoy learning how to screenshot on a ThinkPad laptop using it.
FoneLab Screen Recorder allows you to capture video, audio, online tutorial, etc on Windows/Mac, and you can easily customize size, edit the video or audio, and more.
- Record video, audio, webcam and take screenshots on Windows/Mac.
- Preview data before saving.
- It is safe and easy to use.