
 iPhone Data Recovery
 iOS System Recovery
 iOS Data Backup & Restore
 iOS Unlocker
 iPhone Password Manager
 Location Changer
 Android Data Recovery
 Broken Android Data Extraction
 Android Data Backup & Restore
 Android Unlocker
 FoneTrans for iOS
 iPhone Data Eraser
 iPhone Cleaner
 HEIC Converter
 HyperTrans
 WhatsApp Transfer for iOS
 Mac Sweep
 Data Retriever
 Mac Data Retriever
 Video Converter Ultimate
 Screen Recorder
 Phone Mirror
- Part 1. The Easiest Built-In Way – Xbox Game Bar
- Part 2. The New Windows 11 Way – Using the Snipping Tool
- Part 3. Professional Tool - FoneLab Screen Recorder
- Part 4. Built-in PowerPoint Screen Recording
- Part 5. The Professional Free Choice – OBS Studio
- Part 6. Comparison of Ways to Screen Record on Windows
- Part 7. FAQs about How to Screen Record on Windows
Excellent Guide on How to Record Screen on Windows
 Updated by
Wondering how to record your screen on Windows? Whether you want to capture a game, make a tutorial, or save an important video call, screen recording is a skill worth learning. Thankfully, there are multiple screen recording techniques you can choose from to document your activities on the computer, whether for a quick clip or a long-duration video recording.
In this guide, we will explore the different ways to record your screen on Windows, from the easiest built-in features to more advanced or professional tools. Read through the information and simplified steps in each section, then pick the one that fits your needs best afterward. By the end, you will be able to record your Windows screen with confidence.

Guide List
- Part 1. The Easiest Built-In Way – Xbox Game Bar
- Part 2. The New Windows 11 Way – Using the Snipping Tool
- Part 3. Professional Tool - FoneLab Screen Recorder
- Part 4. Built-in PowerPoint Screen Recording
- Part 5. The Professional Free Choice – OBS Studio
- Part 6. Comparison of Ways to Screen Record on Windows
- Part 7. FAQs about How to Screen Record on Windows
Part 1. The Easiest Built-In Way – Xbox Game Bar
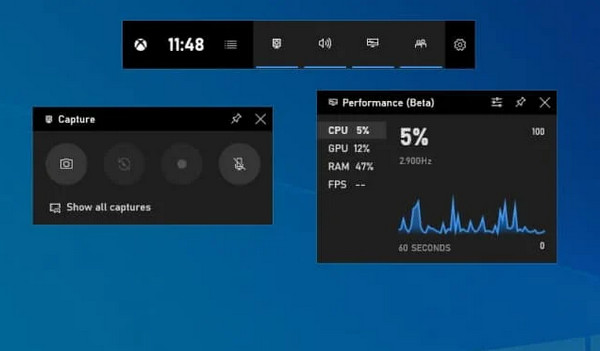
First off is the Xbox Game Bar. It is built into Windows 10 and 11, so installation is no longer required. It is designed mainly to screen record on computer games, but it also works well for capturing full apps and on-screen activities. You can access it easily with the designated keyboard shortcut. So, it is the simplest option if you want a fast, straightforward way to record your screen without downloading any extra software. However, it has a key limitation. It cannot record the desktop, File Explorer windows, the Start menu, or the taskbar.
Follow the steps below to learn how to screen record on Windows via the Xbox Game Bar:
Step 1Open the game or program you want to record, then press Win + G to bring up the Xbox Game Bar overlay. You will then see the Capture widget in the upper-left area.
Step 2From there, select the Record symbol or press Win + Alt + R to begin capturing your game or other computer activities. You can use the same keyboard shortcut to stop afterward.
Part 2. The New Windows 11 Way – Using the Snipping Tool
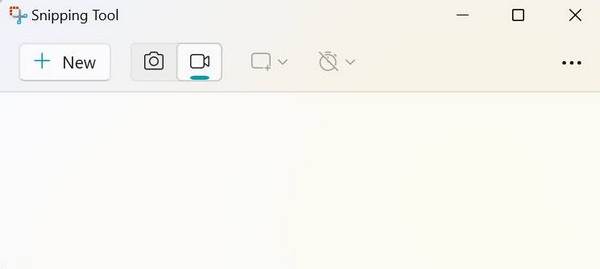
Another one of the best screen recorders for Windows is the Snipping Tool. Unlike the Xbox Game Bar, which is available on both Windows 10 and 11, this one’s screen recording feature is built into Windows 11 only. It is especially useful for recording your desktop, tutorials, or specific areas of your screen, making it more flexible than the previous option. Just note that it can be unreliable during longer sessions, as some users report that recordings fail to save properly.
Follow the directions below to learn how to screen record in Windows using the Snipping Tool:
Step 1Open the Snipping Tool from your Start menu, then click the video camera icon when the tool appears to switch to recording mode. Afterward, click New to see the recording overlay.
Step 2Drag to select the area of the screen you want to record, then click Start when ready. There will be a 3-second countdown before it starts recording. Once done, select Stop.
Part 3. Professional Tool - FoneLab Screen Recorder
Meanwhile, the professional tool we recommend as the most well-rounded option is FoneLab Screen Recorder. It goes beyond a simple screen recording, offering multiple modes, such as Video Recorder, Audio Recorder, Game Recorder, Window Recorder, Phone Recorder, and Webcam Recorder. Aside from that, it supports recording both microphone and system audio simultaneously and even allows users to take snapshots.

FoneLab Screen Recorder allows you to capture video, audio, online tutorial, etc on Windows/Mac, and you can easily customize size, edit the video or audio, and more.
- Record video, audio, webcam and take screenshots on Windows/Mac.
- Preview data before saving.
- It is safe and easy to use.
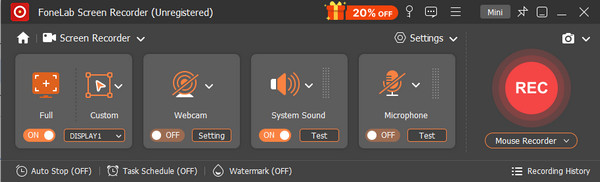
FoneLab Screen Recorder can also be installed on macOS in addition to Windows, making it stand out from other screen recording tools. You can record your full screen or a custom area without limits, using your available space and its user-friendly functions. That’s not all. After capturing your Windows activities, it provides multiple editing features, including the ability to add lines, arrows, and text. So, it’s perfect for those who want professional results with ease.
Follow the process below to learn how to screen record on Windows with FoneLab Screen Recorder:
Step 1Click Free Download for the FoneLab Screen Recorder file, and when it’s saved, use it to install the program. After the quick installation, select Start, and the program will launch and immediately present the Screen Recorder interface.
Step 2You can directly manage your preferred recording settings there, including the area of the screen you want to capture, system sound, microphone, webcam, and more. Once satisfied, click the huge REC button on the right to begin recording. You can stop the recording at any time using the Stop icon.
Part 4. Built-in PowerPoint Screen Recording
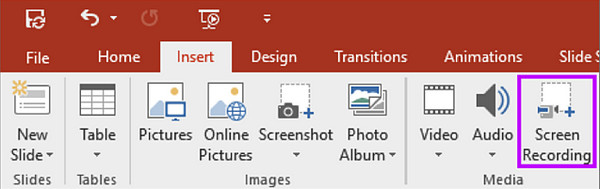
As a quick alternative, PowerPoint includes a built-in screen recorder that lets you capture your presentation. It is suitable if you wish to record your PowerPoint slides or other on-screen content. It lets you capture a selected area of the screen, along with audio and mouse pointer movements, and save the recording as a separate MP4 file. However, this feature is only available in PowerPoint for Windows, so not everyone can use it.
Follow the instructions below to learn how to screen record on Windows PC in PowerPoint:
Step 1Open your PowerPoint presentation and view the slide containing the content you want to record. Afterward, pick the Insert tab at the top, then click Screen Recording.
Step 2When the feature launches, drag your mouse to select the specific area you will record on the screen. Then, choose Record to document the part you need from the presentation.
Part 5. The Professional Free Choice – OBS Studio
Another professional option is OBS Studio. It is a free screen recording and live streaming tool that gives you more control than the built-in Windows recorders. It is best suited for users who want full customization, whether you are recording tutorials or streaming on platforms like YouTube or Twitch. It offers multiple advantages, like hardware encoder support, and lets you fine-tune resolution, frame rate, and recording quality accordingly. However, some users find it confusing because it has a steeper learning curve than other options.
Follow the steps below to learn how to screen record on Windows computer through OBS Studio:
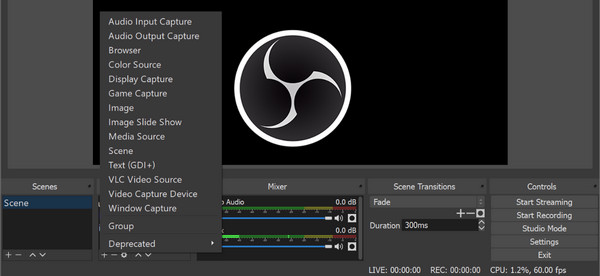
Step 1Install and launch OBS Studio on your Windows desktop. In the Sources panel at the bottom, click the + icon and select Display Capture.
Step 2Afterward, name the source, click OK, and select the monitor or window you want to record. Then, click Start Recording in the bottom-right corner to begin.
Part 6. Comparison of Ways to Screen Record on Windows
| Feature | Xbox Game Bar | Snipping Tool | FoneLab Screen Recorder | PowerPoint Screen Recording | OBS Studio |
| Best For | Games & full apps | Desktop and tutorials | Professional all-in-one recording | Quick recordings for presentations | Streaming & full customization |
| System Audio | Yes | Yes (newer versions) | Yes | Yes | Yes |
| Microphone Audio | Yes | Yes | Yes | Yes | Yes |
| Webcam Overlay | No | No | Yes | No | Yes |
| Ease of Use | Very easy | Easy | Easy | Easy | Steep learning curve |
| Customization | Low | Low | Medium | Low | High |
| Output Format | MP4 | MP4 | Multiple formats | MP4 | Multiple formats |
Part 7. FAQs about How to Screen Record on Windows
Why can't Xbox Game Bar record my desktop?
That’s because Xbox Game Bar is designed to capture only one program or window at a time.
Can I pause and resume a recording?
Yes, you can. However, most built-in Windows recorders don’t support this, so using a professional one like FoneLab Screen Recorder is recommended.
With these options, you can now record your screen on Windows using the method that best fits your needs. If you can’t choose, you can always count on FoneLab Screen Recorder for the best overall performance.


