Excellent Ways on How to Crop A Screenshot on Windows
 Posted by Lisa Ou / Feb 01, 2021 16:00
I took a screenshot of an important announcement on my computer to send to my co-workers. However, I think I need to crop it to make it more formal, but I don't know how to do it. Can someone help me how to crop screenshots?
Taking a screenshot has become a habit people use on their phones whenever they see something interesting online. It is also used for professional matters, like the situation above. And cropping images is the usual way to make the screenshot more formal without the unnecessary backgrounds on the screen. It is easy to take a screenshot and crop them on the phone. But the thing is, it's different on the computer. If you are new to taking screenshots on computers, you may not know how and where to find the tools for this. Especially if you are not that familiar with the technology, you will have difficulty taking screenshots and cropping them.

Thankfully, you found the perfect article to assist you in handling this matter. You may not know enough about taking screenshots and cropping them for now, but after reading, you will be equipped with everything you need to know regarding this. In the first part, this article will grant you the most dependable tools with easy guides for cropping screenshots. Two methods are provided for you to learn and use effectively. And as a bonus, this article will also present a powerful program that will give you additional functions aside from cropping. Kindly proceed to each part below to discover them all.

Guide List
Part 1. How to Crop A Screenshot on Windows with Built-in Tools
The shortcut keys and the Snipping Tool are the two primary methods for taking a screenshot on Windows. Although their main function is to take screenshots, they have other features that differ. One may have more features than the other, but you can expect that both tools can crop screenshots. You can also see more once you use them on your computer.
FoneLab Screen Recorder allows you to capture video, audio, online tutorial, etc on Windows/Mac, and you can easily customize size, edit the video or audio, and more.
- Record video, audio, webcam and take screenshots on Windows/Mac.
- Preview data before saving.
- It is safe and easy to use.
Method 1. Press Shortcut Keys
Similar to taking screenshots using mobile phones, there are also specific keys you need to press to take them on a computer. It is a key combination that will let you immediately capture the computer screen. One of the good things about it is that it gives you options to capture the screen the usual way, which is the Fullscreen Snip. On the other hand, you can also try the Freeform Snip, Window Snip, and Rectangular Snip. If you use these, you no longer have to crop the photo since it lets you capture only the portion you need on the computer screen.
After taking a screenshot, this method has additional functions to help you enhance the screenshot. That includes the Image Crop function that you need to eliminate the unnecessary parts of the photo. Besides that, other options also include touch writing. You can use a ballpoint pen, pencil, and highlighter to write or draw anything on the photo. And the unique attribute of this method is its ruler and protractor function that lets you draw lines neatly on your screenshot.
Pay attention to the undemanding instructions below to crop a screenshot using the shortcut keys on Windows:
Step 1Hit the Windows logo + Shift + S keys on your keyboard to display the screenshot feature. You can choose the type of screenshot you want, as mentioned above: fullscreen, freeform, rectangular, or window.
Step 2Select the portion you want to capture on the screen using the mouse cursor. When done, you will see the photo notification in the lower-right area of the screen. Click it for the editing screen to show up.
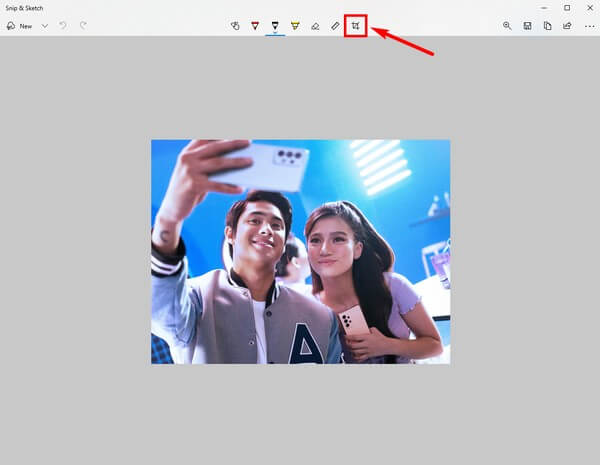
Step 3The editing features will appear at the top of the screen. Click the Image Crop icon at the end of the options. Crop the photo according to your needs, then click the check symbol on the top-right of the screen to apply the changes. You may use the other features if you want. Once finalized, hit the Save button to save the screenshot on your computer.
Method 2. Use Snipping Tool
Another method for cropping screenshots is through the use of the Snipping Tool. This program is a built-in Windows utility developed by Microsoft in 2002. Many people often mistake it for the method above, but note that they are different. Compared to the previous method, Snipping Tool contains more features.
Besides cropping, more pens are available if you want to write or highlight something on the screenshot. This is because this tool is associated with the Paint 3D program. A significant advantage of the Snipping Tool over other methods. But if you don’t have Paint 3D on your computer, this program won’t have more features than the shortcut keys method. Hence, you won’t be able to crop a screenshot without its help. You can then take the screenshot precisely instead of cropping the photo.
Pay attention to the undemanding instructions below for cropping screenshots using the Snipping Tool:
Step 1Click the search icon near the Start menu and search for the Snipping Tool. The program will immediately let you take a screenshot once you launch it.
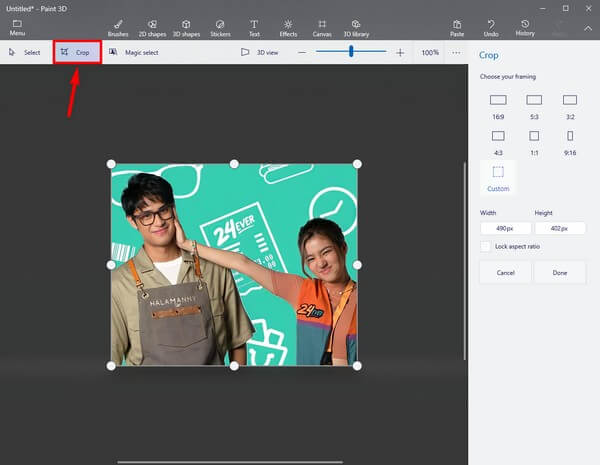
Step 2Select the portion of the screen you need to capture. As soon as you release your hold on the mouse, the Snipping Tool’s interface will be displayed on the screen. Click the Paint 3D icon on the top-right corner to launch the editing program.
Step 3On the upper-left area of the interface, click the Crop icon and cut the screenshot according to your preferences. You may also choose the framing you want on the right column of the interface. After that, you can finally save the cropped screenshot on your computer.
While these 2 methods are excellent for taking screenshots and image cropping, it is evident that they lack features compared to other tools. Since they are free and pre-installed on the computer, it is understandable they only offer the basic functions. If you want more advanced features, proceed to the following part.
Part 2. Bonus Tip: Take A Screenshot and Crop it with FoneLab Snapshot Tool
If you want or need more advanced features, you can try FoneLab’s snapshot tool, FoneLab Screen Recorder. As the program’s name suggests, its primary function is a screen recording, but you can also use it to take a screenshot and crop images. Then multiple editing features will be available afterward. This includes adding arrows, ellipses, lines, texts, and more. You can also blur an area of the screenshot to remove unnecessary elements. And the best part is the different types of screen recorders you can utilize after using the program’s snapshot feature.
FoneLab Screen Recorder allows you to capture video, audio, online tutorial, etc on Windows/Mac, and you can easily customize size, edit the video or audio, and more.
- Record video, audio, webcam and take screenshots on Windows/Mac.
- Preview data before saving.
- It is safe and easy to use.
Pay attention to the undemanding instructions below to acquire knowledge about how to crop a screenshot using FoneLab’s snapshot tool, FoneLab Screen Recorder:
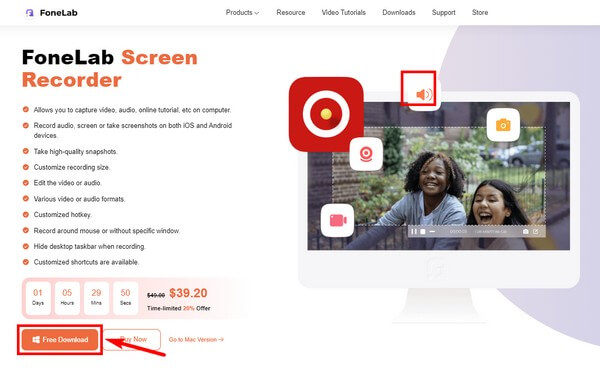
Step 1Direct to FoneLab Screen Recorder’s homepage. On the lower-left area, hit the orange Free Download tab to obtain the program’s installer file. Once it is saved on your files, start installing it on your computer. Through that, you can finally run the program.
Step 2Click any of the recorders you see on the primary interface. At the top end of the following screen, hit the camera sign to take a screenshot. Alternatively, you can press the Ctrl + Shift + C keys once the program is launched. It is the default keyboard shortcut for taking a screenshot with this program.
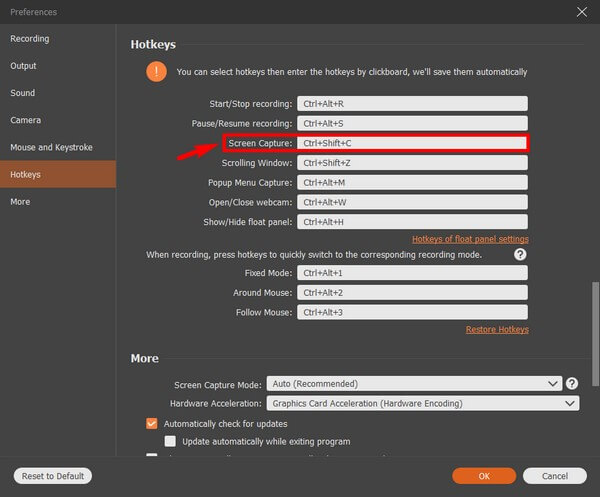
Step 3By clicking the gear icon, the Settings will be opened. If you go to the Hotkeys section, you can edit the keyboard shortcut for screen capture and change it to keys you’re more comfortable using.
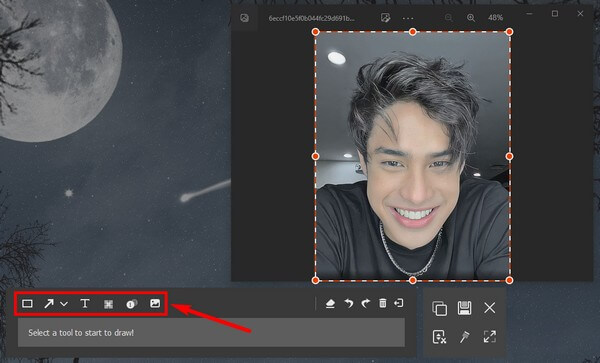
Step 4View the screenshot on your computer screen. After that, begin taking a screenshot. Select the area you want, excluding the unnecessary parts to crop the photo. When done, you can edit the cropped screenshot to enhance it. Finally, save it on your computer.
FoneLab Screen Recorder allows you to capture video, audio, online tutorial, etc on Windows/Mac, and you can easily customize size, edit the video or audio, and more.
- Record video, audio, webcam and take screenshots on Windows/Mac.
- Preview data before saving.
- It is safe and easy to use.
Part 3. FAQs about How to Crop A Screenshot
1. Why is the keyboard shortcut for screenshots not working on my computer?
It may not be turned on. If this shortcut is not working on your computer, you must enable Snip and Sketch in Settings. Just click System > Notifications, then turn on Snip and Sketch.
2. Is there a Snipping Tool to crop a screenshot on Mac?
Yes, there is. However, it's not as advanced as the other recording tools. It only has the most basic functions. You can try installing the Mac version of FoneLab Screen Recorder for more bonus features.
3. Can you crop screenshots in a video recording?
Yes, you can. Using the FoneLab Screen Recorder, you can take screenshots during the video recording. If you want to capture the screen in a recording, follow the steps above. Meanwhile, if it's during the recording, the program has a snapshot button you can click every time you want to capture the screen.
FoneLab Screen Recorder allows you to capture video, audio, online tutorial, etc on Windows/Mac, and you can easily customize size, edit the video or audio, and more.
- Record video, audio, webcam and take screenshots on Windows/Mac.
- Preview data before saving.
- It is safe and easy to use.
If you have concerns about taking screenshots and video recordings, you can never go wrong with FoneLab Screen Recorder. If you need more reliable tools like this, head to the FoneLab website.