Easily erase all contents and settings on iPhone, iPad or iPod completely and permanently.
- Clear iPhone Junk Files
- Clear iPad Cache
- Clear iPhone Safari Cookies
- Clear iPhone Cache
- Clear iPad Memory
- Clear iPhone Safari History
- Delete iPhone Contacts
- Delete iCloud Backup
- Delete iPhone Emails
- Delete iPhone WeChat
- Delete iPhone WhatsApp
- Delete iPhone Messages
- Delete iPhone Photos
- Delete iPhone Playlist
- Delete iPhone Restrctions Passcode
How to Set Up Two Factor Authentication on iPhone
 Posted by Lisa Ou / Jan 05, 2021 09:00
Do you know iPhone Two Factor Authentication? What can it do for your iPhone?
If you want to know the answers to these questions, you should keep moving to get what you want.

Guide List
1. What is two factor authentication?
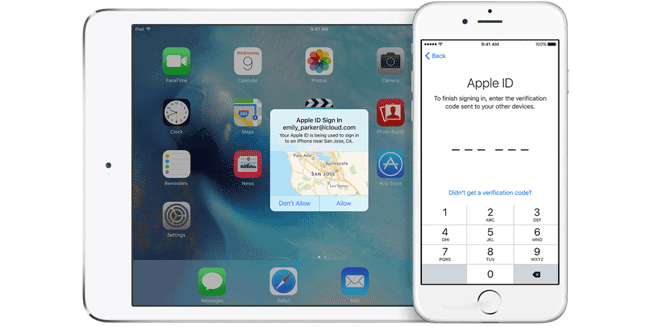
Two-factor authentication is an extra layer of security for your Apple ID designed to ensure that you are the only person who can access your account, even if someone knows you password.
Your account can only be accessed on your trusted devices, like your iPhone, iPad or Mac. You need to verify that you trust the new device with your password and six-digit verification code which displayed on your trusted devices automatically if you want to use your Apple ID on a new device.
You won't be asked for a verification code on that device again unless you sign out completely, erase iOS device or want to change the password for security reasons.
2. How to Turn On Two Factor Authentication
Below are steps to turn on two-factor authentication for Apple ID.
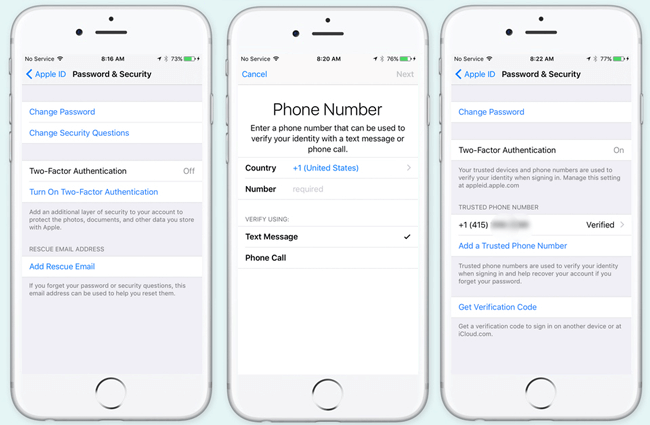
Step 1Go to Settings > your name > Password & Security if you are using iOS or later. Or you can go to Go to Settings > iCloud > your Apple ID > Password & Security if you are using iOS 10.2 or earlier.
Step 2Tap turn on Two-Factor Authentication.
Step 3Tap Continue.
Step 4Enter a phone number to receive the verification codes when you sign in. You can choose to receive the codes by text message or phone call, then tap Next.
Step 5 Enter the code and turn on two-factor authentication.
3. How to Remove Trusted device for 2 Factor Authentication
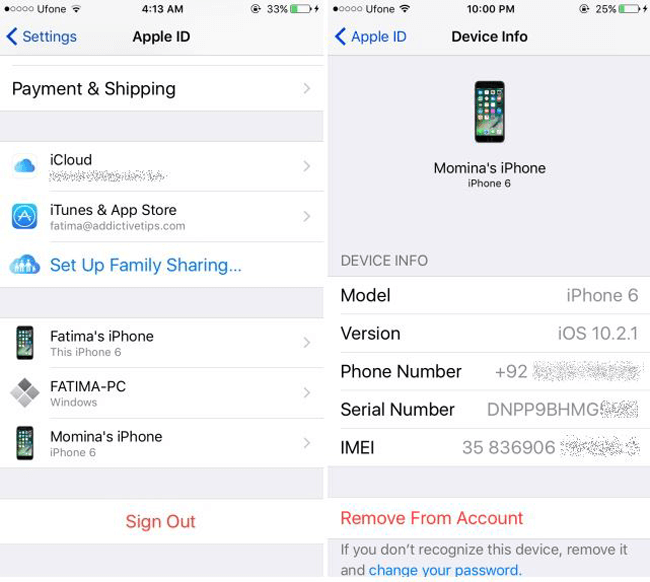
You will have questions about how to do if you don't use one of these trusted devices anymore. You can view and manage the list of trusted devices, which shows the devices that you are currently signed in to with your Apple ID. Here are simple steps to remove a trusted device.
Step 1Go to Settings > Your name.
Step 2Scroll down to find the trusted device which you want to remove and tap on it.
Step 3Then you can see the detailed information of the device you trusted, tap the Remove From Account.
4. How to Turn Off Two Factor Authentication
If you choose the Recover from iCloud Backup File recover mode with FoneLab for iOS, you will be asked to turn off two-factor authentication on your device. After that, you can turn it on or turn it off as you like. Please kindly note that you can't turn off two-factor authentication for some accounts created in iOS 10.3 or macOS Sierra 10.12.4 and later. If you created your Apple ID in an earlier version of iOS or macOS, you can turn off two-factor authentication.
Below are how to turn off two factor authentication before Apple remove the Turn Off service.
Step 1Go to the Apple ID account page and sign in your account.
Step 2Find Security and click Edit on the right.
Step 3Click Turn Off Two-Factor Authentication.
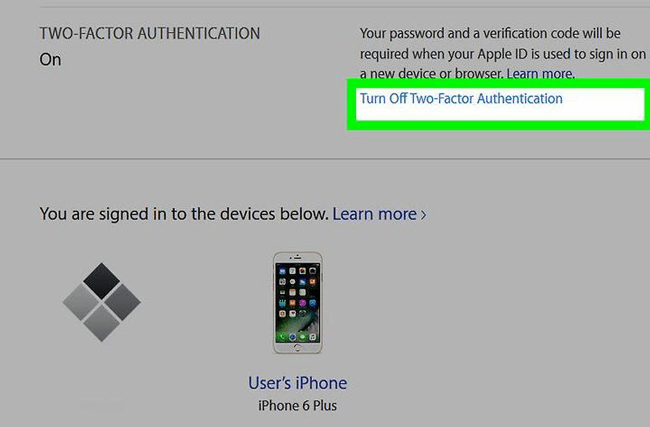
Step 4Create new security questions and verify you date of birth.
Unfortunately, it is not able to turn off two-factor authentication on your Apple ID account page anymore. If you have turned on the two-factor authentication accidentally, you are enabled to reset a new password for your Apple ID through the email from Apple with simple clicks.
Step 1Open the secured email you used for your Apple ID, select the email about two-factor authentication received just now.
Step 2There is a link in it to let you disable two-factor authentication through resetting password, click to open it.
Step 3Enter a new password in the box twice.
Then you will be reminded that your two-factor authentication has been turned off. Please note that the link will be workable for once only, please use it carefully.
5. Remove All Settings on iPhone with FoneEraser for iOS
There are more and more data stored on iPhone as the time goes. Such as photos, videos, apps, settings and more. If you think the storage of your phone is almost full and want to remove them to free up your iPhone space, you can use FoneEraser for iOS to clear iPhone data. It has great features to make your iPhone run more smoothly.
- This software fully supports iPhone, iPad and iPod touch.
- There are three erasing levels for options.
- It ensures you deleted data can not be recovered.
- It is safe and easy to use.
Steps below is how to clear all settings on iPhone.
Step 1Download and install the software on your computer. Then it will be launched automatically. If not, please double click the program icon to open it.
FoneEraser for iOS is the best iOS data cleaner which can easily erase all contents and settings on iPhone, iPad or iPod completely and permanently.
- Clean unwanted data from iPhone, iPad or iPod touch.
- Erase data quickly with one-time overwriting, which can save you time for plenty of data files.
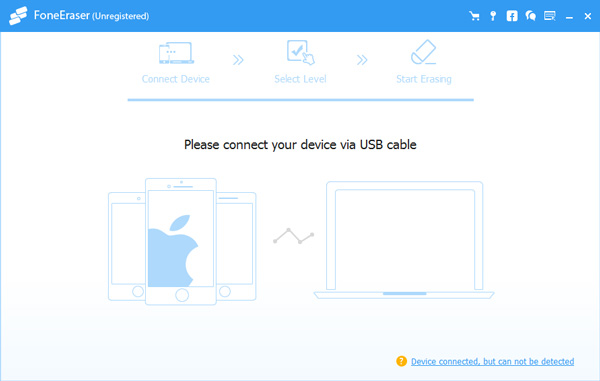
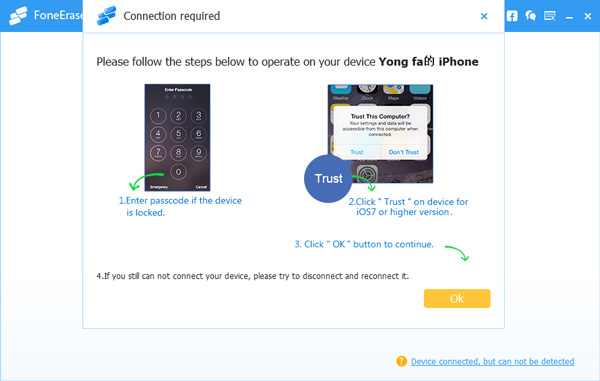
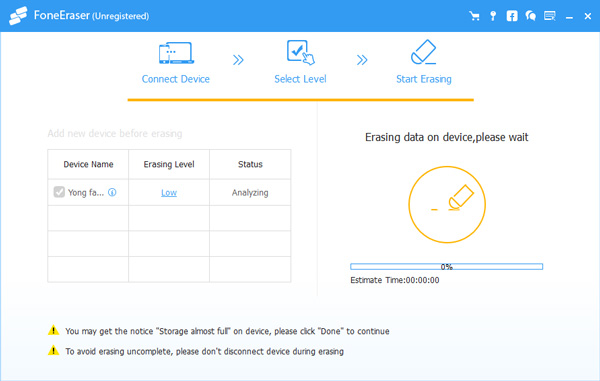
Step 2Connect your iPhone or iPad with USB cable, then tap Trust on your device screen if it pops up.
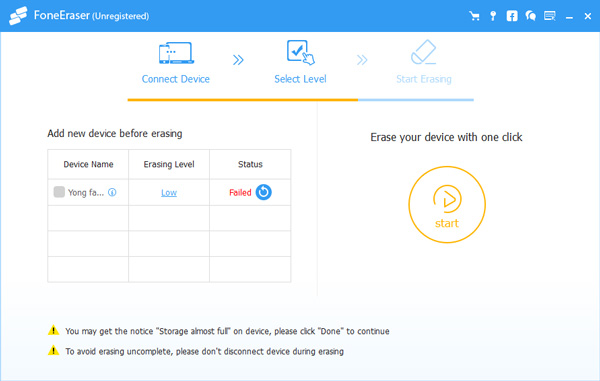
Step 3Choose a erasing level from the High Level, Medium Level and Low Level. The High Level is recommended to you here.

Step 4Click the Start icon on the right after everything is ready.
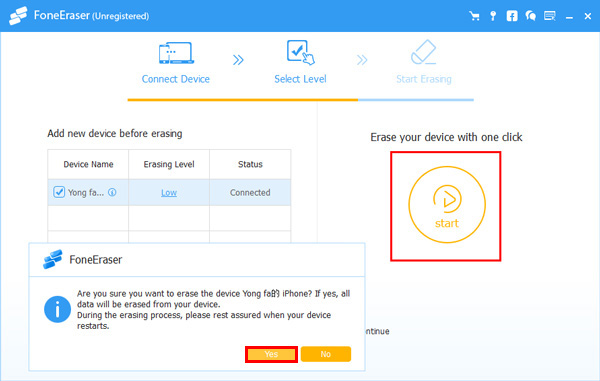
Step 5 Click Yes to confirm you want to erase your device again.
As you see,erase iPhone or iPad with FoneEraser for iOS is simple and safe. It also enables you to delete photos, wipe cache data on your device. Why not download and have a try now!