
 iPhone Data Recovery
 iOS System Recovery
 iOS Data Backup & Restore
 iOS Unlocker
 iPhone Password Manager
 Location Changer
 Android Data Recovery
 Broken Android Data Extraction
 Android Data Backup & Restore
 Android Unlocker
 FoneTrans for iOS
 iPhone Data Eraser
 iPhone Cleaner
 HEIC Converter
 HyperTrans
 WhatsApp Transfer for iOS
 Mac Sweep
 Data Retriever
 Mac Data Retriever
 Video Converter Ultimate
 Screen Recorder
 Phone Mirror
- Part 1: Why Print Screen Gives You a Black Frame in WMP
- Part 2: The Built-In WMP Shortcut Most People Never Try
- Part 3: Snipping Tool When You Need More Control
- Part 4: FoneLab Screen Recorder for Precision and Batch Frames
- Part 5: Side-by-Side Comparison of All Three Methods
- Part 6: Common Mistakes to Avoid When Grabbing Video Frames
- Part 7: FAQs About Capturing Stills from Windows Media Player
Capture Still Images from Video in Windows Media Player
 Posted by Lisa Ou / Aug 28, 2026 16:00
Paused a video in Windows Media Player, hit Print Screen, and pasted into Paint only to find a black rectangle? WMP renders video on a hardware overlay that the standard screenshot shortcut can't capture. You're not alone — here's how to fix it.
The good news is there are several ways around this, from a built-in WMP shortcut to a dedicated screen capture tool. I've tested each one — including how newer Windows 11 versions behave — so you can pick what fits your format and workflow.

Guide List
- Part 1: Why Print Screen Gives You a Black Frame in WMP
- Part 2: The Built-In WMP Shortcut Most People Never Try
- Part 3: Snipping Tool When You Need More Control
- Part 4: FoneLab Screen Recorder for Precision and Batch Frames
- Part 5: Side-by-Side Comparison of All Three Methods
- Part 6: Common Mistakes to Avoid When Grabbing Video Frames
- Part 7: FAQs About Capturing Stills from Windows Media Player
Part 1: Why Print Screen Gives You a Black Frame in WMP
When WMP plays a video, it hands the frames to your graphics card through an overlay surface. Windows' screenshot API only sees the main framebuffer — which is often a black box where the overlay is.
This isn't a bug. Newer WMP versions addressed it, which is why some people get a normal capture while others get nothing. If you're seeing black frames, it's the overlay — and the fix is simple.
Quick test: pause the video, press Print Screen, paste into Paint. Frame shows — you're fine. Black — keep reading.
Part 2: The Built-In WMP Shortcut Most People Never Try
You might not need extra software. WMP has a built-in shortcut — Ctrl + I opens a 'Save Captured Image' dialog that saves the current frame. It's the fastest option when it works. I've used this shortcut for years, and it works reliably as long as the video format is one WMP can natively decode.
It works reliably for formats WMP decodes natively — WMV, AVI, MPEG-1, and some MP4 files. If a codec-pack format grays it out or saves a blank image, move on to Part 3 or 4.
Step 1Open the video in Windows Media Player 10. Go to Tools > Options > Performance, click the Advanced button, and uncheck "Use Overlays" under Video Acceleration Settings. Click OK, then Apply and Yes to save.
Step 2Pause the video at the frame you want to capture. Drag the slider to find the exact moment, and make sure the video is in full-screen mode.
Step 3Press the Print Screen key to take a screenshot. The captured image is now on your clipboard and can be pasted into any image editor (e.g., Paint) to save.
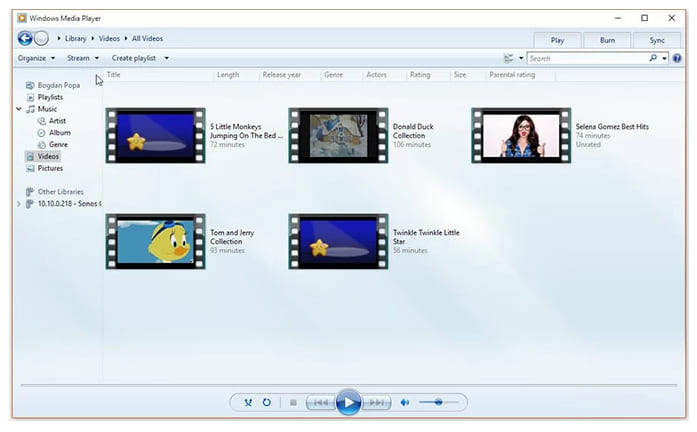
The frame saves to your chosen location instantly. The only downside: you can't crop or annotate before saving.
Part 3: Snipping Tool When You Need More Control
If Ctrl+I doesn't work for your format, or you want to crop as you capture, Windows' Snipping Tool is next. Its delay timer is perfect for this exact situation. It's been part of Windows since Vista, and in Windows 11 it got a major overhaul with a delay timer that's perfect for capturing video frames.
The key is the delay feature — set 3-5 seconds so you can switch to WMP, pause at the right frame, and let the overlay settle before the capture fires.
Step 1Open Snipping Tool and set a 3 or 5 second delay in the toolbar.
Step 2Click New, switch to Windows Media Player, and pause at the frame you want.
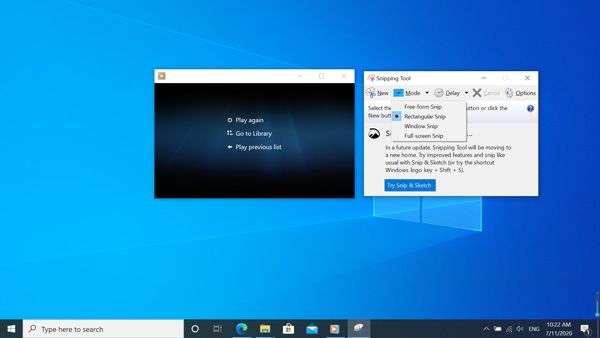
Step 3When the delay ends, drag a selection around the video area. Choose Window or Full-screen mode if you prefer.
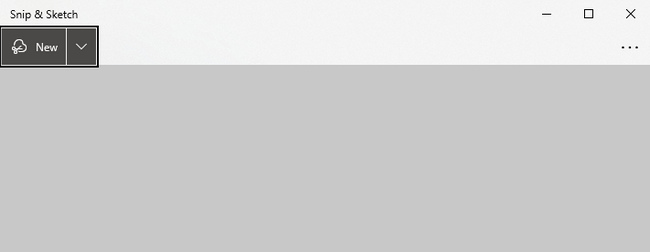
Step 4Crop or mark up the frame in the editor, then save it as PNG, JPEG, or GIF (Ctrl + S).
Snipping Tool lets you crop and annotate on the spot, but captures at your screen's resolution — maximize WMP for full-resolution frames.
Part 4: FoneLab Screen Recorder for Precision and Batch Frames
For multiple frames or pixel-perfect control over output, a dedicated tool is much faster. I use FoneLab Screen Recorder's Screen Capture mode and it saves a lot of time on batches. I tested this on a 45-minute training video and pulled 23 frames in about two minutes — something that would have taken ten times as long with Snipping Tool.
You can lock the capture region so every frame is the same size, snap frames while watching, and manage them from the built-in history panel.

FoneLab Screen Recorder allows you to capture video, audio, online tutorial, etc on Windows/Mac, and you can easily customize size, edit the video or audio, and more.
- Record video, audio, webcam and take screenshots on Windows/Mac.
- Preview data before saving.
- It is safe and easy to use.
Screen Capture hooks into the Windows Graphics Capture API, bypassing the overlay entirely — my 1080p PNG frames had no artifacts. Here's how I set it up.
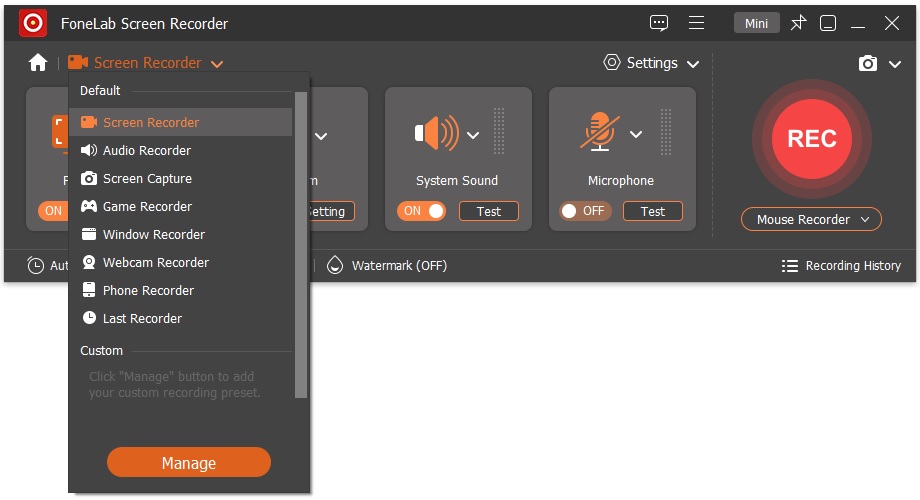
Step 1Install and launch FoneLab Screen Recorder and click Screen Recorder next to the home icon. Choose Screen Capture from the drop-down options.
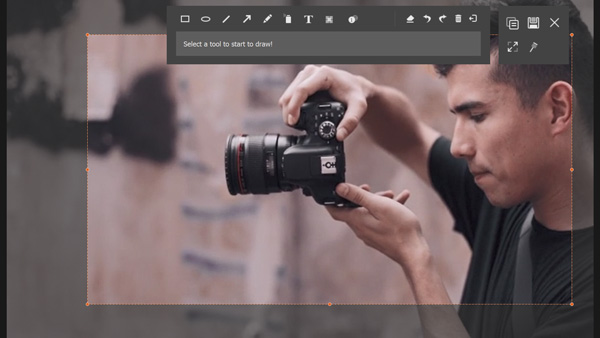
Step 2Drag to select the video area in Windows Media Player. Adjust the edges so the selection matches the video's aspect ratio.
Step 3Play the video and click the camera icon. Add shapes or text if needed, then Save.
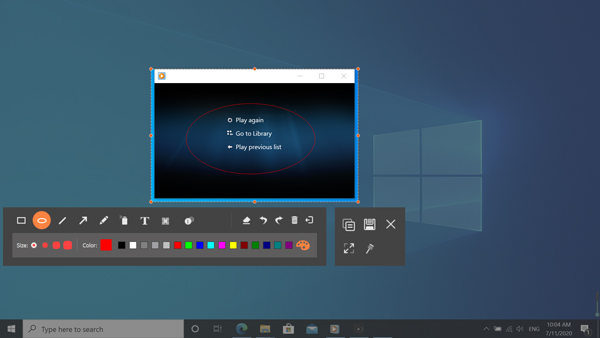
Step 4Keep the region active and press the hotkey for each frame you want. Browse all captures in Recording history when you're done.
The free version captures screenshots with no watermark or time limit. Once the region is set, capturing a frame is one keystroke.
One detail that trips people up: Windows Media Player pauses audio when you press Ctrl+I, and the saved frame can look darker than the on-screen preview. If colors seem off, it's usually the video's own encoding, not a setting you missed.
For a single frame, any of the free tools will do. The dedicated recorder starts paying off when you need several frames of the same scene or consistent output size across a series — things that take minutes to set up by hand.
Part 5: Side-by-Side Comparison of All Three Methods
Here's a comparison based on my testing with a 1080p WMV in WMP 12 on Windows 11. Your results may vary by GPU and format, but the order holds in most setups. I've used all three in different situations, and having them in your toolkit means you'll never stare at a black screenshot again.
| Method | Best For | Output Quality | Speed | Annotation | Batch Capture |
|---|---|---|---|---|---|
| Ctrl + I (WMP built-in) | Quick single frame, native formats | Full video resolution | Instant | None | No |
| Snipping Tool | Cropping on the fly, occasional use | Screen resolution | Fast (with delay) | Basic pen/highlighter | No |
| FoneLab Screen Recorder | Multiple frames, precision, hotkeys | Full resolution, lossless PNG | Very fast (hotkey) | Full editor (shapes, text, arrows) | Yes (history panel) |
| Print Screen + Paint | Only if overlay is disabled | Screen resolution | Fast | Requires Paint | No |
If you just need one frame and Ctrl+I works, use it. Need to crop or annotate? Use Snipping Tool. Pulling many frames or need consistent sizing? Use FoneLab Screen Recorder. Print Screen alone is the least reliable.
Part 6: Common Mistakes to Avoid When Grabbing Video Frames
After helping friends troubleshoot, I've seen the same mistakes repeated. Here's what to watch out for.
- Capturing while the video is playing. Even with a fast tool, you can easily end up with motion blur or a frame between two keyframes. Always pause the video first, or use the frame-by-frame advance shortcut (Ctrl + Shift + F in WMP 12) to land on the exact frame you want.
- Forgetting to maximize WMP before snipping. Snipping Tool captures at your screen resolution, not the video's native resolution. If WMP is in a small window, your frame will be small too. Maximize the player (or at least make it large enough) before capturing to get the best quality.
- Saving everything as JPEG when you need to edit. JPEG is a lossy format, and every time you open and re-save a JPEG, you lose a little quality. If you plan to crop, resize, or annotate the frame in another program, save as PNG first, do your edits, and then export to JPEG if needed for web use.
- Ignoring the video format. The Ctrl+I shortcut in WMP only works with formats WMP decodes natively. If you're playing an MKV, HEVC, or other format that requires a third-party codec, the shortcut may not work. In those cases, use Snipping Tool or FoneLab Screen Recorder instead.
- Not checking the saved file. It's easy to assume the capture worked and move on, only to find later that the frame is black or cropped incorrectly. Take two seconds to open the saved file and verify it looks right before you close WMP.
If you regularly need frames, consider VLC Media Player — its snapshot feature (Shift+S) works with virtually every format at native resolution.
Whatever method you pick, the biggest win is consistency — save frames into a dedicated folder with clear names so you can find them later. A screenshot buried in a cluttered desktop is as good as lost.
Part 7: FAQs About Capturing Stills from Windows Media Player
Why does my screenshot come out black when I use Print Screen in WMP?
Windows Media Player renders video on a hardware overlay that the standard Print Screen function can't capture. Use the built-in Ctrl + I shortcut, Snipping Tool with a delay, or FoneLab Screen Recorder instead.
Can I capture frames at the video's original resolution, not my screen resolution?
Yes. Ctrl + I saves the frame at the video's native resolution regardless of window size. With other tools, maximize WMP to get the largest possible frame.
What image format should I use for captured frames?
Use JPEG for images you'll share online, and PNG if you plan to edit them further. WMP's Ctrl + I dialog offers JPEG and BMP; for PNG, use Snipping Tool or FoneLab Screen Recorder.
Is there a way to capture multiple frames quickly without pausing between each one?
Yes. Set a capture region in FoneLab Screen Recorder, play the video, and press Ctrl + Shift + C whenever you want a frame — no pausing needed.
Conclusion
Capturing a still frame from WMP doesn't have to be a guessing game: Ctrl+I is fastest for single frames, Snipping Tool adds cropping, and FoneLab handles batches at native resolution.
FoneLab Screen Recorder allows you to capture video, audio, online tutorial, etc on Windows/Mac, and you can easily customize size, edit the video or audio, and more.
- Record video, audio, webcam and take screenshots on Windows/Mac.
- Preview data before saving.
- It is safe and easy to use.



