Hassle-free Methods to Change iTunes Library Location
 Posted by Boey Wong / March 08, 2023 16:00
Can I change iTunes backup location to Windows 7? My iPhone and iTunes storage is full, so the device performance is getting slower. And sometimes, it even froze. Is there a better way to save my data?
iTunes is one of the popular ways to back up your files, such as songs and movies. However, its storage is limited since it keeps the iOS backup files on your computer system drive by default. And as time goes by, the storage constantly reduces because of backup files, downloading files and installing programs. This eventually leads to insufficient storage. Hence, changing the location of your iTunes backup is highly recommended. This will help you maintain the excellent performance of your device and avoid lagging.

With that said, it would be a pleasure to provide you with the proper methods to change your iTunes library or backup location. In addition, we included some of the top tools and techniques to back up your iOS data. Whether you are comfortable with a third-party tool or built-in techniques, this article will lay out the best for you. And if you haven't tried to back up your files on iTunes yet, this is your chance to learn the backup process on the program. Keep reading below to have more knowledge regarding backing up.

Guide List
Part 1. How to Change iTunes Backup Location
One of the proper ways to change your iTunes backup location is by using the Windows PowerShell program. This method involves technicalities and has complex steps. But if you follow the instructions properly, you can change your backup location successfully.
Obey the instructions below to change location of iTunes library successfully:
Step 1Search for %USERPROFILE%\Apple\MobileSync on your computer to open your backup’s location. Afterward, select the Backup folder and move or drag it to a new location drive. Rename it as well to avoid overwriting.
Step 2Now, go back to the original location of the folder. Press Shift and right-click wherever to see the options. Then choose the Open PowerShell window here tab. The Windows PowerShell program will then launch.
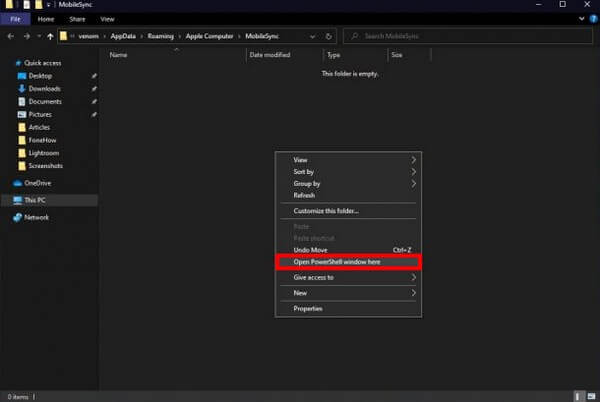
Step 3Enter the command, /c mklink /J “%USERPROFILE%\Apple\MobileSync\Backup” “C:\Backup” on the program’s interface. Just modify the “C:/Backup” part depending on the location of your backup’s new destination folder.

You will see a new Backup folder in the original location when the process is done. But note that it’s not an actual folder but a shortcut that leads you to your backup files’ new location.
Part 2. How to Backup iOS Data
Meanwhile, if you haven’t created a backup for your files yet, the methods below will help you do so. You can try them anytime to secure your files and avoid data loss.
Method 1. Try FoneLab iOS Data Backup & Restore
FoneLab iOS Data Backup & Restore is an underrated program that does more than what you expect it to do. It quickly backs up your files and other data on Windows or Mac. And unlike other tools, this program allows you to choose the files you want to back up individually. Instead of backing up or restoring all your files at once, it gives you the option to select only the important files you need to secure. This way, you can save time, storage, and effort by not including your other insignificant data. In addition, this tool supports almost all versions of iPhones, iPad, and iPod Touch, so compatibility would be the least of your problems.
FoneLab enables you to backup and restore iPhone/iPad/iPod without data loss.
- Backup and restore iOS data to your PC/Mac easily.
- Preview data in detail before you restore data from backups.
- Backup and restore iPhone, iPad and iPod touch data Selectively.
Obey the undemanding instructions below to backup iPhone on Windows 7, 8, 10, and more with FoneLab Data Backup & Restore:
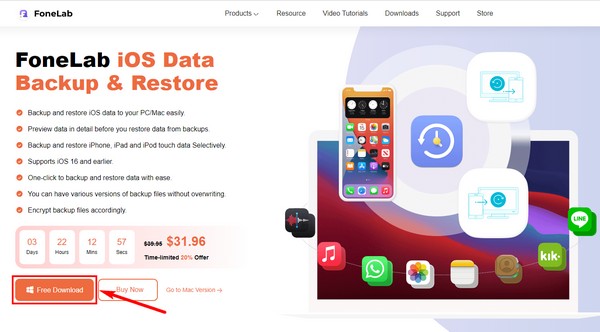
Step 1Access the website of FoneLab iOS Data Backup & Restore to get the installer file for free by pressing the Free Download button. Open the file and ensure to authorize the tool to make changes to your device. When the installation begins, you only need to wait a brief moment before it finishes. Then launch the program smoothly on your computer.
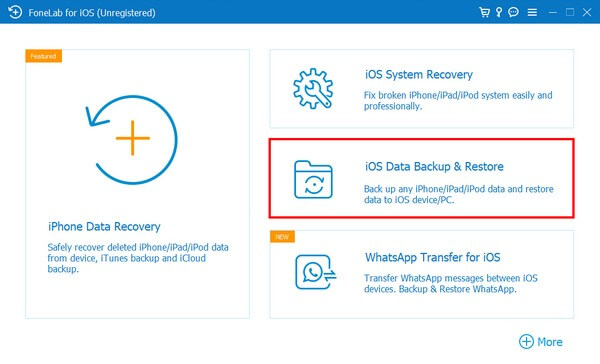
Step 2You will stumble upon the FoneLab iOS Data Backup & Restore’s features on its primary interface. You can use them whenever you need them for future purposes. There is a feature for data recovery, system recovery, and WhatsApp transfer. But for now, hit the iOS Data Backup and Restore function.
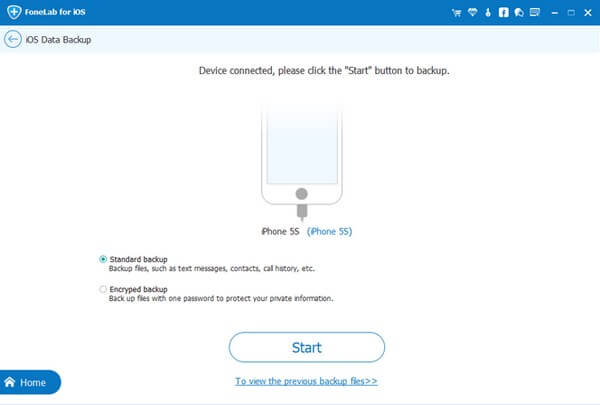
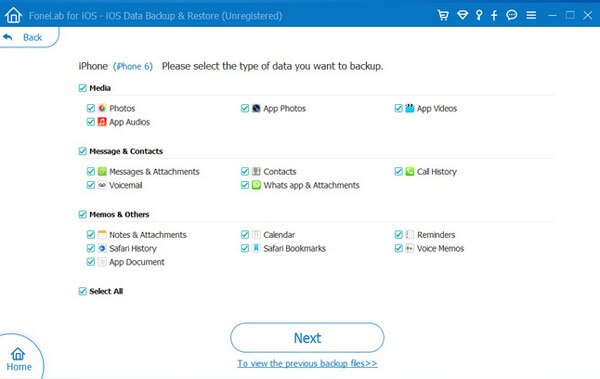
Step 3Through that, click the iOS Data Backup feature on the following interface. You may use the other feature, iOS Data Restore, once you’re ready to recover your files. Meanwhile, connect your iOS device with a USB cable to the computer. Then choose the type of backup you want before clicking the Start button.
Step 4Following that, check the data types you wish to back up. Or check Select All if you want to back up everything. After that, click Next to let the program start backing up your files. Once done, you will see the Congratulations interface at the end, indicating the successful process.
Method 2. Use Finder
If you wish to back up your device using your Mac with macOS 10.15 or later versions, you can use Finder. If you are using an earlier version, try iTunes or other methods instead.
Obey the undemanding instructions below to save or move iPhone backup on Mac with Finder:
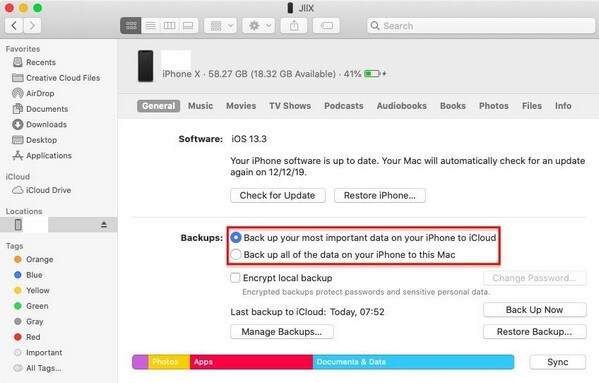
Step 1Link your iPhone with a USB cable to your Mac. You will then see your iPhone in the Finder sidebar on the screen.
Step 2Select it, then click General on the Finder window. Afterward, select the Back up all of the data on your iPhone to this Mac option.
Step 3Finally, hit Back Up Now to start backing up your data.
FoneLab enables you to backup and restore iPhone/iPad/iPod without data loss.
- Backup and restore iOS data to your PC/Mac easily.
- Preview data in detail before you restore data from backups.
- Backup and restore iPhone, iPad and iPod touch data Selectively.
Method 3. Operate iTunes
If you use Windows or earlier versions of macOS, you can back up your device manually using iTunes. It only requires easy steps without worrying about technicalities. However, reports say that iTunes sometimes don’t include other files you want to back up. So if you need a tool that can include all your files safely, try the other method above.
Obey the undemanding instructions below to back up your files with iTunes:
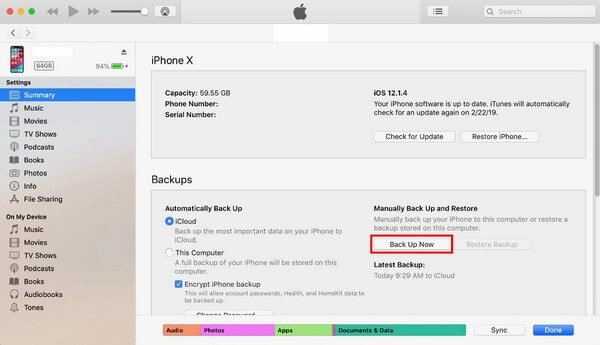
Step 1Launch iTunes on your computer and attach your device using a lightning cable. Then click the phone icon on the upper left area of the iTunes window.
Step 2In the Summary section, hit the Back Up Now tab to back up your iOS data on iTunes.
Part 3. FAQs about Backing Up iOS Data
1. Is iCloud a service for backing up data?
Yes, it is. iCloud is another method to back up your iOS data. However, it only offers limited storage for free users. If you need to back up more files, you must avail yourself of a monthly plan or payment.
2. Can you preview the backups before restoring them?
Yes, you can. Programs like FoneLab iOS Data Backup & Restore let you preview your backup files by the time you want to restore them. Thus, you can view and restore the specific file you want instead of restoring all before previewing them, which is a hassle.
3. Does FoneLab iOS Data Backup & Restore support documents?
Yes, it does. FoneLab iOS Data Backup & Restore can back up almost all data types, including documents, photos, audio, videos, contacts, messages & attachments, voice mails, call history, notes, and more.
FoneLab enables you to backup and restore iPhone/iPad/iPod without data loss.
- Backup and restore iOS data to your PC/Mac easily.
- Preview data in detail before you restore data from backups.
- Backup and restore iPhone, iPad and iPod touch data Selectively.
Hopefully, this article can assist you in backing up your files successfully. You can discover more tools for any device matter once you head to FoneLab iOS Data Backup & Restore's site.