Snipping Tool for Chromebook: Guide and Alternatives
 Updated by Lisa Ou / November 29, 2024 16:30
Is there an available Chromebook Snipping Tool? I've only been using the computers in our school library whenever we have a task or project for class. So, I'm used to the Snipping Tool on Windows when screenshots are needed. The problem is that I couldn't find it when I bought a Chromebook. Now, I wonder whether or not it is available. Can anyone please inform me?
When discussing screenshot tools on a computer, it's unsurprising to hear that the Snipping Tool is among the most popular. It can be effortlessly accessed on Windows, among the leading and accessible computer systems worldwide. Hence, most users are more used to it than the other screenshot programs or features. But the question is, will you find it on a Chromebook laptop?

Determine the answer in the following parts using the provided information. Sufficient details will be revealed, and you will also discover the best alternatives to the Snipping Tool. Moreover, see the bonus part we included, as it will be helpful in other situations you will encounter later. Basic instructions will be in every section for assistance, allowing you to navigate the processes easily.

Guide List
Part 1. Is Snipping Tool on Chromebook
“Is there a Chromebook Snipping Tool?” is a question many people seek because of the Windows Snipping Tool’s popularity. It provides several features users need and enjoy, so it’s no wonder they still seek it even on other computers. Its functions include various screenshot modes, like Free-form Snip, Rectangular Snip, Window Snip, and Full-screen Snip. You can also enjoy the basic photo editors, such as a pen, highlighter, and eraser.
Unfortunately, Chromebook doesn’t offer the Snipping Tool. It is only built into Windows computers, so you won’t be able to use it on other operating systems, like Chrome, macOS, Linux, etc. In this case, you don’t have a choice but to use other screenshot features or programs on the Chromebook. Don’t worry, though. Like Windows, Chromebook laptops also have built-in screenshot functions as alternatives, which will be discussed in the next section.
FoneLab Screen Recorder allows you to capture video, audio, online tutorial, etc on Windows/Mac, and you can easily customize size, edit the video or audio, and more.
- Record video, audio, webcam and take screenshots on Windows/Mac.
- Preview data before saving.
- It is safe and easy to use.
Part 2. 2 Best Alternatives to Snipping Tool on Chromebook
As mentioned, the Snipping Tool can’t be accessed on Chromebook, so we recommend the best alternatives. Lucky for you, it also has built-in screenshot features; you can use them instead of the Snipping Tool, especially since they are also effective in capturing the screen.
Option 1. Keyboard Shortcut
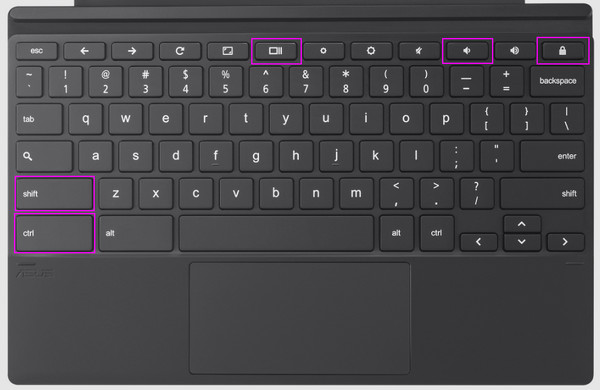
Like on other computers or laptops, you can take screenshots using the designated keyboard shortcut on a Chromebook. Various keyboard combinations are available, so you only have to press one, depending on the type of screenshot you intend to take. You may capture the entire screen, partially, on tabs, etc., but no worries, all are uncomplicated. You only need to memorize multiple keyboard shortcuts if you intend to use different screenshot modes frequently.
Comply with the proper operation below to use the screenshot keyboard shortcuts as an alternative to the Snipping Tool on Chrome:
Capture Entire Screen: Press the Chromebook’s Ctrl + Show Windows keys.
Capture Partial Screen: Press the Chromebook’s Shift + Ctrl + Show Windows keys. Once the crosshair is shown, drag it to get the portion you want on the screen.
Capture a Tab: Press the Chromebook’s Power and Volume Down keys simultaneously.
FoneLab Screen Recorder allows you to capture video, audio, online tutorial, etc on Windows/Mac, and you can easily customize size, edit the video or audio, and more.
- Record video, audio, webcam and take screenshots on Windows/Mac.
- Preview data before saving.
- It is safe and easy to use.
Option 2. Screen Capture Tool
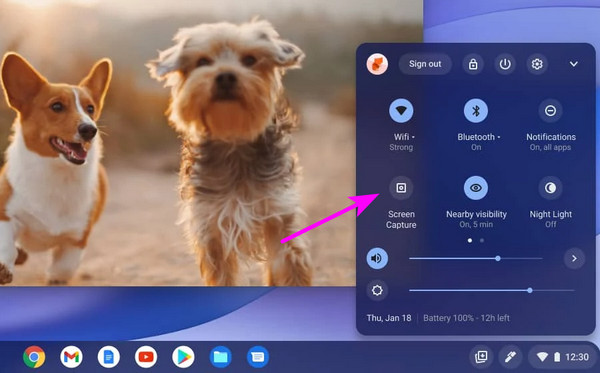
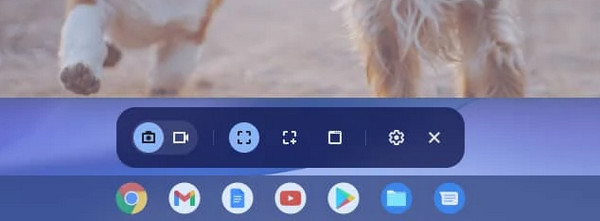
Meanwhile, Chromebook’s Screen Capture Tool is another built-in screenshot feature you can use. Like the previous option, it no longer requires an installation since you can effortlessly access it by viewing the Chromebook’s Quick Settings. But instead of memorizing the keyboard shortcuts, it will provide multiple options if you’d like to capture the entire screen, only a specific part, or a window. Aside from that, its screenshot bar offers a video recording button if you want.
Note the appropriate procedure below to utilize the Screen Capture Tool as an alternative to the Snipping Tool in Chromebook:
Step 1First, view the Chromebook’s Quick Settings by clicking the time on the lowermost right of the desktop. Afterward, you will see the Screen Capture button from the options, so click it.
Step 2The Screen Capture bar will then appear. Thus, click the appropriate screenshot mode button from there. Suppose you have chosen to capture only a portion; drag the crosshair accordingly to take a screenshot of your desired screen. It will immediately be saved afterward.
After taking screenshots using either method, view the photo on the Chromebook’s Files section and use the built-in photo editing functions, such as Crop, Rescale, and Filters. However, know that all the features you will find are only basic. Installing a separate editing app is needed if you need more advanced options to enhance your Chromebook screenshots.
Part 3. Bonus Tip - Top Screenshot Tool for Computers
We understand that the Snipping Tool is always the first option for users to capture the Windows computer screen. Still, we encourage you to also learn about the FoneLab Screen Recorder. It is guaranteed to be among the leading screen-capturing and recording programs. Thus, getting it on your computer, whether on Windows or macOS, will be beneficial, as it allows you to document almost anything on the screen. It doesn’t matter if you want it as a photo or video.
FoneLab Screen Recorder’s capability to capture the entire or specific portion of the screen has your back. Besides, it also allows you to take screenshots while video recording, making it more flexible than other programs. Also, you can enjoy its multiple recording types, including video recorder, audio recorder, game recorder, webcam recorder, etc. They all let you choose whether or not to use the system, microphone, or both sounds while capturing your computer screen.
FoneLab Screen Recorder allows you to capture video, audio, online tutorial, etc on Windows/Mac, and you can easily customize size, edit the video or audio, and more.
- Record video, audio, webcam and take screenshots on Windows/Mac.
- Preview data before saving.
- It is safe and easy to use.
Perceive the user-oriented steps underneath as a model for taking screenshots or screen recording on a computer with FoneLab Screen Recorder:
Step 1Explore FoneLab Screen Recorder’s page; its Free Download tab is on the left side. So, select it to save the installer immediately inside your computer’s Downloads folder. You won’t need much to open it and process the installation quickly. The Start tab will appear shortly; you must only tick it to run the program.
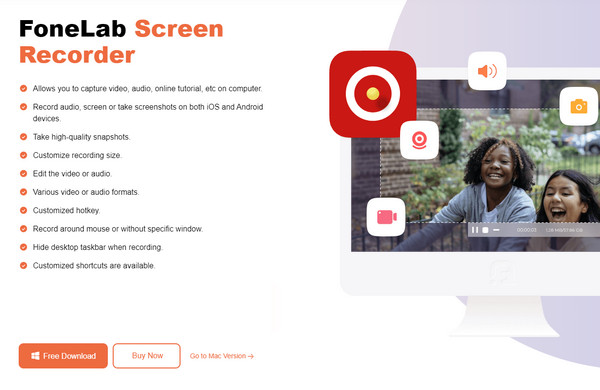
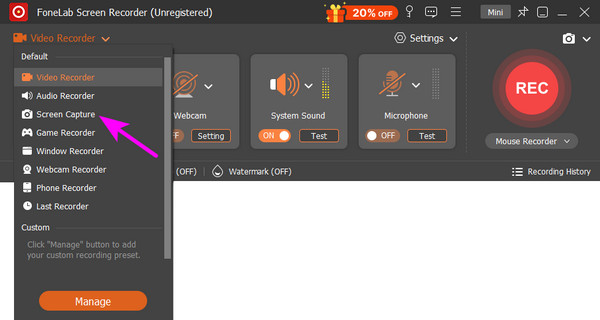
Step 2The Video Recorder will be displayed once FoneLab Screen Recorder’s initial interface launches. Thus, click the down arrow on the upper left first to see the other features. From the drop-down menu, choose Screen Capture to initialize the screenshot feature.
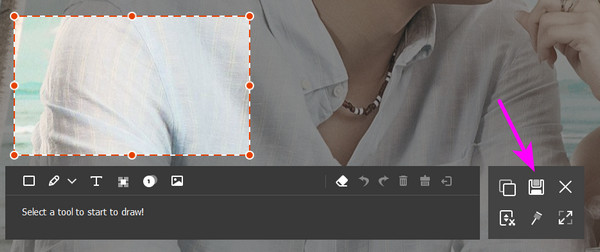
Step 3Next, the crosshair will appear. Drag it accordingly, and once you have captured your desired portion of the screen, the editing features will immediately be shown in a toolbar. Use them to enhance your screenshot before clicking the Save button afterward.
FoneLab Screen Recorder allows you to capture video, audio, online tutorial, etc on Windows/Mac, and you can easily customize size, edit the video or audio, and more.
- Record video, audio, webcam and take screenshots on Windows/Mac.
- Preview data before saving.
- It is safe and easy to use.
Part 4. FAQs about Snipping Tool on Chromebook
1. Can I get the Snipping Tool on my Chromebook with an installer?
No, you can't. Even if you save the Snipping Tool's installer, your Chromebook still won't be able to install and launch it since it runs Chrome OS, which doesn't support Windows programs.
2. Where are my Chromebook screenshots saved?
After taking screenshots using Chromebook's built-in features, the photos are automatically saved in the Files' Downloads folder.
Understand each part's information to optimize your Chromebook's screenshot features' usage. You must also not miss the bonus program, as it will be useful in later situations.
FoneLab Screen Recorder allows you to capture video, audio, online tutorial, etc on Windows/Mac, and you can easily customize size, edit the video or audio, and more.
- Record video, audio, webcam and take screenshots on Windows/Mac.
- Preview data before saving.
- It is safe and easy to use.
