- Part 1. How to Screenshot on Windows Laptop with Key Combinations
- Part 2. How to Take a Screenshot on Windows Laptop with FoneLab Screen Recorder
- Part 3. How to Take a Screenshot on a Windows Laptop with Snipping Tool
- Part 4. Screenshot on Windows Laptop with Game Bar
- Part 5. FAQs about How to Screenshot on Windows Laptop
How to Take A Screenshot on A Windows Laptop Quickly
 Updated by
 Hello! My sister sent me videos on my Windows laptop from my graduation ceremony last week. She made the videos to compile my images with background music. How thoughtful, right? Now, I want to take screenshots of the images to save them on my Windows laptop. Can you help me? Thank you!
There are countless ways to screenshot on a Windows laptop. You can use its built-in tools and third-party programs. But which one is the best? We got you! We outlined the most convenient procedures in this article as a reference. You can browse them by scrolling below to know the best method for you.

Guide List
- Part 1. How to Screenshot on Windows Laptop with Key Combinations
- Part 2. How to Take a Screenshot on Windows Laptop with FoneLab Screen Recorder
- Part 3. How to Take a Screenshot on a Windows Laptop with Snipping Tool
- Part 4. Screenshot on Windows Laptop with Game Bar
- Part 5. FAQs about How to Screenshot on Windows Laptop
Part 1. How to Screenshot on Windows Laptop with Key Combinations
The Windows laptop is more than just typing on documents or texts. You can use them to take a screenshot. You can use a single key or a combination of keys to do this. One thing is sure: The Print Screen key is the most important. Please note that these key combinations can also guide you on how to take a screenshot on a HP laptop Windows 10, including other versions and models. Please see the table below for more information.
| Key Combinations | Function |
| Print Screen | This key will take a quick screenshot of the entire Windows screen. It does not automatically save the screenshot. You need to do it manually. |
| Cntrl + Print Screen | This key combination allows you to take a portion of your Windows screen. You can take a screenshot of a particular section on the mentioned device using its cursor. It also does not save the screenshot automatically. |
| Windows Key + Print Screen | This key combination takes a screenshot on your Windows laptop in a snap. It automatically saves the screenshot to your clipboard. |
Part 2. How to Take a Screenshot on Windows Laptop with FoneLab Screen Recorder
Besides the key combinations, FoneLab Screen Recorder also offers a convenient and quick screenshot for your Windows laptop screen. In fact, it provides three screenshot methods, which are Screen Capture, Scrolling Screenshot, and Popup Menu Capture. They have different screenshot processes that you will love using.
FoneLab Screen Recorder allows you to capture video, audio, online tutorial, etc on Windows/Mac, and you can easily customize size, edit the video or audio, and more.
- Record video, audio, webcam and take screenshots on Windows/Mac.
- Preview data before saving.
- It is safe and easy to use.
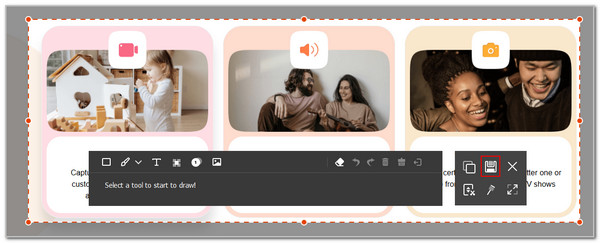
Furthermore, it allows you to edit the images after taking screenshots. You can add text, arrows, lines, and other drawing panels. The tool also supports countless image formats, including JPG, PNG, JPEG, TIFF, BMP, and GIF. Additionally, you can use the tool for taking screen recordings in high quality. Take a screenshot on a Windows laptop utilizing this tool with the steps below.
Step 1Download FoneLab Screen Recorder from its trusted website by clicking the Free Download button. Then, set up, install, and launch the tool. The first interface will show you the primary features it contains. Please go to the screen where you want to take a screenshot.

Step 2Click the Camera button at the top right of the tool's main interface. Three options will appear from the drop-down section. You can click the Screen Capture, Scrolling Screenshot, and Popup Menu Capture buttons.
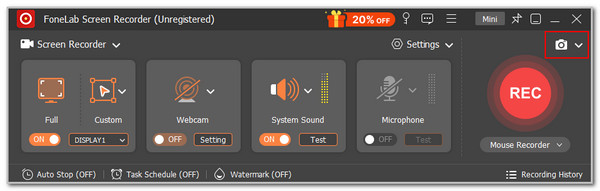
Step 3Use the cursor to highlight the screen you want to screenshot. Then, release it. After that, you will see the software tools on the screen. Click the Save button on the right and choose an album from your Windows laptop to save it.
Part 3. How to Take a Screenshot on a Windows Laptop with Snipping Tool
Snipping Tool is another screenshot tool that can be used on a Windows laptop. This tool is pre-installed on Windows devices. You do not need to download it to access it. Additionally, it has a simple interface. The tool has four supported snips, which are Free-form Snip, Rectangular Snip, Window Snip, and Full-screen Snip features. Discover the screenshot process of Snipping Tool with the steps below.
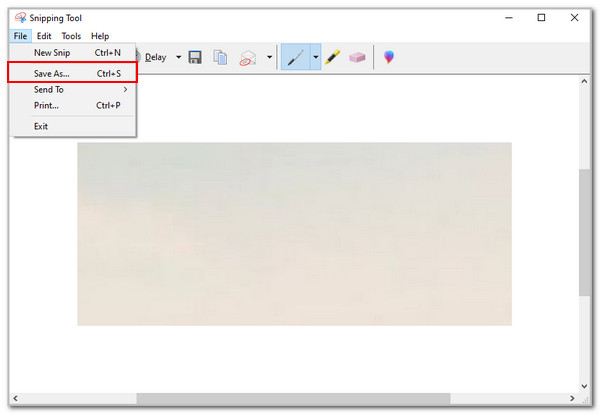
Step 1Open the Snipping Tool program on your Windows laptop. After that, click the Modes button at the top. You can click the Free-form Snip, Rectangular Snip, Window Snip, and Full-screen Snip features to continue.

Step 2Click the New button at the top left. Then, use the cursor to trace the area of the screen you want to capture. Release the cursor to see its preview with Snipping Tool. Finally, click the File menu at the top left. Click the Save As button from the drop-down options and rename it before saving it to your Windows laptop album.
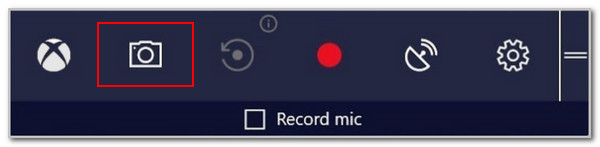
Part 4. Screenshot on Windows Laptop with Game Bar
The Windows laptop can be used for gaming. Game Bar is a feature that is convenient in this field. You can use it to take a screenshot on your Windows laptop screen while playing or browsing. Additionally, it allows you to take screen recordings. The best thing about this tool is that it can do the procedures without causing lag on the screen. However, it lacks editing tools that can be performed after the screenshots. Refer to the steps below to see how to take a screenshot on Windows laptop.
Please open the Game Bar program on your Windows laptop. You can search it at the bottom left or press the Windows + G key combination. The interface of the tool will be shown. Please go to the screen that you want to capture. Click the Capture button and track the screen you want to capture. Save the screenshot afterward as the final step.
Part 5. FAQs about How to Screenshot on Windows Laptop
Why isn't my screenshot saving to the Desktop?
Commonly, the screenshots taken are saved from the Windows Desktop section. It happens to access them quickly after the screenshot. However, some screenshots are not stored from the Desktop section. You can try to paste them into documents or other platforms to check if they are saved from the clipboard. Additionally, the screenshot might not be successful. Take another screenshot if that's the case.
How to find unsaved screenshots on Windows?
The unsaved screenshots on your Windows laptop will not be stored in its folders. But you can still check the Recycle Bin tool to see if it contains the unsaved screenshots. You only need to open the mentioned tool, and the recently deleted files will appear on the screen. Then, you can restore them to your Windows laptop. Right-click on the screenshot you want to retrieve and click the Restore button afterward.
To summarize, we have guided you on how to take a screenshot on a Windows laptop. You can use key combinations, Snipping Tool, Game Bar, and FoneLab Screen Recorder. The last-mentioned third-party tool is the best! After taking a screenshot in a few clicks, you can apply basic editing operations to your screenshots. Do you want to explore it more? You may download it to your computer.