3 Excellent and Easy Ways How to Take Screenshots on MacBook
 Posted by Valyn Hua / Nov 29, 2022 16:00
Taking screenshots on Mac is very easy if you enlighten yourself with tools and shortcut keys. Familiarizing yourself with the methods will benefit you big time. For instance, you are having meetings related to your work online. The host of that meeting explains the topics using images that contain words. You must take a screenshot quickly before it proceeds to the next issue.
For this reason, you have to take a screenshot immediately. There are many ways how to screenshot on MacBook. It can use shortcut keys or the screenshot toolbar of the Mac. You can also use the FoneLab Snapshot Tool to give a wonderful experience. Launching it will provide you with a quick screenshot, good-quality pictures, and more. It is essential to know the proper operations of your MacBook to access them in this situation. Don't worry. The steps are simple for a beginner like you.

Guide List
Part 1. How to Screenshot on MacBook Using FoneLab Snapshot Tool
This software that is a screen recorder, at the same time taking screenshots, is rare to find. Most of the time, they only have single functions. However, FoneLab Screen Recorder has these two features. You can take a snapshot while screen recording. Another good thing about this is capturing the whole screen while taking a screenshot of a document. It will not blur the document, and the words are still readable because this software supports high-quality pictures. This device supports Mac and Windows, that's why it is possible to take a screenshot on MacBook using this. You can use it anywhere you want, including when you are in a game, audio recording, or video recording. Proceed to its steps.
FoneLab Screen Recorder allows you to capture video, audio, online tutorial, etc on Windows/Mac, and you can easily customize size, edit the video or audio, and more.
- Record video, audio, webcam and take screenshots on Windows/Mac.
- Preview data before saving.
- It is safe and easy to use.
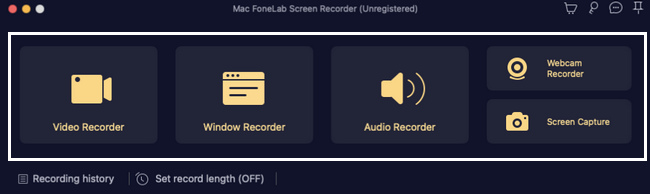
Step 1Download FoneLab Snapshot Tool. You must click the Switch to Mac button because you are using a Mac device. Afterward, install the software and launch it instantly. By clicking the Start button, it will direct you to the main interface of the tool.
Step 2On the software's interface, choose one of the screen recorder features of the tool. You can select Video Recorder, Audio Recorder, and Game Recorder buttons. Soon, you will see the Snapshot tool of this screen recorder software.
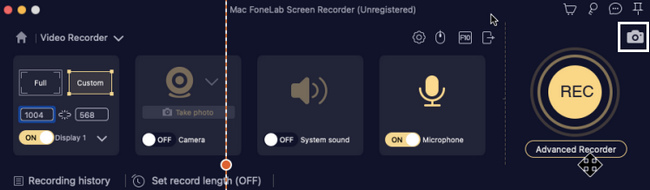
Step 3Now, you can click the Arrow Down button beside the Camera Icon of the software. There will be a Drop Down option for screenshotting. Click the Screen Capture button to screenshot a particular part of your screen. On the other hand, click the Scrolling window button to take the snapshot in scrolling mode.
Step 4The Adjustable Frame will pop up. Locate it on the screen you want to take a snapshot. After locating it, you can edit the tool by clicking the software's Editing Tools before saving it.
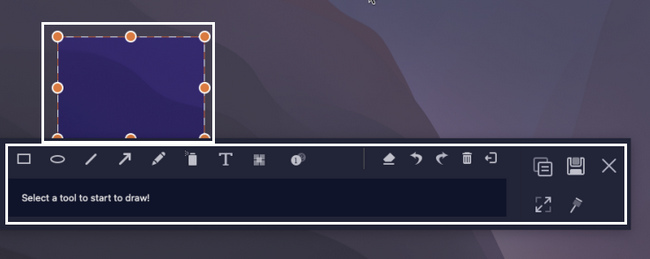
Step 5Editing your picture can add designs to it. If the edit already satisfies you, click the Save icon of the software and save it to any device folder you prefer.
FoneLab Screen Recorder allows you to capture video, audio, online tutorial, etc on Windows/Mac, and you can easily customize size, edit the video or audio, and more.
- Record video, audio, webcam and take screenshots on Windows/Mac.
- Preview data before saving.
- It is safe and easy to use.
Part 2. How to Screenshot on MacBook with Screenshot Bar
This method is one of the easiest ways to screenshot MacBook. It is easy to access because you can find it quickly. It allows you to select the type of screenshot you need to use. You can choose to screenshot the whole screen in one snap. However, you can also screenshot only a portion of the screen, depending on your preference. After that screenshotting process, it has features that you can use to edit your pictures. It is way better because you do not need to download any editing software to do it. So, you can save some of the device storage because of this.
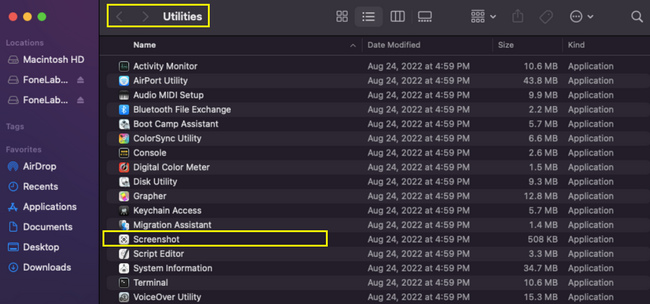
Step 1It would be best to locate the Finder section at the top of the screen. Click the Go button. On the Drop Down section of it, click the Cross Tools icon for utilities to locate the screenshot tool of the device.
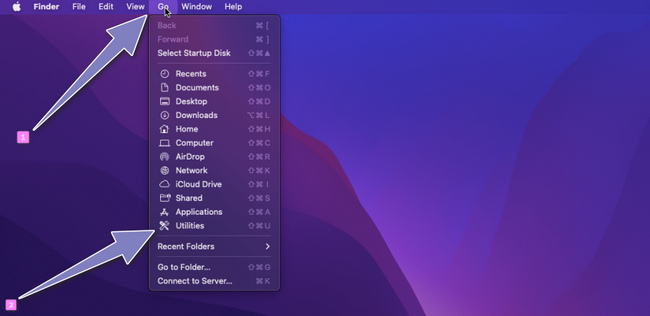
Step 2The Utility section will pop up on the device screen and locate the Screenshot Tool. Launch it, and the tool and its features appear on the screen.
Note: If you cannot locate the screenshot tool on the Finder. You can press the Comman+Shift+5 to launch it.
Step 3You will see the screenshot feature you can use using the screenshot tool. Click the First Box from the left to screenshot the whole screen of your Mac. On the other hand, click the Second Box to capture a portion of the screen.

Step 4Look for the screenshot image. You can see it on the device's desktop. Click it and press the Save icon to save it on your Mac.
Part 3. How to Screenshot on MacBook via Shortcuts
The keyboard of your device is not only used for typing. It can also perform functions for your devices quickly, like taking a screenshot on a MacBook Air or other models. Shortcut keys are the most effective and quick ways to accomplish a screenshot. By memorizing these shortcut keys, you will not need to download any software or look for the screenshot tool of the device. However, pressing the wrong shortcut keys can lead to bad results. There are instances when you can accidentally delete your files instead of only taking screenshots. It has many shortcut keys, and you need to ensure that the one you are performing is the correct key. If you need help with the screenshot shortcut key you will use, here is the guide below to not achieve the wrong functions.
Step 1Look for the shortcut keys you need. Too much pressing of some keyboard keys can give you different results. Afterward, press the Comman+Shit+3 keys on your keyboard.
Step 2The device will screenshot the whole screen. You can locate the image on the device screen of it. Click it and press the Save button on the picture.
FoneLab Screen Recorder allows you to capture video, audio, online tutorial, etc on Windows/Mac, and you can easily customize size, edit the video or audio, and more.
- Record video, audio, webcam and take screenshots on Windows/Mac.
- Preview data before saving.
- It is safe and easy to use.
Part 4. FAQs Finding the Screenshots
1. Where are my screenshots saved?
The images you screenshot must be in one of your folders. You can locate the pictures in the Screenshot folder of your Mac.
2. Why can't I find my screenshots on my MacBook air?
There are tendencies that the screenshot method you use could not be successful. You can do it again. Once you cannot still find the screenshot, you can look for it on the desktop folders of the Mac device or do that again to affirm the folder on your Mac.
3. Why is the screenshot on the MacBook pro not working?
Maximum storage may be one of the reasons the screenshot on your device is not functioning. You can delete some of the unimportant files or move them to your iCloud or anywhere. Sometimes, it is because of human error, like pressing the wrong keys or buttons. In this case, you can repeat the process.
FoneLab Screen Recorder allows you to capture video, audio, online tutorial, etc on Windows/Mac, and you can easily customize size, edit the video or audio, and more.
- Record video, audio, webcam and take screenshots on Windows/Mac.
- Preview data before saving.
- It is safe and easy to use.
Performing these methods does not require any professional skills. Consider these excellent and easy ways to achieve the best outcome in screenshotting your Mac. This article includes the reliable software for taking snapshots, the FoneLab Snapshot Tool. Experience these ultimate methods with the best results for taking screenshots of MacBook pro and other devices.