Recover the lost/deleted data from computer, hard drive, flash drive, memory card, digital camera and more.
Best Ways to Fix Why is Screenshot Not Working on Mac like a Pro
 Posted by Lisa Ou / Nov 05, 2021 16:00
Apple has successfully provided the most convenient way for taking screenshots specifically on Mac. Screenshot now is a built-in feature of macOS, with which you don't need another program for you to capture your mac screen. However, at times, there are still users that have been struggling and complaining about being unable to take screenshots with their Mac. The usual problem that they've encountered is Screenshot on Mac Not Working. If you're one of those who wants to fix this type of issue, reading this article can help you a lot.


Guide List
1. Why Screenshot on Mac Not Working
Apple’s Mac has been popular these days particularly for those who are into the products of Apple. Yet, there are still users that are having problems with this product. And, the most common line that we hear from them is “Why is my screenshot not working on Mac?”. So definitely there are root causes for this problem. Below are the lists of reasons why screenshot is not working on your Mac.
- Screenshot not working on your Mac may be a result of the keyboard experiencing momentary unresponsiveness. Or there is also a problem with your keyboard shortcuts.
- Another reason is you have changed the screenshots location where it will be saved. So, you can hear the shutter sound whenever you do screenshots but you cannot see where the images have been placed.
- And, there may be bugs or viruses on your Mac that is why you struggled to capture your screen, and also why the screenshot is not working.
FoneLab Screen Recorder allows you to capture video, audio, online tutorial, etc on Windows/Mac, and you can easily customize size, edit the video or audio, and more.
- Record video, audio, webcam and take screenshots on Windows/Mac.
- Preview data before saving.
- It is safe and easy to use.
2. How to Fix Screenshot on Mac Not Working
As stated in the previous part, there are various reasons why sometimes Screenshot on Mac Not Working. So now, we will give you solutions and procedures on how to work out the problem with your Mac, most specifically in taking screenshots using it.
Restart the Mac
One of the first ways that you can try to fix a screenshot not working is to restart your Mac. For this will help you clear and clean up the issue. There are three ways to execute restarting:
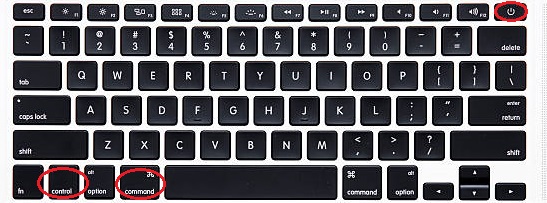
Option 1. Press Power button or Control+Eject, click the Restart button when a dialog box appears.
Option 2. Select Apple key, and then click the Restart.
Option 3. Press Control + Command + Eject or Control + Command + Power. If it works for you, that’s good. If not, try the next solution.
Restart Mac in Safe Mode
Be mindful that Safe Mode on your Mac is one of the many ways to stop running certain applications to view and confirm if the problem in the screenshot is because of the installed program.
Steps to restart your Mac in Safe Mode:
Step 1Restart your Mac, then press and hold the Shift key promptly.
Step 2Once you see the login window, release the key. Then, it will ask you to login your account twice.
Step 3Finally, try taking a screenshot, if it works then the problem has been solved.
Check the keyboard shortcuts for screenshots
These keyboard settings are by default. And, it may have been set to other combinations or it is also possible that they have been switched off or disabled. To fix this, enable them from the System Preferences. If they were already enabled, disable them then, enable them again. Below are the steps on how to check and re-enable keyboard shortcuts.
Step 1Select Apple Menu, then System, after that click Keyboard, then shortcuts, and finally Screenshots.
Step 2Choose the shortcut you want to enable again through checking the box. Then, close the window.
Update the macOS
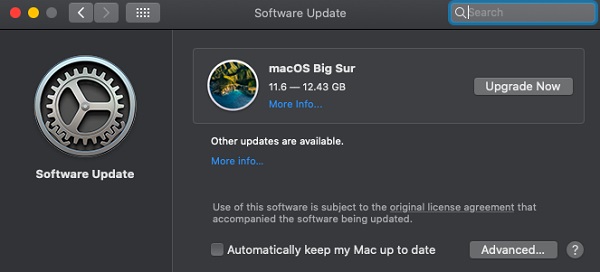
The operating system of your Mac may be not up to date, that is why you’re struggling to take screenshots.
Steps to update your macOS to the latest version:
Step 1To your Apple Menu, click About This Mac, then to Software Update, check if there are software updates available that need to be downloaded.
Step 2Then choose Apple Menu, then click App Store, lastly Updates to update the downloaded software from the Apple Store.
Check the folder where the images are located
To fix the issue you can also try to locate the screenshot photos that will be saved. Normally, the file will be automatically saved to Mac Desktop. But you can change its location by Screenshot then to Option. Paste the screenshots to the location where you want it to be placed. And, it will be easier for you to find screenshots.
Show filename extensions
Filename extensions may be hidden that’s why you are unable to view the image that you had screenshot. So, you can try the steps below and it will help you see all filename extensions.
Steps on How to Show Filename Extensions:
Step 1Go to your Mac’s Finder click Preferences.
Step 2Then finally fill the box with check that said “Show all filename extensions”.

Reset the NVRAM
NVRAM or nonvolatile random-access memory is a computer memory that stores certain settings. Resetting it at times can settle issues. And, one of them is to fix a screenshot that is not working on your Mac.
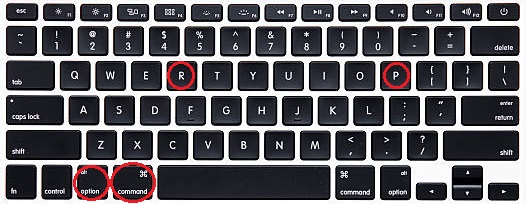
Steps on how to reset NVRAM:
Step 1Go to the Apple menu then click Shutdown to turn off your Mac.
Step 2Upon hearing the start-up sound, press and hold Option + Command + P + R on your keyboard for about 20 seconds. Then, finally release it.
Retrieve Lost Screenshots
There are also reasons why your screenshots are lost or hidden. So, you may need a tool to retrieve them. You can try FoneLab Data Retriever on Mac that examines your computer and you can use it to ensure that the screenshots are still present. With one simple click, you can recover images from your computer.

FoneLab Screen Recorder allows you to capture video, audio, online tutorial, etc on Windows/Mac, and you can easily customize size, edit the video or audio, and more.
- Record video, audio, webcam and take screenshots on Windows/Mac.
- Preview data before saving.
- It is safe and easy to use.
3. Alternatives to Screenshot on Mac
Looking for ways on how to screenshot on Mac correctly and effectively using tools, keyboards and more? If yes, you can continue reading this part to learn how to screenshot on your Mac. But this time, we will tell you how to screenshot using different methods on capturing your screen. Including FoneLab Screen Recorder, Snipping Tool, and Keyboard Buttons.
Mac FoneLab Screen Recorder
The first on the list is Mac FoneLab Screen Recorder. As its name implies, this application program allows you to record your screen, audio, virtual meetings, online tutorial, webcam, including taking screenshots and a lot more on your computer.
Mac FoneLab Screen Recorder is a program that allows you to capture video, take high-quality pictures and edit them using its built-in editing and customizing tools along with customizing the recording size. Not only that, you can also record solely the video without the audio or include audio if you want. One of its remarkable advantages is that it hides the desktop taskbar upon recording. In our case, it can be excellently used to screenshot on Mac correctly and effectively. Whether what operating system your device has, this software is fit for you. That is why Mac FoneLab Screen Recorder is highly recommended to you.
Steps on How to Screenshot on Mac using FoneLab Screen Recording:
Step 1First and foremost, go to the official website of FoneLab Screen Recorder, then click Download from the main page to download FoneLab Screen Recorder.

Step 2Next, open the installer of the app. From the dialog box, drag the app’s icon to the Applications folder to successfully install it on your Mac.
Step 3After that, launch the software to have access to its functionality. On the main interface, click the Camera icon on the top right corner. Then, drag the pointer to the area where you want to screenshot.
Step 4Lastly, to save it on your device, click the Save button and locate the folder on your computer.
Mac Snagit (Snipping Tool)
Snagit is a program that offers a complete tool for screen capture and video recording on Windows and Mac. Also, it allows you to capture your whole screen, add additional context, save the snip, and you can freely and easily share it with your workmates.
Steps on How to Screenshot on Mac using Snagit:
Step 1First of all, go to the main page of Snagit and then, click the Free Trial. After that, click the Mac Download.
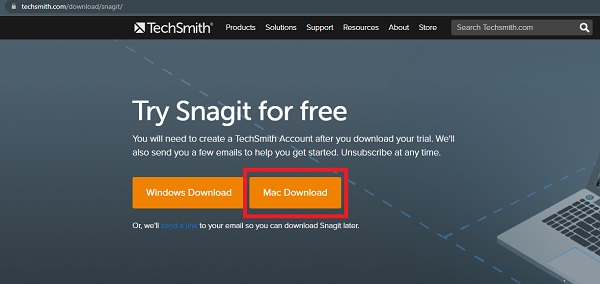
Step 2Next, click the red button at the upper left of the interface to select the part of your screen that you want to be captured.
Step 3Finally, after selecting, click the Camera icon on the right lower part of the application’s main interface. And, then you’re done!
Keyboard Buttons
Without downloading a program, Mac has made it easy and simple to take a screenshot just by keyboard buttons. These keyboard buttons or keyboard shortcuts enable you to capture your entire screen, a window, or just a part of your screen.
Ways on How to Take a Screenshot on Mac using Keyboard Buttons:
Steps on How Screenshot the Entire Screen
Step 1To take a screenshot press and hold Command+Shift+3 together.
Step 2Then, if you see a thumbnail on the right corner, wait for that to be saved or click the screenshot to edit it. It will be automatically saved to your Desktop as PNG file.
Steps on How to Screenshot Portion of the Screen
Step 1To capture only a portion of your screen press and hold these keys together, Command+Shift+4. Then, you’ll see the crosshair.
Step 2Then, drag the crosshair to select an area to screenshot.
Steps on How to Screenshot Menu or Window
Step 1Open the window that you want to capture, then press and hold these three keys together Command+Shift+4 and then tap the SpaceBar.
Step 2Afterwards, the cursor will change to a Camera icon. Then, click the menu or window that you want to be captured.
4. Where to Find Screenshots on Mac
Where do we find screenshots on Mac? By default, screenshots on Mac are usually saved on the Desktop with the name “Screenshot [date] at [time].png”. Search them on the Desktop file to verify if they’re really saved on your Mac. But you can locate them in other places or folders where you can easily find them. on the Desktop by default.
5. FAQs about How to Screenshot on Mac
1. Does screenshot on Mac reduce its quality of the screen?
Doing a screenshot on your Mac does not reduce the quality of your screenshot. The resolution of the screenshot output will depend on the resolution of the screen your Mac has. But, if you want a tool to enhance your screenshot, you can use the FoneLab Screen Recorder to do it.
2. Can I edit the screenshot on Mac?
Absolutely, yes. Right after you screenshot on Mac and click the picture, it will give you a tab where you are allowed to add shapes, annotate, highlight selection, sign, border, fill color, and text style.
3. How to save a screenshot on Mac?
When you do a screenshot on Mac, it will be automatically saved on your Mac storage. Specifically on the Finders on the desktop area.
To end this article with a blast, taking screenshots is indeed an important part of our routine these days. For we are sharing funny photos with our family and friends, saving notes, and information. On that note, you should choose the best for your screenshot task. However, among the articles mentioned above FoneLab Screen Recorder is the best tool for you. Download and give it a try now!
FoneLab Screen Recorder allows you to capture video, audio, online tutorial, etc on Windows/Mac, and you can easily customize size, edit the video or audio, and more.
- Record video, audio, webcam and take screenshots on Windows/Mac.
- Preview data before saving.
- It is safe and easy to use.