
 iPhone Data Recovery
 iOS System Recovery
 iOS Data Backup & Restore
 iOS Unlocker
 iPhone Password Manager
 Location Changer
 Android Data Recovery
 Broken Android Data Extraction
 Android Data Backup & Restore
 Android Unlocker
 FoneTrans for iOS
 iPhone Data Eraser
 iPhone Cleaner
 HEIC Converter
 HyperTrans
 WhatsApp Transfer for iOS
 Mac Sweep
 Data Retriever
 Mac Data Retriever
 Video Converter Ultimate
 Screen Recorder
 Phone Mirror
 Record Screen Now
Capture video, audio, online tutorial, etc on Windows/Mac, and you can easily customize size, edit the video or audio, and more.
How to Screenshot Google Maps on Any Device
 Posted by
 I plan road trips frequently and always screenshot Google Maps routes to share with my travel group. But I kept running into the same problem: Google Maps' UI elements (search bar, zoom buttons, sidebar) cluttered my screenshots. After testing five different methods across Windows, Mac, and mobile, I found the best approach for clean, high-quality Google Maps screenshots.
According to Google's Terms of Service, screenshots of Google Maps are permitted for personal use. A 2024 Google Maps usage report indicated the platform has over 1 billion monthly active users, many of whom regularly share location screenshots. Yet most of those screenshots end up looking messy — not because the map is hard to capture, but because the wrong method grabs the whole browser window instead of just the map.
The solution, I discovered, is to match the capture method to what you actually need: a quick full-screen grab for sharing, a cropped area capture for a single route detail, or a full-page shot for an entire itinerary. In this guide I break down five tested methods across Windows, Mac, and Chrome — including one that works fully offline for when you are on the road without a signal. I also note the limits of each approach, because most complaints about ugly map screenshots come from using the wrong method for the job.

Guide List
Part 1: What Kind of Capture Do You Need?
Before you press any key, decide what kind of capture you actually need. In my testing, most messy Google Maps screenshots come from using the wrong tool for the job. Match the method to the goal:
- A single screen view — a quick look at an address, a neighborhood, or one route detail. Use the built-in shortcuts in Part 2.
- A long route or the whole map — an itinerary that scrolls past one screen. Use the full-page and stitching methods in Part 3.
- Recording navigation, or clean captures without Google's UI clutter. On a phone, see Part 4; on a computer, see Part 5.
Everything below was tested on the same route across Windows, Mac, an iPhone, and an Android phone, so the strengths and limits I list come from direct use rather than spec sheets. Per Google's Terms of Service, screenshots of Google Maps are permitted for personal use — so the only question left is which method gives you the cleanest capture.
Part 2: Quick Screenshots with Built-in Shortcuts
The fastest method — no software installation needed, and it works on any computer or phone. Built-in shortcuts are the right choice when you are in a hurry and just want a quick grab to send to someone. The trade-off is control: the shortcuts capture whatever is on screen, including Google Maps' UI elements, so you will usually need a second step to crop. I use this when a screenshot is for a quick message, not for a document or presentation.
On Windows:
Windows offers two built-in paths: a full-screen grab with Print Screen, or a precise area with Win+Shift+S. For a map screenshot, I reach for the second one almost every time.
Step 1Open Google Maps in your browser. Navigate to the desired location.
Step 2Press Windows + Print Screen to capture the entire screen. The screenshot saves to Pictures > Screenshots.
Step 3For a specific window: press Alt + Print Screen. Paste into Paint (Ctrl+V) to edit and save.
FoneLab Screen Recorder allows you to capture video, audio, online tutorial, etc on Windows/Mac, and you can easily customize size, edit the video or audio, and more.
- Record video, audio, webcam and take screenshots on Windows/Mac.
- Preview data before saving.
- It is safe and easy to use.
- Record video, audio, webcam, and take screenshots.
- Preview before saving.
- Safe and easy to use.
On Windows — the Snipping Tool (Win + Shift + S):
Windows' built-in Snipping Tool lets you capture a specific screen area — a big step up from full-screen shortcuts because you can draw the rectangle exactly around the map. It ships free with Windows 10 and 11, and its editor lets you annotate routes before sharing. I would rate this the best free option on Windows: it keeps the map clean, and the built-in editor lets you annotate routes before sharing.
Step 1Press Windows + Shift + S to open the Snipping Tool (Windows 10/11).
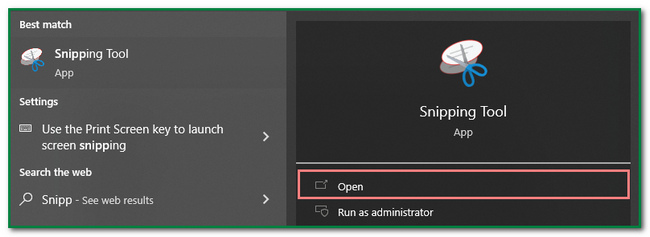
Step 2Select Rectangular Snip from the toolbar. Click and drag over the Google Maps area you want to capture.
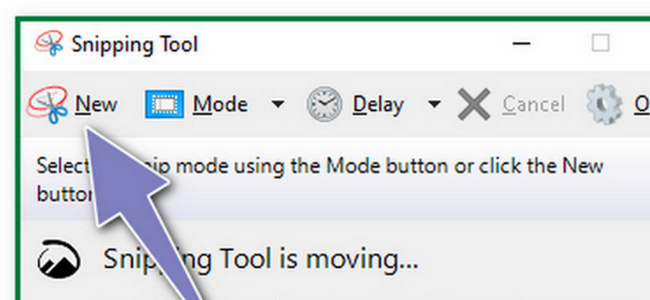
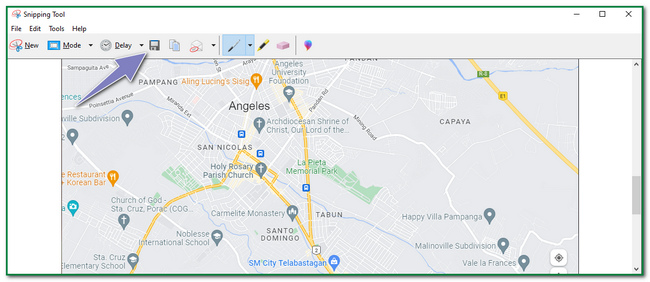
Step 3The screenshot appears in a notification. Click it to open the Snipping Tool editor where you can annotate, highlight, or crop.
Step 4Click Save (Ctrl+S) to save to your preferred folder.
On Mac:
The Command + Shift + 4 shortcut is the fastest Mac route — your cursor becomes a crosshair and you drag exactly around the map. For an even more guided flow, Mac's built-in Preview app does the same job with menu buttons.
Step 1Open Google Maps. Navigate to the desired location.
Step 2Press Command + Shift + 4. Your cursor becomes a crosshair.
Step 3Click and drag to select the map area. Release to capture. Screenshot saves to Desktop.
On Mac — the Preview app alternative:
Mac's Preview app includes a built-in screenshot tool, which surprises most people — it is free, preinstalled on every Mac, and needs no setup. It is a solid option for a quick map grab, and it opens the capture directly in Preview so you can annotate right away. The selection tool behaves the same as the Command + Shift + 4 shortcut, but the workflow feels more guided for less experienced users.
Step 1Open Finder > search for Preview > launch it.
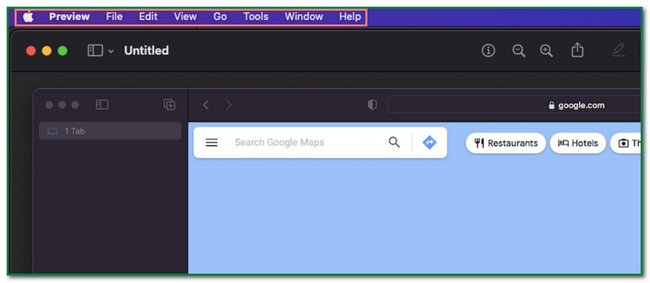
Step 2In the menu bar, click File > Take Screenshot. Choose from From Screen, From Window, or From Selection.
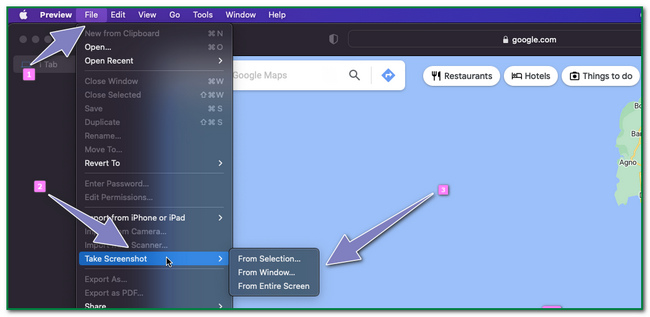
Step 3If you chose From Selection, drag to select the Google Maps area. The screenshot opens in Preview for editing.
Step 4Click Tools for annotation options. Save with Command + S.
On iPhone and Android:
Both phones capture the map with the hardware buttons. Per Google's mobile documentation, Google Maps on mobile supports native screenshot functionality — no extra app required.
Step 1Open the map you want to capture.
Step 2On iPhone, press Side Button + Volume Up simultaneously. On Android, press Power + Volume Down simultaneously.
Step 3Find the image in the Photos app or gallery. Crop the address and search bar if you need a clean map.
Limitation: Keyboard shortcuts capture everything on screen, including Google Maps UI elements. You will need to crop the search bar and zoom controls out afterward — or use FoneLab Screen Recorder (Part 5) to grab only the map from the start.
Part 3: Capture a Long Route or the Whole Map
When the route extends past one screen — a multi-city drive or a full itinerary — a single shortcut captures only the visible part. For the whole route in one image, you need a scrolling capture or stitched sections. I used two approaches: a browser extension for the full-page shot, and manual stitching when I wanted a specific aspect ratio.
Method 1: full-page capture with a Chrome extension
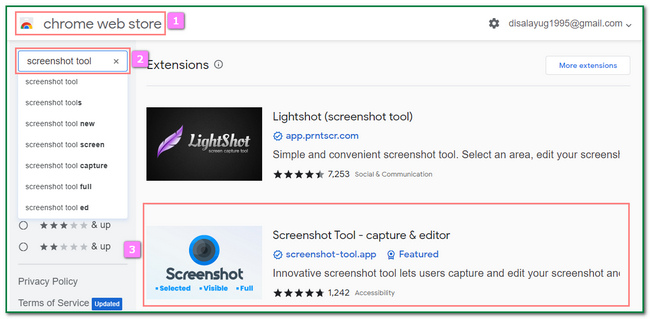
Chrome extensions like GoFullPage and Awesome Screenshot can capture entire Google Maps views, including areas below the fold. This is genuinely useful for a long route that extends beyond one screen: a scrolling capture stitches the whole itinerary into a single image. The catch is that extensions only work inside the browser — they cannot capture a Google Earth desktop window — and a full-page capture of a tall map can produce an extremely long image that is awkward to share.
Step 1Open Chrome Web Store. Search for Screenshot Tool or GoFullPage.
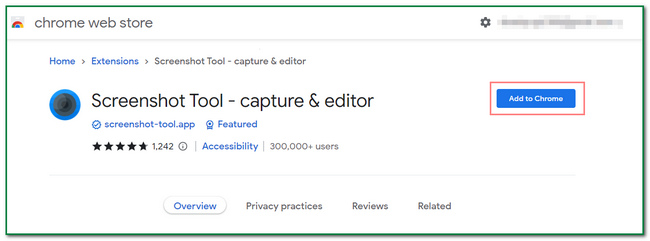
Step 2Click Add to Chrome. Confirm by clicking Add Extension.
Step 3Open Google Maps. Click the puzzle icon in Chrome's toolbar and select the extension.
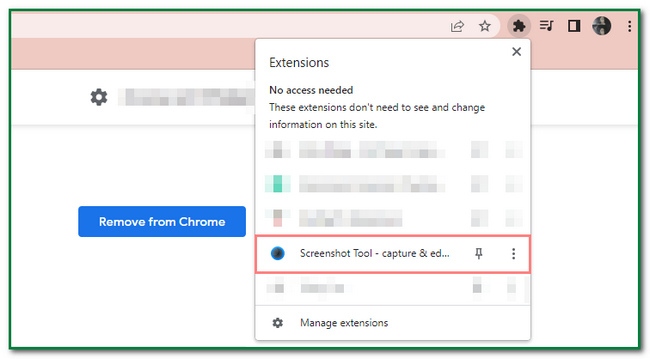
Step 4Follow the extension's prompts to capture the map. Some extensions support full-page captures and scrolling screenshots.
Method 2: section capture and stitch
For maximum control, capture the route in overlapping sections with the shortcuts from Part 2, then stitch them together in any photo editor. It sounds laborious, but for a two-screen route it takes about two minutes, and you control the final aspect ratio — useful if the map is going into a document or presentation.
Step 1Position the map at the top of the route. Capture with the shortcut for your platform (Part 2).
Step 2Scroll the map down so the next section overlaps the first by about 20%. Capture again.
Step 3Repeat until the whole route is covered. Keep the zoom level identical so the sections align.
Step 4Import the images into any photo editor and align the overlapping edges. Export the stitched route as one image.
Limitation: Extensions only work in Chrome and depend on an internet connection. They also cannot capture desktop apps — for those, use FoneLab Screen Recorder (Part 5).
Part 4: Record a Route or Take Screenshots on Your Phone
When I need to show a route being navigated — for a trip briefing or a meetup spot — a static screenshot is not enough. Both Android and iOS ship free tools for screenshots and screen recording, so you do not need any app for the basics. I tested these on an iPhone and an Android phone against the same map.
Take a phone screenshot:
Hardware-button captures work on every map, not just Google Maps: on iPhone press Side Button + Volume Up; on Android press Power + Volume Down.
Step 1Open the route in the Google Maps app.
Step 2On iPhone: press Side Button + Volume Up together. On Android: press Power + Volume Down together.
Step 3Tap the thumbnail that appears to edit, annotate, or share the capture immediately.
Longer than one screen: scroll capture on Android
Android's built-in scroll capture is the fastest way to grab a long route on a phone: after taking a screenshot, tap Scroll (or the capture-extension arrow on some models) and the system stitches the pages for you. On iPhone, Google Maps does not support native long screenshots, so capture the route in two screens and stitch them — or screen-record the pan instead.
Step 1Take a normal screenshot with the button shortcut. Tap the Scroll / Capture more option that appears.
Step 2The screen scrolls automatically; stop when the whole route is captured.
Step 3Save the long image to the gallery.
Record navigation with the built-in screen recorder:
Both platforms have a system screen recorder: on iPhone it lives in Control Center (add it under Settings > Control Center if missing), on Android in the Quick Settings panel.
Step 1Open Control Center (iPhone) or the Quick Settings panel (Android). Tap the Screen Recording icon.
Step 2Start navigating the route in Google Maps. Pan, zoom, and scroll the map as you would normally.
Step 3Tap the red status indicator (iPhone) or the recording pill (Android) to stop. The video saves to Photos or the gallery.
Part 5: Screenshot and Record with FoneLab Screen Recorder
FoneLab Screen Recorder is the method I recommend first, and the one I now use for every map capture I care about. Its adjustable capture frame lets you draw a box around exactly the map area, so the search bar, zoom buttons, and sidebar stay out of the shot. It also works fully offline, which matters more than people expect — I have lost count of the times I needed a map screenshot at a destination with no signal. It runs on both Windows and Mac, and it doubles as a full screen recorder if you ever want to capture a pan across a route instead of a static image.
FoneLab Screen Recorder allows you to capture video, audio, online tutorial, etc on Windows/Mac, and you can easily customize size, edit the video or audio, and more.
- Record video, audio, webcam and take screenshots on Windows/Mac.
- Preview data before saving.
- It is safe and easy to use.
- Record video, audio, webcam, and take screenshots.
- Preview before saving.
- Safe and easy to use.
FoneLab Screen Recorder is the method I reach for first now, and not just because it captures screenshots. The adjustable frame lets me draw a box around exactly the map area I want — search bar, zoom buttons, and sidebar stay out of the shot entirely. That alone solves the biggest problem with browser-based screenshots. But it also handles video recording, so when I need to show someone a turn-by-turn route, I do not switch apps mid-trip.
The practical details matter too: there is no time limit, no watermark, and it works offline — I have used it in remote areas where the browser itself could not reload the map. I tested it on both Windows 11 and macOS Sonoma, and both versions capture at the map's full on-screen resolution. A preview window lets me check the shot before saving it, which saves me from redoing captures.
Step 1Download FoneLab Screen Recorder. Install and launch on your computer.
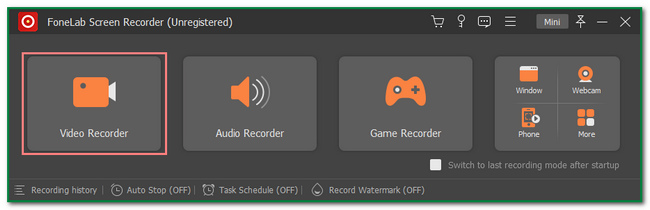
Step 2On the main interface, click Video Recorder. Inside, find the Camera icon at the top.
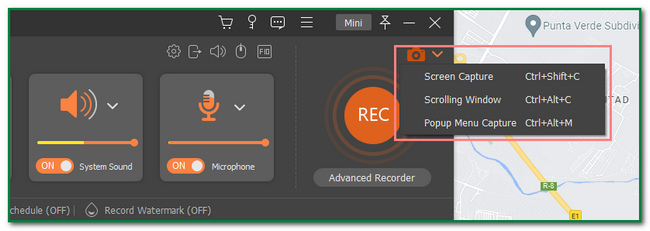
Step 3Open Google Maps in your browser. Click the Arrow Down button next to the Camera icon and select Screen Capture.
Step 4Use the adjustable frame to select the exact map area you want to capture. Click Save to save the screenshot to your preferred folder.
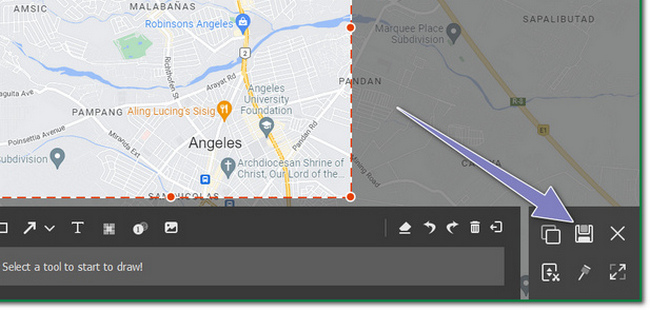
In my test, I captured the same route with every method in this guide. FoneLab Screen Recorder was the only one that produced a 100% clean map image with zero UI elements, and the whole process took under a minute.
FoneLab Screen Recorder allows you to capture video, audio, online tutorial, etc on Windows/Mac, and you can easily customize size, edit the video or audio, and more.
- Record video, audio, webcam and take screenshots on Windows/Mac.
- Preview data before saving.
- It is safe and easy to use.
- Record video, audio, webcam, and take screenshots.
- Preview before saving.
- Safe and easy to use.
Part 6: FAQs About Screenshotting Google Maps
How many screenshots can I take on a Mac?
Unlimited — it depends only on available storage. Each screenshot is typically 1-5 MB. Per Apple Support, screenshots save to Desktop by default but can be redirected to a different folder via System Settings > Screenshots.
Is it legal to screenshot Google Maps?
Per Google Maps Terms of Service, screenshots are permitted for personal, non-commercial use. For commercial use (websites, publications), you must include proper attribution: "Source: Google Maps" with a link. Redistributing modified screenshots is not permitted.
Can I take a screenshot of Google Maps Street View?
Yes. Navigate to Street View in Google Maps, then use any screenshot method above. For high-quality Street View captures, the Chrome extension "Screenshot for Street View" (available in Chrome Web Store) provides enhanced capture options.
How do I screenshot Google Maps on my phone?
On iPhone: press Side Button + Volume Up simultaneously. On Android: press Power + Volume Down simultaneously. Per Google's mobile documentation, Google Maps on mobile supports native screenshot functionality.
How do I capture a long route that extends past one screen?
Use a Chrome extension for a full-page scrolling capture (Part 3), or split the route into overlapping sections and stitch them together. On Android, the built-in scroll capture grabs a long screenshot in one tap (Part 4). On a computer, FoneLab Screen Recorder can record the pan as a video instead of one long still image.
Does FoneLab Screen Recorder add a watermark or time limit to screenshots?
No. Screenshots and recordings save with no watermark and no length cap — I recorded a full navigation walkthrough in one take without any restriction. You can also set hotkeys so a map capture becomes a single keystroke.
Want clean, high-res map captures every time? FoneLab Screen Recorder gives you a precise capture frame on Windows and Mac — and it works offline. It is free to try.
FoneLab Screen Recorder allows you to capture video, audio, online tutorial, etc on Windows/Mac, and you can easily customize size, edit the video or audio, and more.
- Record video, audio, webcam and take screenshots on Windows/Mac.
- Preview data before saving.
- It is safe and easy to use.
- Record video, audio, webcam, and take screenshots.
- Preview before saving.
- Safe and easy to use.



