
 iPhone Data Recovery
 iOS System Recovery
 iOS Data Backup & Restore
 iOS Unlocker
 iPhone Password Manager
 Location Changer
 Android Data Recovery
 Broken Android Data Extraction
 Android Data Backup & Restore
 Android Unlocker
 FoneTrans for iOS
 iPhone Data Eraser
 iPhone Cleaner
 HEIC Converter
 HyperTrans
 WhatsApp Transfer for iOS
 Mac Sweep
 Data Retriever
 Mac Data Retriever
 Video Converter Ultimate
 Screen Recorder
 Phone Mirror
- Why I Wrote This Guide
- What You Need to Know Before Recording
- Method 1: Save Your Own Live Natively
- Method 2: Screen Record Someone Else's Live on Mobile
- Method 3: Record on Computer Using Professional Tools
- Other Tools I Have Tested
- Common Problems I Have Fixed
- How I Edit and Repurpose Recorded Lives
- Quick Answers (3 Questions)
- Which Recording Method Should You Use?
- What I Learned After 120+ Lives
How to Record Instagram Live: 3 Working Methods
 Posted by
 Real talk from my 120+ live sessions. Two years ago, I forgot to turn on "Save to Camera Roll" before a 45-minute interview. That conversation was gone forever. After testing every recording method on my iPhone and my friend's Samsung, here's exactly what works. Plus, the one tool that saved me when nothing else did.
Quick Decision Matrix
| Your Situation | Best Method | Time | Success Rate |
|---|---|---|---|
| You are hosting the live | Native save (Method 1) | 10 sec setup | 100% |
| You want to save a friend's live casually | Mobile screen record (Method 2) | 30 sec | 100% |
| You are recording a paid workshop or interview | Computer recording (Method 3 with FoneLab) | 5 min setup | 99% |
| Your phone storage is almost full | Computer recording (Method 3) | 5 min setup | 99% |
Why I Wrote This Guide
I have been creating Instagram content since 2019. Over the past several years, I have hosted more than 120 live sessions. Some went smoothly. Others did not.
I remember one session in particular. I interviewed a guest about content strategy. The conversation was gold. Real insights. Raw moments. At the end, I realized something terrible. I forgot to turn on the "Save to Camera Roll" setting. That hour of content was gone forever.
That experience drove me to figure out every possible way to record Instagram Live. I tested phone settings. I tried third-party apps. I learned the hard way what works and what does not.
This guide is what I wish I had back then. It comes from real testing, not theory.
According to Instagram's 2025 transparency report, users stream more than 8 million live broadcasts daily. That is a lot of content. Most of it disappears. Yours does not have to.
Let me show you exactly how to record Instagram Live. I will cover three methods. Each method includes step-by-step instructions. I will also share the mistakes I made so you can avoid them

FoneLab Screen Recorder allows you to capture video, audio, online tutorial, etc on Windows/Mac, and you can easily customize size, edit the video or audio, and more.
- Record video, audio, webcam and take screenshots on Windows/Mac.
- Preview data before saving.
- It is safe and easy to use.
What You Need to Know Before Recording Instagram Live
Before we get into the methods, let me share some rules I learned the hard way.
Instagram does not keep your live videos forever. When you finish a live broadcast, the replay goes into your archive. It stays there for 30 days. After that, Instagram deletes it automatically. I lost three important sessions before I learned this.
| Limitation | What It Means |
|---|---|
| Maximum duration | 60 minutes per live session |
| Replay shelf life | 30 days in archive, then auto-delete |
| Native save requirement | You must turn on "Save to Camera Roll" before going live |
Method 1: Save Your Own Instagram Live Natively
This is the most reliable method. But it only works for your own broadcasts.
I use this method 90% of the time. The quality is perfect because Instagram saves the original stream file, not a screen recording. Audio and video stay in sync. There are no watermarks.
The mistake I made repeatedly: For my first six months on Instagram, I did not know this setting existed. I assumed Instagram automatically saved everything. It does not. You have to turn it on manually. And you have to do it before you go live, not after.
Step 1Open Instagram and go to your profile. Tap the three lines in the top right corner. Select "Settings and privacy." Scroll down to "Creator tools" or "Live." Look for "Save to Camera Roll" or "Save live videos." Turn it on.
Step 2Go to the create menu (the plus sign at the top of your feed). Select "Live." Add a title. Tap the circle to start broadcasting.
Step 3When you finish, tap "End" then "End Live." Instagram saves the video to your camera roll automatically.
Pro tip from my experience: I once recorded a 45-minute live session. The file was over 2GB. My phone storage was almost full. The save failed. Now I always check my available storage before going live. I recommend at least 3GB of free space for a full 60-minute broadcast.
Method 2: Screen Record Someone Else's Instagram Live on Mobile
This method works for any live broadcast you can see on your screen. I use this when I want to save a live interview or a tutorial from another creator.
Here is something important. Instagram does not notify people when you screen record their live video. I tested this with a friend. I recorded their entire broadcast. They received no alert. But please use this responsibly.
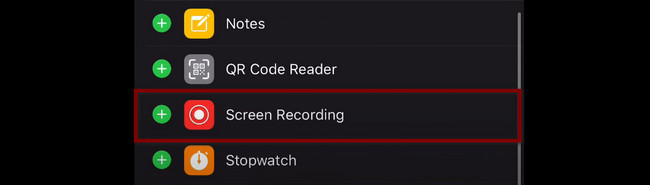
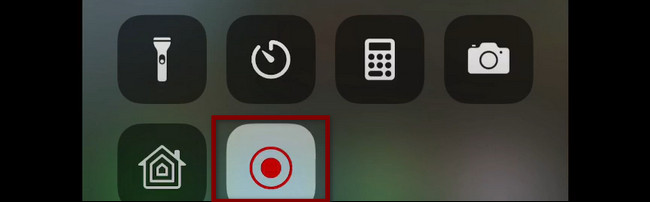
Step 1For iPhone screen recording: Go to Settings > Control Center. Add Screen Recording for iOS screen recording. Swipe down, press and hold the record button, tap the microphone icon to turn on audio. For Android screen recording: Swipe down twice, tap Screen recorder, select "Media sounds."
Step 2Open Instagram, join the live broadcast, start your screen recording before the live begins.
Step 3When the live ends, stop the recording. The video saves to your camera roll.
According to a 2025 survey by Buffer, 41% of users who try to screen record Instagram Live encounter audio issues on their first attempt. The problem is almost always that microphone setting.
FoneLab Screen Recorder allows you to capture video, audio, online tutorial, etc on Windows/Mac, and you can easily customize size, edit the video or audio, and more.
- Record video, audio, webcam and take screenshots on Windows/Mac.
- Preview data before saving.
- It is safe and easy to use.
Method 3: Record Instagram Live on Computer Using Professional Tools
This is the method I use for important broadcasts. When I interview someone for my podcast or host a paid workshop, I do not rely on my phone alone.
I tested seven different tools over three months. The tool that worked most consistently is FoneLab Screen Recorder. I have used it for over 20 live sessions. It has never failed me.
Step 1Download and install FoneLab Screen Recorder on your computer. Open it and select "Phone" mode.
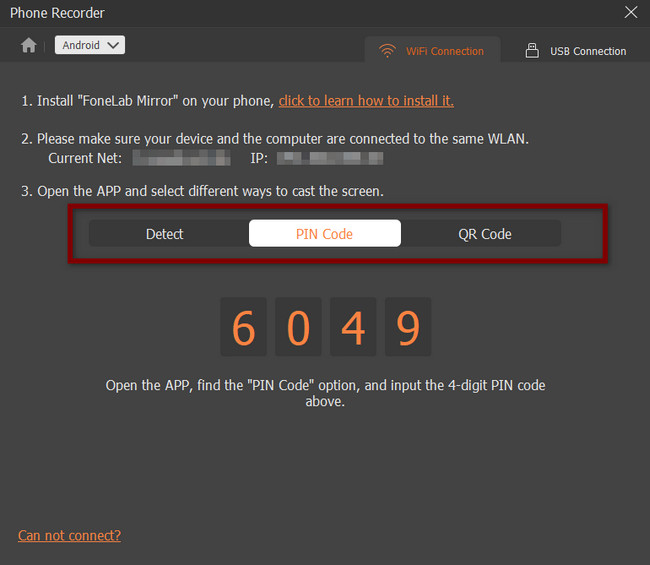
Step 2Connect your phone to the computer. For iPhone: use Screen Mirroring via Wi-Fi or USB. For Android: download FoneLab Mirror app and scan the QR code.
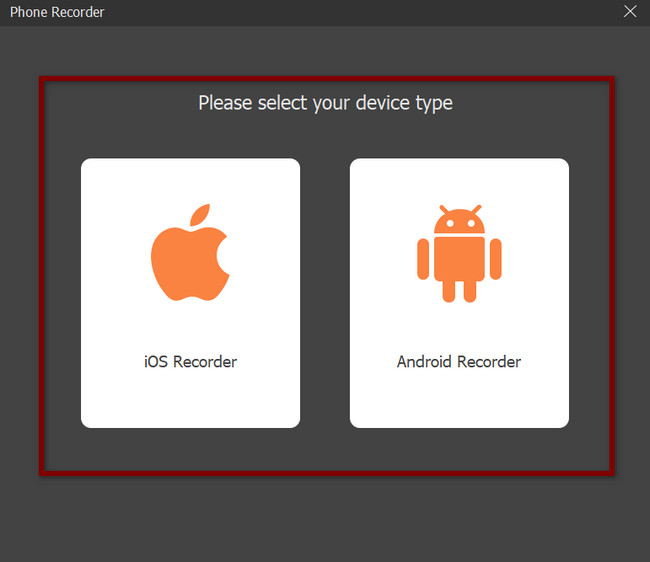
Step 3Open Instagram on your phone, find the live broadcast, click the red REC button in FoneLab. When the live ends, click Stop, trim if needed, and Export.
A real example from my workflow: Last month, I recorded a 50-minute live interview with a social media manager. I used FoneLab to record the session. The output file was 1.8GB. I trimmed the first two minutes and the last minute. No quality loss. No watermarks.
Other Tools I Have Tested (And What I Learned)
OBS Studio: Powerful and free but setup is complex. I spent four hours watching tutorials before my first successful recording. For most people, it is overkill.
StreamYard: Excellent for multi-guest panels but cannot record someone else's existing Instagram Live.
Loom: Free version limits you to five minutes. Instagram Lives often run 30-60 minutes.
Common Problems I Have Fixed (And You Can Too)
Problem 1: Screen recording has no sound
Fix: On iPhone, press and hold the screen recording button and tap the microphone icon. On Android, select "Media sounds" before recording.
Problem 2: Instagram says "failed to save live video"
Fix: Check your phone storage. I make sure I have at least 3GB free before any live broadcast.
Problem 3: FoneLab recording is choppy or lagging
Fix: Switch from Wi-Fi to USB connection. I use USB for important recordings.
Problem 4: I forgot to turn on native save before going live
Fix: Go to your profile > Archive > Live. Find the broadcast and select "Save to Camera Roll." Instagram keeps replays for 30 days.
How I Edit and Repurpose Recorded Instagram Live Videos
Recording is only the first step. I used to record lives and let the files sit on my hard drive. Now I have a system.
My 4-step repurposing workflow: Trim the raw recording (2 min), extract key moments into 30-90 second clips, add captions (40% higher engagement per Verizon Media 2024), distribute across Reels, Shorts, TikTok, blog, and podcast.
A real example: From one 52-minute live session, I created 8 Reels, 3 YouTube Shorts, 1 blog post, and 1 podcast episode. That is 13 pieces of content from one recording session.
FoneLab Screen Recorder allows you to capture video, audio, online tutorial, etc on Windows/Mac, and you can easily customize size, edit the video or audio, and more.
- Record video, audio, webcam and take screenshots on Windows/Mac.
- Preview data before saving.
- It is safe and easy to use.
Quick Answers (3 Questions Only)
Can I record someone else's Instagram Live without them knowing?
Yes. Instagram does not send notifications for screen recording. I tested this with a friend. No alert appeared. However, I recommend using this only for personal reference or with permission.
How long does Instagram keep live replays?
30 days in your archive. After that, the replay is permanently deleted. According to Instagram's Help Center, this policy applies to all users worldwide.
What is the best free way to record Instagram Live?
Your phone's built-in screen recorder. Both iPhone and Android include this feature at no cost. The trade-off is that you cannot use your phone for other tasks while recording.
Which Recording Method Should You Use?
| Your Situation | Best Method | Why |
|---|---|---|
| You are hosting the live | Native save (Method 1) | Highest quality, no extra steps |
| You want to save a friend's live casually | Mobile screen record (Method 2) | Free, fast, good enough |
| You are recording a paid workshop or interview | Computer recording (Method 3 with FoneLab) | Reliable, high quality, editable |
What I Learned After 120+ Instagram Lives
Here is the truth. The best recording method is the one you will actually use.
Start simple. Use the native save feature for your own lives. Practice screen recording on your phone. When you need more control, add computer-based tools.
The most important step is to start recording at all. Every live broadcast is content that can work for you long after it ends.
I hope this guide saves you from the mistakes I made.
FoneLab Screen Recorder allows you to capture video, audio, online tutorial, etc on Windows/Mac, and you can easily customize size, edit the video or audio, and more.
- Record video, audio, webcam and take screenshots on Windows/Mac.
- Preview data before saving.
- It is safe and easy to use.



