- Part 1. How to Take A Screenshot in Minecraft Using Shortcuts
- Part 2. How to Take A Screenshot in Minecraft with Its Built-in Tool
- Part 3. How to Take A Screenshot in Minecraft with FoneLab Screen Recorder
- Part 4. How to Take A Screenshot in Minecraft via Windows Snipping Tool
- Part 5. FAQs about Taking A Screenshot on Minecraft
4 Astonishing Methods How to Screenshot Minecraft Easily
 Posted by Lisa Ou / Feb 20, 2023 16:00
Minecraft is a sandbox game wherein you can create various three-dimensional designs. Your imagination, creativity, and other skills will improve once you play this game. For instance, you have been dreaming of a house since childhood. You can use this game to have the representation of the design you want. In this case, you can visualize what's in your imagination. What if you want to take a picture of it?

For this reason, you can learn to take Minecraft screenshots using the right tool. This post will let you choose among all the tools for taking screenshots. However, the most recommended software is the FoneLab Screen Recorder. Please scroll down below if you wish to know the 4 leading methods to screenshot Minecraft.

Guide List
- Part 1. How to Take A Screenshot in Minecraft Using Shortcuts
- Part 2. How to Take A Screenshot in Minecraft with Its Built-in Tool
- Part 3. How to Take A Screenshot in Minecraft with FoneLab Screen Recorder
- Part 4. How to Take A Screenshot in Minecraft via Windows Snipping Tool
- Part 5. FAQs about Taking A Screenshot on Minecraft
Part 1. How to Take A Screenshot in Minecraft Using Shortcuts
The fastest way to learn how to take a Minecraft screenshot is by using keyboard shortcuts. It is quick to perform because you will only use the keyboard. You do not have to click the computer mouse. However, this technique is quite dangerous if you are not knowledgeable about the different shortcuts. You can perform the wrong command and produce the worst results. To avoid that, you can read the list of the screenshot command keys below. Use the concrete and appropriate way for you.
Here is the list of the screenshot shortcut keys after you launch the Minecraft game:
- PrtScn
- Windows Logo Key + PrtScn keys
- Fn + Windows Logo Key + Space Bar keys
- Shift + Windows Logo Key + S keys
However, if you do not want to use them because you are knowledgeable enough, continue scrolling down. You will see many tools for taking screenshots.
Part 2. How to Take A Screenshot in Minecraft with Its Built-in Tool
Some players prefer to use their keyboards to screenshot their Minecraft game by pressing the F2 or FN+F2 keys. It is the standard key of the Minecraft built-in screenshot tool. However, some keyboards cannot screenshot screens because they are not working. Fortunately, there is nothing more than the most accessible tool aside from the built-in screenshot of Minecraft. It is very flexible because you can change the keyboard shortcut key to take a screenshot. Aside from that, you can access whatever game version you use. Thankfully, this article will guide you to learn how to screenshot in Minecraft by changing the keyboard shortcuts. Move on and perform the guide accordingly to have a smooth process.
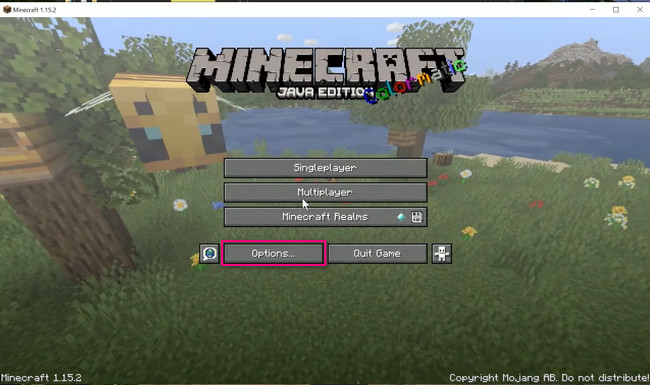
Step 1Launch Minecraft on your computer. After that, log in to the account you currently use and where you want to take the screenshot. Choose or click the Options button at the center of the main interface, and choose or click the Options button.
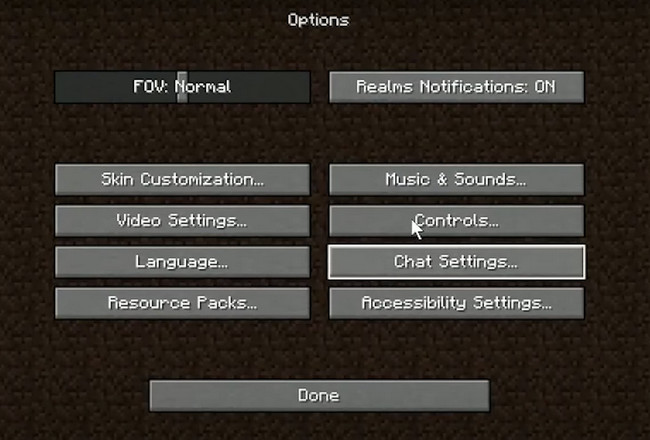
Step 2On the right side of the tool, choose the Controls button. After that, you will see the many options for the game.
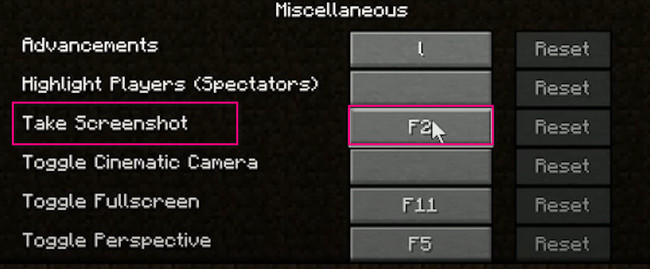
Step 3Scroll all way down to the bottom. After that, locate the Take Screenshot button. Click the F2 button, then change it to the key you want. Afterward, go to Minecraft and click the button you set up to take a screenshot.
If you find it hard to learn how to take a screenshot in Minecraft using it, you can use other methods. You can use the software below, the leading tool for taking screenshots. Move on.
Part 3. How to Take A Screenshot in Minecraft with FoneLab Screen Recorder
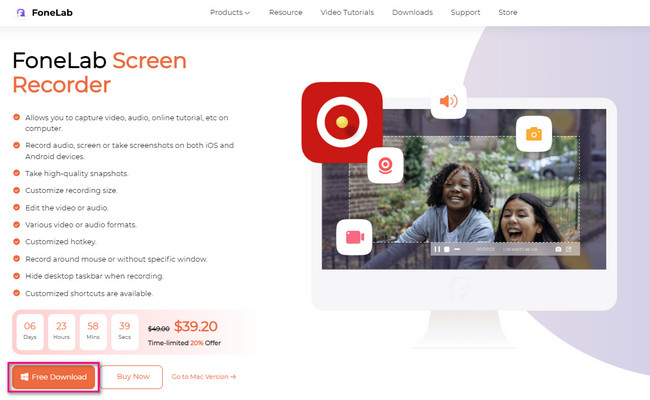
You can download a tool if you do not want to customize anything on your Minecraft. You can use FoneLab Screen Recorder. It will quickly help you to learn how to take screenshots in Minecraft. Unlike other tools, this software will not cause lag while playing Minecraft. In this case, you will still be able to enjoy the game without hassle. Aside from that, the tool will not ruin or destroy the quality of the picture. It supports high-quality images, which means that it can capture every detail of your screen on Minecraft. Do you want to use this fantastic tool? Scroll down.
FoneLab Screen Recorder allows you to capture video, audio, online tutorial, etc on Windows/Mac, and you can easily customize size, edit the video or audio, and more.
- Record video, audio, webcam and take screenshots on Windows/Mac.
- Preview data before saving.
- It is safe and easy to use.
Step 1Download FoneLab Screen Recorder to your computer by clicking the Free Download button. After that, set up the downloaded file at the bottom of the main interface. Install > Launch it instantly to start taking the screenshot on your Minecraft account.
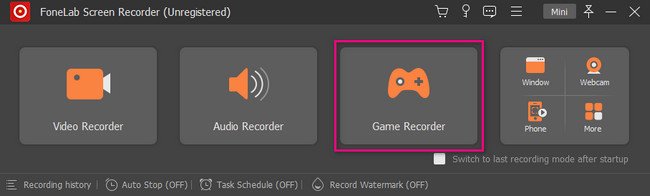
Step 2The screenshot tool of the software will not appear yet. It would be best if you chose among all the recording modes it offers. Since you play Minecraft, it is advisable to click the Game Recorder to avoid lag.
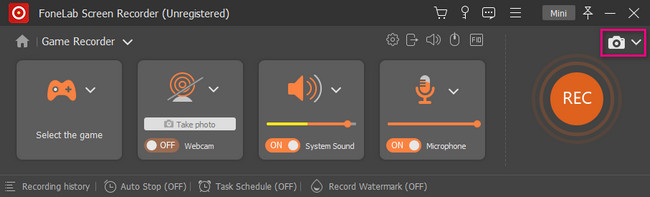
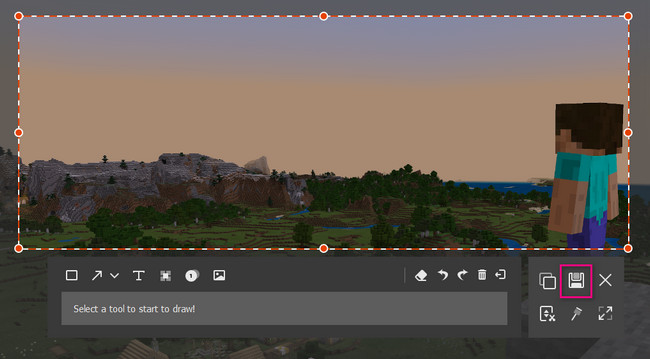
Step 3You will see the Snapshot tool at the top right corner of the software. Launch the Minecraft game you wish to screenshot. After that, click the Camera icon to take a screenshot. Trace the part of your Minecraft you want to screenshot using the Tracing Frame, then release.
Step 4Click the Save button after you screenshot the screen of Minecraft. The software will save the picture automatically.
There is still one more tool to screenshot in Minecraft. However, sometimes it does not work when the version is not up to date.
FoneLab Screen Recorder allows you to capture video, audio, online tutorial, etc on Windows/Mac, and you can easily customize size, edit the video or audio, and more.
- Record video, audio, webcam and take screenshots on Windows/Mac.
- Preview data before saving.
- It is safe and easy to use.
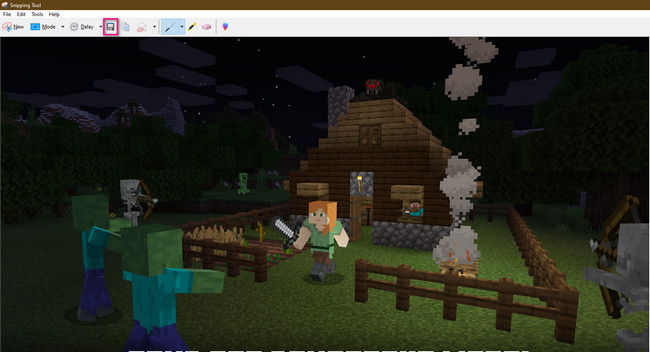
Part 4. How to Take A Screenshot in Minecraft via Windows Snipping Tool
Other people prefer using the Snipping Tool to take screenshots because of many factors. One of the reasons is that they can send large pictures or files to nearby devices using email. Aside from that, you can print the image directly through the tool. In this case, you will not need to convert it to a word document or PDF file to process it. You can also change the picture format of the screenshot. However, you can only use HTML, PNG, GIF, or JPEG file formats. Are you ready to discover how to take a screenshot on Minecraft using the Snipping Tool? Proceed.
Step 1Launch the Minecraft. After that, launch the Snipping Tool on your computer.
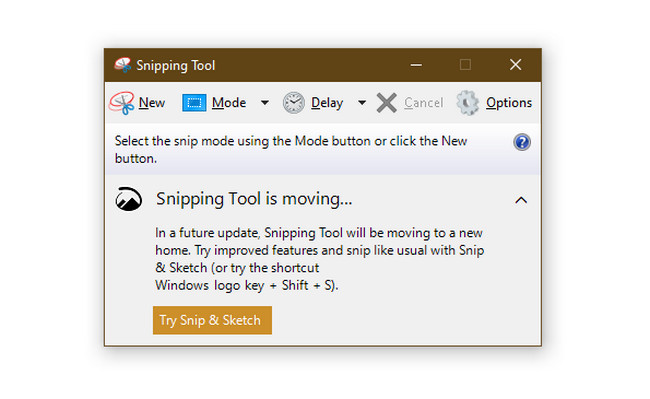
Step 2Click the New button. Trace the part of the screen of your Minecraft, then release the computer mouse. Click the Save button to keep the picture.
FoneLab Screen Recorder allows you to capture video, audio, online tutorial, etc on Windows/Mac, and you can easily customize size, edit the video or audio, and more.
- Record video, audio, webcam and take screenshots on Windows/Mac.
- Preview data before saving.
- It is safe and easy to use.
Part 5. FAQs about Taking A Screenshot on Minecraft
Where to find Minecraft screenshots?
When you screenshot Minecraft using its built-in tool, you can find the images on the computer's album. Search Run on your computer. After that, type in %appdata%, then click the OK button. Later, the album will pop up in the Roaming folder. Choose the Minecraft album, then locate the images.
Why can't I find my screenshots on Windows 10?
You will not see your image on the computer album when you screenshot your screen using the PrtScn. Once you use this shortcut key, the picture is only saved on the computer's clipboard. You can paste it to Paint, then keep it formally.
FoneLab Screen Recorder is the best among all the mentioned above. It will help you discover how to take a screenshot on Minecraft quickest. Do you wish to explore this tool? Download it now!
FoneLab Screen Recorder allows you to capture video, audio, online tutorial, etc on Windows/Mac, and you can easily customize size, edit the video or audio, and more.
- Record video, audio, webcam and take screenshots on Windows/Mac.
- Preview data before saving.
- It is safe and easy to use.