- Unlock Apple ID
- Bypass iCloud Activation Lock
- Doulci iCloud Unlocking Tool
- Factory Unlock iPhone
- Bypass iPhone Passcode
- Reset iPhone Passcode
- Unlock Apple ID
- Unlock iPhone 8/8Plus
- iCloud Lock Removal
- iCloud Unlock Deluxe
- iPhone Lock Screen
- Unlock iPad
- Unlock iPhone SE
- Unlock Tmobile iPhone
- Remove Apple ID Password
Excellent Guide to Turn Off Stolen Device Protection
 Updated by
 Good day! How do I turn off Stolen Device Protection? My brother borrowed my iPhone last week to take photos during his out-of-town trip with friends. Then, he enabled the said feature to protect the device from theft. The problem is, he didn't turn it off when he returned it to me. It was fine at first, but I realized it added too much security, causing a hassle. Please help me out.
Are you aware of Apple's Stolen Device Protection feature? Whether you are or not, it adds more security to the iPhone if enabled. Apple designed it with the best intentions, specifically to protect its users' iPhones. Hence, many prefer to turn it on, especially in unfamiliar places. However, some also choose to deactivate it, which may include you, for various reasons.
That's because although the feature tightens security with biometric authentication in specific situations, like accessing your passwords, it causes users a hassle in return. So, if you plan to turn off your iPhone's Stolen Device Protection, the following parts can widen your knowledge about it. You will also know the advantages it will provide once you turn it off on the device.


Guide List
Part 1. What Happens If You Turn Off Stolen Device Protection
As mentioned, the feature offers additional protection, so if you turn off Stolen Device Protection on iPhone, these security functions will be disabled. Although it is what many users prefer, many also choose to deactivate them, typically because they find it inconvenient. If you wonder why, the extra security requires your Touch ID or Face ID biometric authentication when accessing sensitive details, such as stored passwords, credit cards, etc., with no passcode alternative.
Aside from that, security delay is included in the security features Stolen Device Protection offers. If you haven't heard about it, it is the designated protection when performing security actions, like changing your Apple account password. The device will oblige you to wait an hour before allowing the vital changes you're trying to make. Additionally, you must do a second Touch ID or Face ID authentication. All these are to prevent thieves from altering your device.
However, even if these security functions are helpful to your iPhone, they can be bothersome and time-consuming for everyday use. Hence, turning off Stolen Device Protection will save you from these disruptions. That's why it's unsurprising you'd also like to deactivate it on your iPhone. Therefore, we encourage you to proceed to the following section to achieve your goal.
Part 2. How to Turn Off Stolen Device Protection
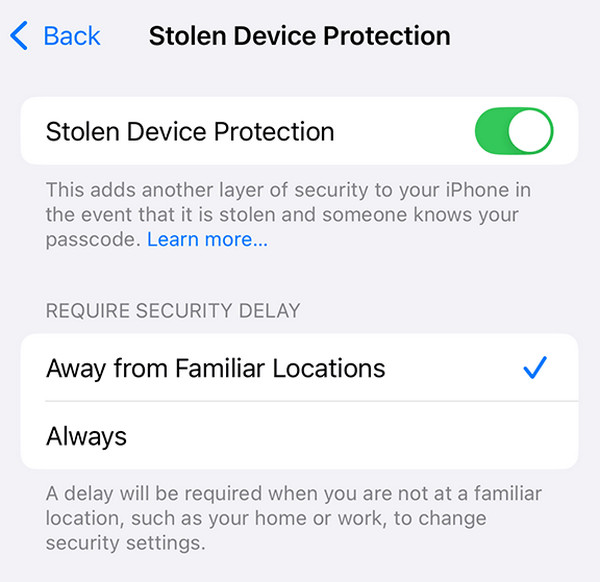
The Stolen Device Protection feature can be turned off effortlessly on the iPhone. You don't need prior or advanced knowledge because the procedure will be on the device's Settings. As you know, this app's interface provides a beginner-friendly design since Apple designed it to let users experience convenience. So, expect not to face difficulties while turning the feature off. Don't worry, though. Even if you deactivate it now, you can still turn it on again later in the same way when you are away from familiar places, like your home and workplace. Meanwhile, Stolen Device Protection can be found in the Face ID & Passcode section, so it won't be hard to see.
Adhere to the appropriate guide below to determine how to turn off Stolen Device Protection on iPhone:
Step 1First, move to the iPhone's Settings interface. The app's options will be displayed quickly, so go directly to the Touch ID & Passcode or Face ID & Passcode section afterwards.
Step 2Before the device allows, you must first input the iPhone's passcode. After that, opt for the Stolen Device Protection tab. Once the Stolen Device Protection slider appears, toggle it to deactivate the feature, removing all its additional security functions.
Besides Stolen Device Protection, Apple offers additional security features that may be inconvenient. Among them is the iCloud Activation Lock feature. Since it automatically activates on the device, some users fail to reaccess their iPhone or other Apple devices when they face it after a reset. Thus, if you also encounter such a problem, kindly refer to the upcoming section.
Part 3. Bonus Tip - Get Through iCloud Activation Lock
If you haven't been informed, iCloud Activation Lock automatically turns on after activating the Find My feature. Then, after performing a factory reset on your iPhone, iPod Touch, or other Apple device, the Activation Lock will appear, requiring you to provide your Apple credentials. Hence, if you fail to input the necessary details, the device won't allow you to access it.
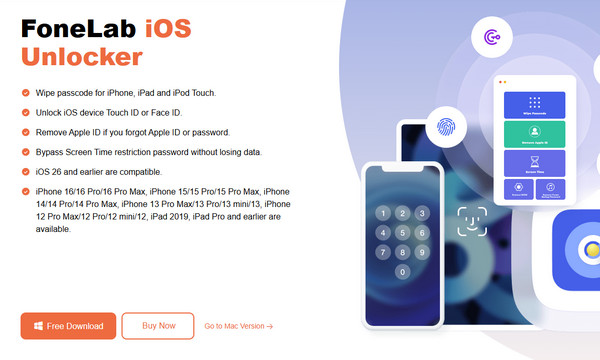
Fortunately, you can depend on FoneLab iOS Unlocker, as it is designed to handle such situations professionally.
Yes, you understood that correctly. It is no longer difficult to deal with iCloud's Activation Lock when you have a professional tool to help. Although your Apple device runs iOS or iPadOS in different versions, it's not a problem because FoneLab iOS Unlocker supports almost all models and versions. Aside from that, if you forget your screen passcode later, this tool will also be effective because of the Wipe Passcode function. Also, other features are offered.
FoneLab Helps you unlock iPhone screen, Removes Apple ID or its password, Remove screen time or restriction passcode in seconds.
- Helps you unlock iPhone screen.
- Removes Apple ID or its password.
- Remove screen time or restriction passcode in seconds.
Perceive the worry-free steps below as a pattern to get through the iCloud Activation Lock with FoneLab iOS Unlocker:
Step 1Let a trusted browsing tool help you visit FoneLab iOS Unlocker's page. A Free Download option will be located on the left side of the page, allowing you to select it to download the program's installer file. It will automatically be in your Downloads when done. Once it's ready, use the file to install the unlocker tool. The Start selection will pop up afterwards; thus, tick it to initiate the program.
Step 2All the program's essential functions are on the key interface. However, focus on the iCloud Activation Lock box for now. Then, as the following interface demands, connect your iPhone via a lightning or USB cable to the program. You can rely on the Device connected but not recognized option for further instructions in connecting your device.
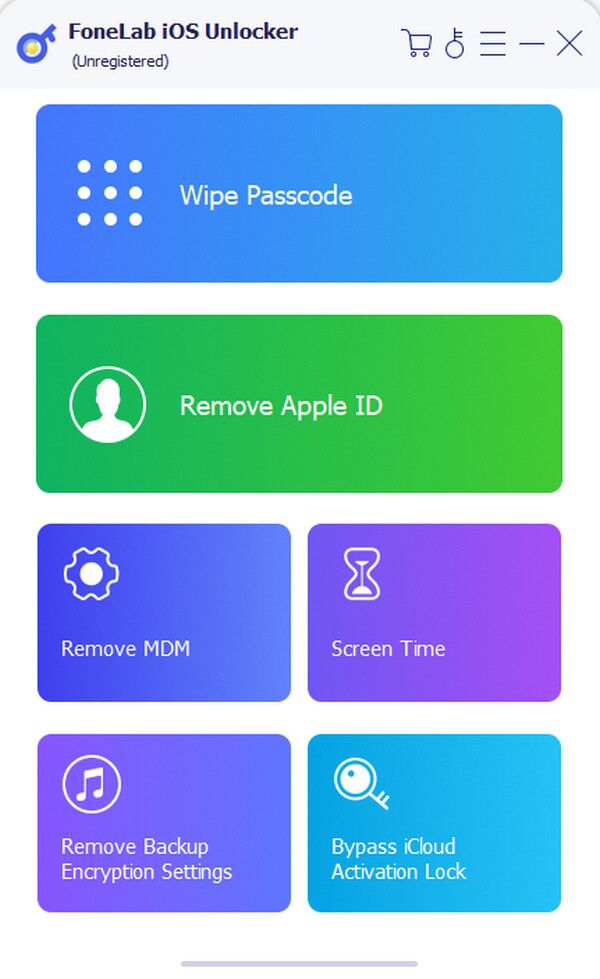
Step 3After your device is linked, tick the Start selection to continue. The unlocker tool will guide you through the next steps; thus, follow along and pay close attention to each prompt. Later, the tool will remove your iPhone's iCloud Activation Lock without any issues.
Part 4. FAQs about How to Turn Off Stolen Device Protection
Can I disable security delay without turning off Stolen Device Protection?
No, you can't. Unfortunately, enjoying only some of the Stolen Device Protection's security functions is impossible. If you prefer to disable the security delay, you must turn off the entire feature, which deactivates all its other functions.
Can I turn off iPhone Stolen Device Protection only temporarily?
Yes, you can, but it won't be automatic. Using the guides above, manually deactivate the Stolen Device Protection feature. However, you must also enable it manually afterwards in Settings, since you only want to turn it off temporarily.
That's all you must know to optimise the Stolen Device Protection feature's usage on your iPhone. Follow accordingly, and you will efficiently achieve your objective.