- Unlock Apple ID
- Bypass iCloud Activation Lock
- Doulci iCloud Unlocking Tool
- Factory Unlock iPhone
- Bypass iPhone Passcode
- Reset iPhone Passcode
- Unlock Apple ID
- Unlock iPhone 8/8Plus
- iCloud Lock Removal
- iCloud Unlock Deluxe
- iPhone Lock Screen
- Unlock iPad
- Unlock iPhone SE
- Unlock Tmobile iPhone
- Remove Apple ID Password
Learn iPhone Stolen Device Protection with A Guide
 Updated by
 What is Stolen Device Protection on iPhone? I frequently travel for work and am always in unfamiliar environments. Thus, the risk of losing my iPhone is high, especially since I meet new people daily. It's not that I'm judging anyone, but I only want to be more careful and keep the device secure. Can anyone explain what this protection feature is and how it works?
As you may know, Apple has developed various features to ensure its users' devices are secure. One of these many functions is Stolen Device Protection. If this is your first time hearing about it, it is specialised to stop unauthorised users from making critical changes to your device if it gets stolen. The feature will secure your iPhone, whether or not they know your passcode.
Hence, many choose to activate the Stolen Device Protection feature, especially in unfamiliar places. If you're interested in learning more about it, kindly advance to the succeeding parts, as we will discuss more about its features, how it works, and how you can manage it on your device. Guidelines and bonus parts are also available, so don't miss them and enjoy learning.


Guide List
Part 1. What is Stolen Device Protection on iPhone
As mentioned, Stolen Device Protection is among Apple's security functions that better protect its devices, including the iPhone. Users can activate it at any time to add an extra layer of security and prevent thieves from adjusting or altering vital options on their accounts and devices. So, suppose you choose to turn this security feature on. In that case, your iPhone will require Face ID or Touch ID verification when taking specific actions that can alter your device management.
For instance, if the thief attempts to access your passwords or credit cards, biometric authentication, such as Face ID or Touch ID, will be required without a passcode alternative. Hence, you will be the only one to enter these sensitive sections. Meanwhile, Security Delay is another option that activates when you turn on Stolen Device Protection. It is a feature that requires users to wait an hour to perform security actions, like changing their Apple password.
On the other hand, you may wonder, where is Stolen Device Protection on iPhone? The simple answer is that you can find it in Settings. That's right. Like any other vital and security options, Stolen Device Protection is seen and managed on this app, and you can visit it to enjoy the functions anytime. That said, move to the following section to use the feature on your iPhone.
Part 2. How to Turn On or Turn Off Stolen Device Protection
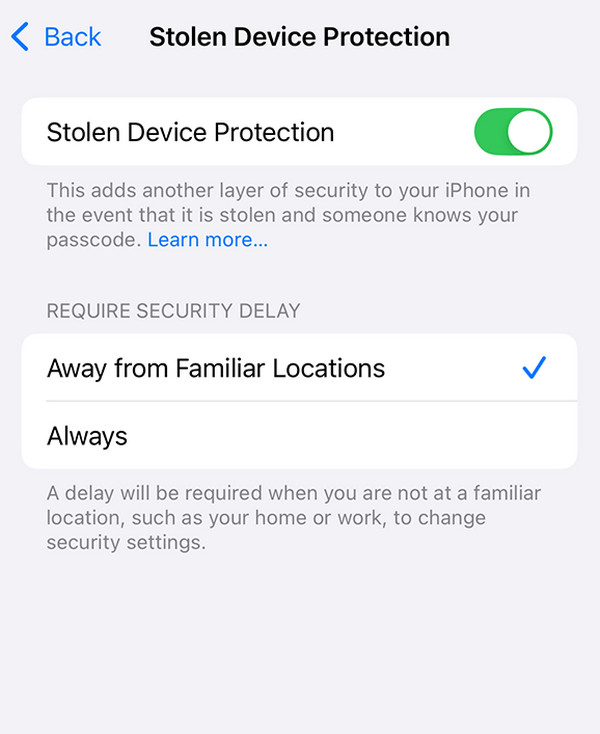
Turning Stolen Device Protection on or off on an iPhone is painless. If you master the steps, you can activate it within seconds since there is only a little navigation and requirements to manage it. Aside from its main function, its section also offers an option for Stolen Device Protection to operate at all times or only when you're away from familiar locations, such as your home or work. Hence, manoeuvre it according to your preferences. After all, it doesn't involve a technical procedure since, as mentioned, it is only on Settings, which has a user-friendly design.
Imitate the proper operation below to turn on or turn off Stolen Device Protection on iPhone:
Step 1Unlock your iPhone to access the Settings interface. Then, slide down until you see and tap the Face ID & Passcode tab. Upon inquiry, type in your device passcode.
Step 2After viewing the options, choose Stolen Device Protection. Finally, toggle the slider corresponding to Stolen Device Protection to turn the feature on or off.
Once you're satisfied with the status of the Stolen Device Protection feature on your iPhone, consider checking out the upcoming part. It discusses another security feature from Apple, iCloud Activation Lock. Many users face difficulties with it, so we included it in this article in case you face challenges with it on your iPhone later.
Part 3. Bonus Tip - Resolve iCloud Activation Lock on iOS Devices
Whether you have heard about iCloud Activation Lock or not, it is important to note that it automatically activates on Apple devices after turning on Find My. Hence, when you factory reset your iPhone or iOS device later, you must input your account credentials before the device allows you to reaccess it. The problem is, if you have forgotten them, you won't be able to use your iPhone again unless you bypass the activation lock. That's what this tool is here for.
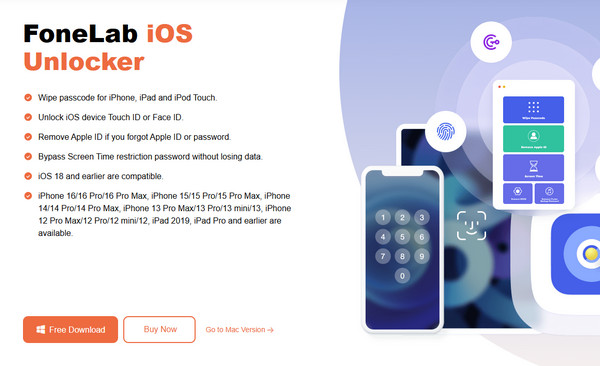
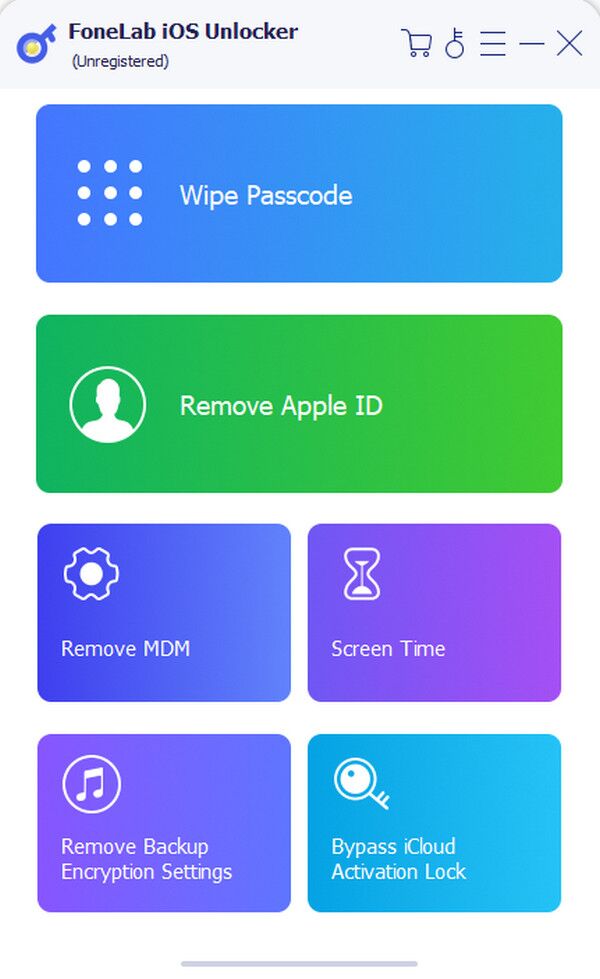
FoneLab iOS Unlocker is a pro at handling iOS device locks, so it can help you bypass your iPhone's iCloud Activation Lock. You don't need to acquire technical knowledge or skills since its functions and interface were developed to resolve beginners' problems. It works with different iOS and iPadOS versions; you can enjoy its other offerings. Among the features available are Screen Time, Remove Apple ID, Wipe Passcode, Remove MDM, and more.
FoneLab Helps you unlock iPhone screen, Removes Apple ID or its password, Remove screen time or restriction passcode in seconds.
- Helps you unlock iPhone screen.
- Removes Apple ID or its password.
- Remove screen time or restriction passcode in seconds.
Notice the accurate directions underneath as a model to resolve iCloud Activation Lock concerns on iOS devices with FoneLab iOS Unlocker:
Step 1Using your browsing program, find FoneLab iOS Unlocker's official site, and when displayed, choose Free Download on the left. The browser will then quickly save the file in your Downloads, so you can access and open it from there. You will be prompted to install it; proceed accordingly until the process finishes, showing the Start button. Click it to launch the unlocker.
Step 2The program's key features, including Bypass iCloud Activation Lock, should be displayed on the primary interface. You may use the others later, but click on the mentioned feature for now to move forward. The interface will shortly instruct your iPhone or iOS device to connect. Thus, do it with a lightning cable and the help of on-screen directions.
Step 3Once you successfully connect, choose the Start selection that appears. This will initiate further interface guidelines and prompts. Follow along and ensure you carefully perform the requirements. The tool will help your iPhone pass through the iCloud Activation Lock shortly.
Part 4. FAQs about Stolen Device Protection on iPhone
Should I enable Stolen Device Protection on my iPhone?
Enabling Stolen Device Protection would be a good idea to tighten your security against theft. It is especially helpful when you're away from familiar places, such as your home and work, because, as mentioned, it adds more layers of security to the device. This way, others won't be able to control or alter anything on your iPhone if it gets stolen later.
Will turning on Stolen Device Protection slow down my iPhone?
No, it won't. The Stolen Device Protection feature doesn't require many resources that can slow down your iPhone. So, feel free to activate it anytime, as it won't affect the device's performance.
Enjoy the knowledge in this article and perform it correctly on your iPhone to achieve the best results in managing the Stolen Device Protection feature.