- Unlock Apple ID
- Bypass iCloud Activation Lock
- Doulci iCloud Unlocking Tool
- Factory Unlock iPhone
- Bypass iPhone Passcode
- Reset iPhone Passcode
- Unlock Apple ID
- Unlock iPhone 8/8Plus
- iCloud Lock Removal
- iCloud Unlock Deluxe
- iPhone Lock Screen
- Unlock iPad
- Unlock iPhone SE
- Unlock Tmobile iPhone
- Remove Apple ID Password
Correct Guide to Disable Stolen Device Protection Easily
 Updated by
 Greetings! Please help me determine how to disable stolen device protection on my iPhone. My sister advised me to turn it on to better protect my device, but after using the feature for a while, I only realized how much of a hassle it was. I feel like the additional security wastes my time; thus, I'm looking for a way to turn it off. Is anyone here knowledgeable enough to help?
Have you ever seen and turned on the Stolen Device Protection feature on your iPhone or other Apple device? If so, you must have already experienced its advantages regarding your device's security. When your iPhone isn't in a trusted location, such as home or work, this feature adds extra security steps for specific actions, preventing thieves from altering your account or settings.
For instance, if someone steals your iPhone and learns its password, Stolen Device Protection will help block unauthorized changes to your device or account. However, some users prefer to turn off the feature for various reasons, such as inconvenience. If you also think this, the next parts will let you understand the benefits and process of turning this security function off.


Guide List
Part 1. Why Disable Stolen Device Protection
The Stolen Device Protection feature is advantageous for device security. However, some users, including you, might have multiple reasons for deactivating it. The first one we can look at is inconvenience. Although your device enjoys tighter protection, the feature can slow down access to some apps, services, etc., as it will first require your Face ID, Touch ID, or passcode.
Besides, if you plan to change your Apple password, Stolen Device Protection will need you to wait an hour and use a second Face ID or Touch ID to authenticate your identity. That said, this is another reason to turn off the feature. Unfortunately, such solid security might frustrate you or other users, as the device has been locked too aggressively.
On the other hand, the Stolen Device Protection disable process may also be necessary if you bring your Apple device to a repair service. This way, the technician can access the essential aspects of the iPhone, iPod Touch, etc., allowing them to fix the problem without restrictions. Aside from that, turning the feature off is also done when selling the device, facing issues, etc.
Part 2. How to Disable Stolen Device Protection
Now that you know the reasons for disabling the Stolen Device Protection feature, it's time to learn its process. Some users may already have it activated for unknown reasons, such as their friends or family turning it on their devices. On the other hand, it may have been a while since you enabled it, and you have already forgotten how to manage the feature. Regardless, you won't have to face complications turning it off because of the straightforward process. If you're unaware, it can only be done through the Settings app, which offers a comprehensible interface, allowing you to access every necessary option effortlessly. You can even complete the steps within a few moments.
Act according to the official guide below to perform the iPhone disable Stolen Device Protection process successfully:
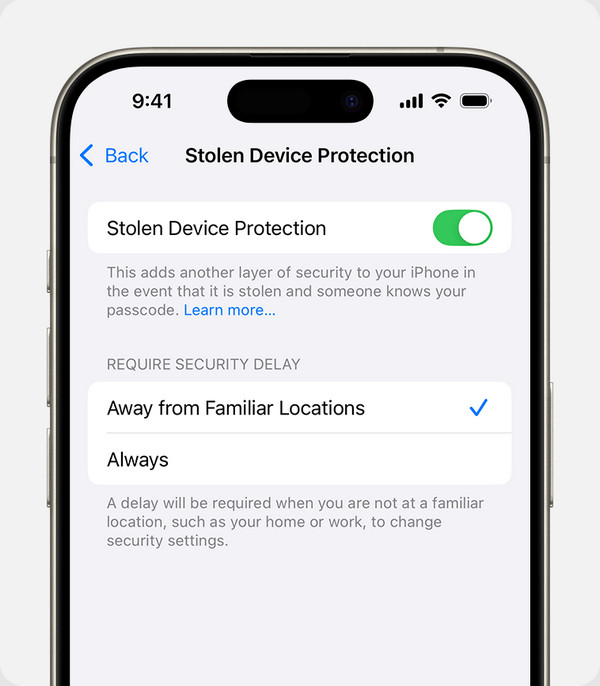
Step 1Go initially to your Apple device's Settings interface. Once its management features are revealed, locate and tap the Face ID & Passcode or Touch ID & Passcode selection.
Step 2The device will immediately prompt you to input your device passcode, so enter it to access the section. Afterwards, choose the Stolen Device Protection tab to display its options on the interface. Finally, disable the function by toggling off the Stolen Device Protection slider.
Besides Stolen Device Protection, Apple offers additional security features for their devices, including the iCloud Activation Lock. If you plan to reset your iPhone, iPod Touch, or other Apple devices, it can also cause inconvenience. Thus, check the following section, as it will help you turn this feature off if you encounter it after resetting and can't recall your account details.
Part 3. Bonus Tip - Bypass iCloud's Activation Lock
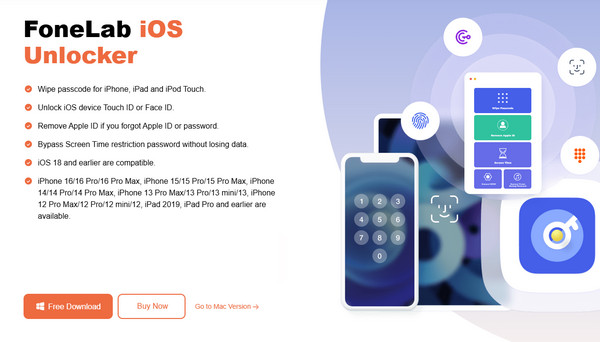
Despite providing more security, Apple's features, such as Stolen Device Protection and iCloud Activation Lock, can cause users trouble. This is especially true with the activation lock, which automatically turns on when activating the Find My feature. As a possible result, some fail to access their devices after a factory reset because they forgot the Google account information requirements. Thankfully, FoneLab iOS Unlocker is reliable in bypassing the feature.
Therefore, even if the activation lock screen asks for your account password after you reset it, it's no longer a problem if you have forgotten it. This tool's Bypass iCloud Activation Lock is enough to get through the lock feature; it doesn't matter if it's only your first time encountering it. FoneLab iOS Unlocker was created for all users, whether experienced or beginners. Besides, the other functionalities can also help you resolve other lock or password concerns later.
FoneLab Helps you unlock iPhone screen, Removes Apple ID or its password, Remove screen time or restriction passcode in seconds.
- Helps you unlock iPhone screen.
- Removes Apple ID or its password.
- Remove screen time or restriction passcode in seconds.
Determine the appropriate instructions underneath as a model for bypassing iCloud's activation lock with FoneLab iOS Unlocker:
Step 1Launch a browsing tool and access FoneLab iOS Unlocker's page to get started. You'll spot the Free Download button immediately, so hit it to obtain the installer on your computer. Once downloaded, open the file to kick off the setup. The installation will complete in a minute or two, so when it's done, hit Start, and you'll be ready to go.
Step 2Once the unlocker program loads, you'll quickly see its key unlocking options. Thus, pick Bypass iCloud Activation Lock from the main interface, then proceed with the on-screen prompts to link your iPhone, iPod Touch, or another Apple device. Just plug in your device with your lightning cable, and you're ready to move forward once it's recognised.

Step 3When everything's set, simply perform the interface steps. You may take the time to ensure you carefully complete each instruction. Then, once finished, the unlocking tool will efficiently remove iCloud's activation lock from your Apple device.
Part 4. FAQs about How to Disable Stolen Device Protection
Does disabling Stolen Device Protection make my device less secure?
Yes, it does. Since the additional security functions will be deactivated once you deactivate the Stolen Device Protection feature, your device will be less secure. So, it would be best to activate it in an untrusted environment, such as public spaces, out of town, etc., and only deactivate it when you're in a secure place, like your home, to prevent hassle.
What if someone else marked my device as lost?
If the thief managed to access and alter your account or device settings, it would be best to contact Apple Support. Show them proof of purchase to authenticate your identity as the original owner, and they will handle your stolen device problem.
The above information has been proven to handle the Stolen Device Protection feature on Apple devices successfully, so use each part wisely to resolve your concern.