- Part 1. How to Take A Screenshot on Chromebook with Keyboard
- Part 2. How to Screenshot on Chromebook with Snipping Tool
- Part 3. How to Screenshot on Chromebook via Built-in Screen Capture Tool
- Part 4. How to Screenshot on Chromebook via FoneLab Screen Recorder
- Part 5. FAQs about How to Screenshot on Chromebook
How to Take A Screenshot on A Chromebook in 4 Quick Ways
 Updated by
 Multiple screen activities can be seen on your Chromebook screen. Taking a screenshot of them is possible for different purposes! It could be for saving important information, documentation, work collaboration, offline reference, and more. The good thing about Chromebooks is that it has various ways to take a screenshot. This article gathers the 4 easiest ways and guides on how to screenshot on a Chromebook effectively. Please scroll below to see the complete information about these methods in this post.

Guide List
- Part 1. How to Take A Screenshot on Chromebook with Keyboard
- Part 2. How to Screenshot on Chromebook with Snipping Tool
- Part 3. How to Screenshot on Chromebook via Built-in Screen Capture Tool
- Part 4. How to Screenshot on Chromebook via FoneLab Screen Recorder
- Part 5. FAQs about How to Screenshot on Chromebook
Part 1. How to Take A Screenshot on Chromebook with Keyboard
You are probably looking for the quickest guide on how to take screenshot on Chromebook. Shortcut key commands using the keyboard on your Chromebook are the answer. These are commands that allow you to capture the Chromebook screen in different ways. They allow you to screenshot the entire Chromebook screen, a portion of it, or the active windows while using it.
However, some users are having confusion about the keys that lead them to different commands. This issue is risky to your Chromebook. Please note that the screenshot will be saved to the Download folder of your Chromebook. They will be in the PNG image format automatically. Discover how to take a screenshot on Chromebook with keyboard below.
1. Full-screen Chromebook Screenshot
Press the Ctrl + Show Windows keys on your Chromebook keyboard. The Show Windows key is a rectangle with two vertical lines. It is usually seen above the number 6 on your keyboard. Then, the screenshot will take place immediately. It will be saved automatically to your Downloads folder afterward.
2. Partial Screenshot or Select Area
Press the Ctrl + Shift + Show Windows keys on your Chromebook. Then, the cursor will appear, allowing you to select the area you prefer to screenshot. Please click and drag the cursor to the area you want to screenshot. Finally, release the cursor to take the screenshot on your Chromebook.
3. Active Chromebook Window Screenshot
Press the Alt + Show Windows keys that the Chromebook contains. After that, it will automatically capture the current window on your Chromebook. Also, it will be automatically saved on the mentioned device. However, this shortcut key combination is only available to some Chromebook models and versions.
Part 2. How to Screenshot on Chromebook with Snipping Tool
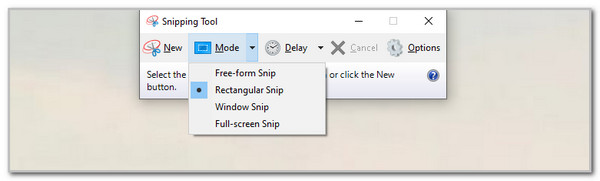
On the other hand, how to take a screenshot on Chromebook without Windows key? There are countless ways to execute this process, and Snipping Tool is one of the programs that can. This tool is free and built into some Chromebook models and versions. You no longer need to download it. It allows you to capture the Chromebook screen in different shapes, including rectangular, free-form, full-screen, and window. Also, it functions in a lightweight manner because it does not take up much system memory.
However, this tool has its drawbacks. It only contains basic editing tools that professionals will find inconvenient. Additionally, it does not come with a cloud storage sync feature. Also, the tool sometimes requires a demanding screenshot process. The steps below will show you how to take screenshots of your Chromebook screen with Snipping Tool.
Step 1Open the Snipping Tool by searching for it from the search bar at the bottom. After that, you will see a small window containing the Snipping Tool interface. Please click the Mode button at the top and select your screenshot shape mode. Then, the tool will allow you to use the cursor to take a screenshot of your Chromebook screen.
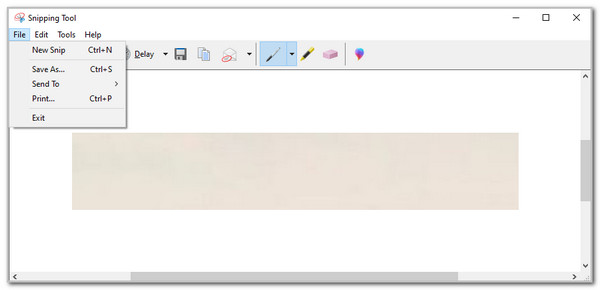
Step 2Release the cursor, and the preview of your screenshot will appear on the interface. You can edit it before you save it on your Chromebook. Then, click the File tab at the top left corner to see more options. Drop-down options will appear, and click the Save As button. Select the folder where you want to keep it afterward.
Part 3. How to Screenshot on Chromebook via Built-in Screen Capture Tool
Chromebook has another built-in tool that allows you to take a screenshot in different ways. That tool is Screen Capture. This tool is free and does not have any hidden charges when you use it on your Chromebook. It has a user-friendly interface that novices will love to use. However, some individuals report that this tool lets them experience performance issues. It has low performance in some of the earlier versions of Chromebooks. It is not ideal for professionals because it does not contain advanced tools.
How to do a screenshot on a Chromebook Screen Capture? The steps below will be your best guide.
Step 1Open your Chromebook and unlock it immediately. After that, click the Settings button at the bottom right of the screen. The Settings screen will appear, and you only need to locate the Screen Capture button and click it to access it. The screenshot and recording features will appear at the bottom afterward.
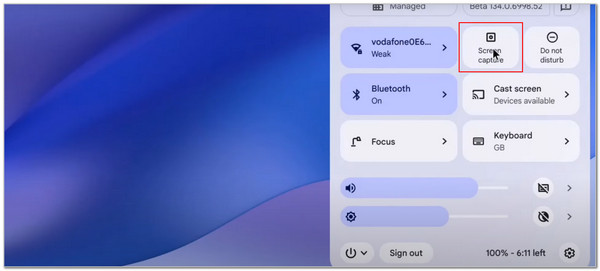
Step 2Please ensure that you click the Camera button on the left to access the screenshot features, not the screen recording tools. You will see the three screenshot features at the bottom. The screenshot below will be your guide as we list their functions to avoid confusion with the process.
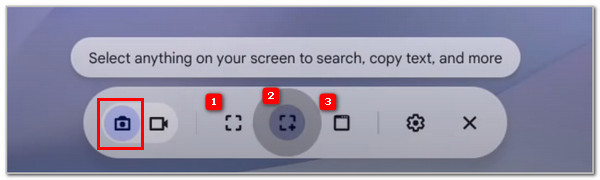
| Number | Function |
| 1 | This screenshot feature of the Screen Capture tool will capture the entire screen of the Chromebook. The cursor will turn into a Camera button, and you only need to click it to take a screenshot. |
| 2 | The feature will capture the Chromebook screen based on your selected area. You only need to use the cursor to select your desired location and release it to take a screenshot. |
| 3 | This feature will take a screenshot of your Chromebook window. You only need to select the window you prefer to screenshot by clicking it to take the screenshot. |
Part 4. How to Screenshot on Chromebook via FoneLab Screen Recorder
FoneLab Screen Recorder is designed for screen recording. Did you know that it has a helpful screenshot tool to take a screenshot on Windows or Mac? That’s right! It captures high-quality snapshots. It offers three screenshot modes that will be beneficial for you. It includes the Screen Capture, Popup Menu Capture, and Scrolling Screenshot features. The best thing about this tool is that it has basic editing tools before you save the screenshot on your Chromebook.
FoneLab Screen Recorder allows you to capture video, audio, online tutorial, etc on Windows/Mac, and you can easily customize size, edit the video or audio, and more.
- Record video, audio, webcam and take screenshots on Windows/Mac.
- Preview data before saving.
- It is safe and easy to use.
Furthermore, this tool allows you to copy the image from your Chromebook clipboard. Then, you can paste it into a program that supports the command. Finally, this software also allows you to use or customize a shortcut key command for taking screenshots. Please follow the steps below to discover how this tool screenshots your Chromebook screen.
Step 1Visit the official website of FoneLab Screen Recorder. After that, click the Free Download button from the main interface. Please locate the downloaded file and set it up, depending on the requirements it needs. Finally, install and launch the tool on your Chromebook to proceed with the screenshot procedure.

Step 2The screen recording tools will appear on the first interface of the tool. Please select the Arrow button at the top right of the screen. Then, choose the screenshot mode you prefer from the list that will be seen from the small window. Finally, click the Camera button and select the area you'd like to screenshot on the Chromebook screen.
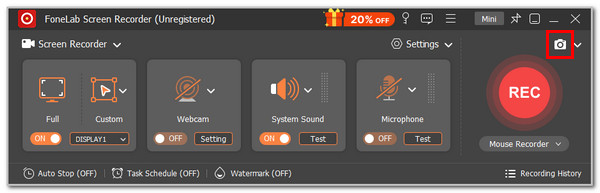
Step 3Please release the cursor afterward to take the screenshot on your Chromebook screen. Then, the screenshot will take place immediately, and you can edit it using the editing features of the tool that will appear on the screen. Please click the Save button from the small toolbar that the tool contains. Then, choose the folder where you want to store the screen to complete the process.

Part 5. FAQs about How to Screenshot on Chromebook
How to find a screenshot in Chromebook Clipboard?
There is no concrete folder or location where you can find the Chromebook clipboard, where the screenshots are saved from some tools. All you need to do is paste the screenshot into the programs that support the command to access the screenshot.
How to screenshot on Dell Chromebook?
This procedure is the same as the screenshot features or tools explained in this article. We recommend that you use the methods in this article to take screenshots on your Dell Chromebook.
Chromebook can indeed do multiple-screen activities. Taking screenshots can capture their activities instantly. Take screenshots on your Chromebook now for documentation, offline references, and more purposes! FoneLab Screen Recorder is the top priority in this procedure since it is a user-friendly tool. Download it to discover more of its features.