2 Ultimate Procedures How to Record on Google Slides Safely
 Posted by Lisa Ou / Jan 10, 2023 16:00
Google Slides is very useful when it comes to academic and work purposes. When creating a presentation, it is hard to create a beautiful template. If you are in a rush, you will need to spend a lot of time creating one. Luckily, Google Slides has a pre-designed template that you can use. For instance, you are required to record your presentation for documentation purposes. Unfortunately, you do not know how to do it. You will need the guides below to understand and learn how to record presentations on Google Slides. These methods are about the powerful screen recorder software and another built-in tool. If you want to master the steps, read more about this article.


Guide List
Part 1. How to Record on Google Slides with FoneLab Screen Recorder
Multiple screen recorders cannot record your voice while you are recording your slides. What if you are required to add a voice-over to your video? Well, FoneLab Screen Recorder can add voice-over on Google Slide recording. Not just your voice! You can also add background music if you want. Another good thing about it, it can record a high-quality video. It is very convenient for you because it will not blur the content or words in your presentation. In this case, your target audiences will clearly understand what is written in the slide presentation. If you want to use this fantastic software, you can view its straightforward steps below. It will serve as your guide.
FoneLab Screen Recorder allows you to capture video, audio, online tutorial, etc on Windows/Mac, and you can easily customize size, edit the video or audio, and more.
- Record video, audio, webcam and take screenshots on Windows/Mac.
- Preview data before saving.
- It is safe and easy to use.
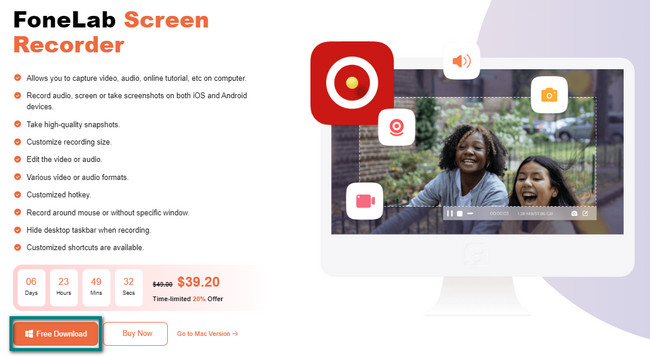
Step 1Tick the Free Download button to download the best screen recorder. You can choose the version you want on the choices. You only need to switch it based on your preference. Wait for the signal of the tool that the downloading process has ended. After that, set up the software, Install > Launch > Run on your device.
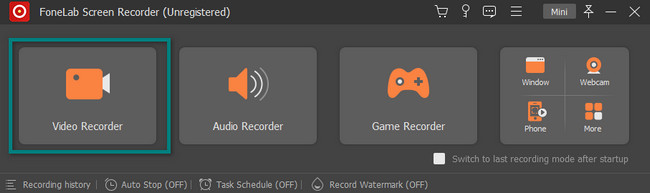
Step 2The software will require you to choose its features for screen recording mode. You only need to choose one. You must select the appropriate tool to record your slide presentation successfully. In this case, choose the Video Recorder section.
Note: If you want to record your Google Slides with a watermark, it is possible. You can choose the Record Watermark option and turn it on. Later, you can use the feature instantly.
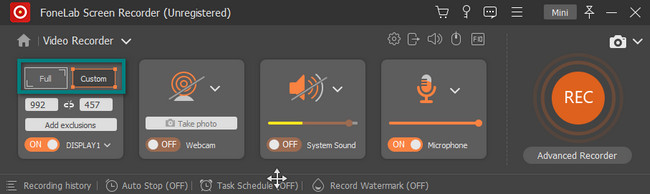
Step 3Launch the Google Slides you want to record. You need to click the Custom button on the left side of the main interface. It will let you use its Adjustable Frame. In this case, you can select and adjust it to capture a particular portion of the screen, not the entire screen. However, if you want to capture the whole screen, click the Full button.
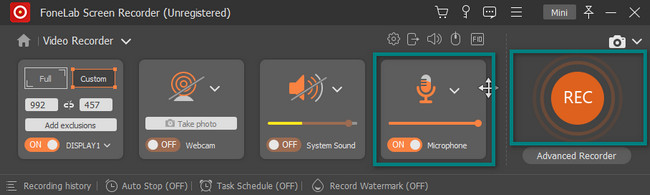
Step 4To add voice-over to the record, choose the Microphone section and click the On button. You can adjust its volume by dragging the Adjustable Bar on it. After that, tick the Rec button on the right side of the main interface. Later, it will countdown before it records the screen you choose. In this case, you will have the chance to prepare your screen for a few seconds.
Note: If you think that the tool is blocking the device screen, click the Mini button at the top of the software. For this reason, it will minimize the software immediately.
Step 5Once the recording session starts, you will see the Adjustable Frame where it records. If you want to stop the recording, click the Red Box button on the tool. In this case, the software will instantly stop the session on your Google Slides.

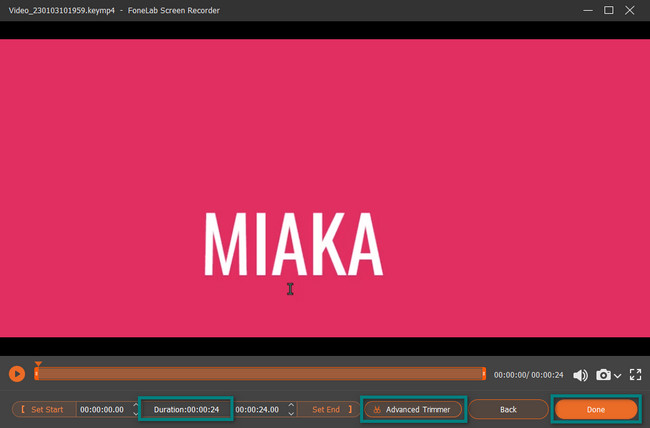
Step 6The software will let you see the duration of the video at the button. On the main interface, the Google Slides video will pop up on the screen. It means that the recording is ended. If you want to edit the video, use the editing tools below. If you are satisfied with the outcome, click the Done button. The software will allow you to save it on one device's folder.
FoneLab Screen Recorder is genuinely unique. Now you know how to add voice-over to Google Slides video using this software, and you can use it again next time. However, you can use the best Chrome Extension if you prefer to use extensions. Do not worry, and this article will help you with that. Move on.
FoneLab Screen Recorder allows you to capture video, audio, online tutorial, etc on Windows/Mac, and you can easily customize size, edit the video or audio, and more.
- Record video, audio, webcam and take screenshots on Windows/Mac.
- Preview data before saving.
- It is safe and easy to use.
Part 2. How to Record on Google Slides via Chrome Extension
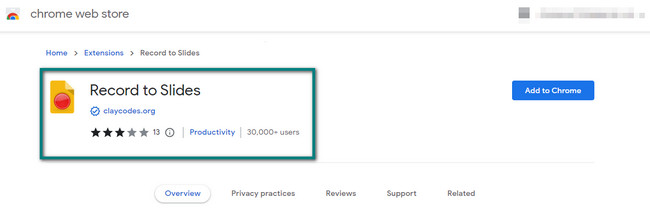
There are numerous ways how to record a Google Slides presentation. You can use Chrome extensions besides the best screen recorder software mentioned above. These extensions bring the best experience to you while browsing and are not just about recording your screen. Examples are screenshot tools, privacy tools, emoji tools, and more! However, the disadvantage is that you have many choices. You must select a reliable and trustworthy tool for your Google Slides. And they will have limited features. However, this article prepares the most excellent Chrome Extension for you. It is the Record to Slides software program for recording. Proceed to learn how to record a presentation on Google Slides using it.
Step 1Search for the Chrome Web Store online. After you click its link, locate the Search Bar at the top of the main interface. Type in Record to Slides on it and press the Enter key on your keyboard. Afterward, the web store will show you the software program you want to use. All you need to do is click it.
Step 2On the right side, click the Add to Chrome button. Later, you will see a pop-up on the screen asking for software permission. To give access to it, click the Add Extension button, and the tool will process it for a few seconds. After that, you will see the screen recorder at the top of Chrome.

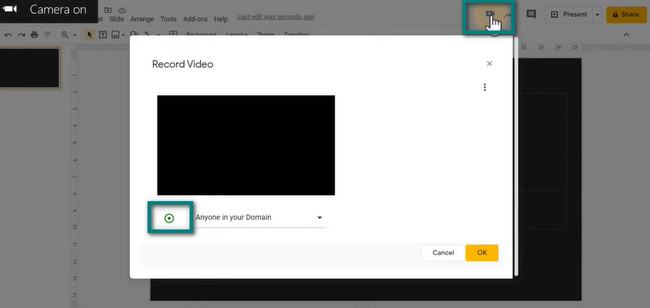
Step 3At the top of the Google Slides Presentation, click the Camera icon. It will instantly pop up the feature that will preview your recording. Click the Green Circle button on the left side of the extension to start recording your screen.
Note: You can use the Microphone icon to record your voice while screen recording.
Step 4Once you want to end the recording session, click the Green Circle button again. The software will immediately stop the tool from processing. After that, the recording tool will let you see the preview of your video on the right side of it. To save the video, click the OK button, then save it to the device folder.

Part 3. FAQs about Google Slides Presentation
Question 1. How to change the background on Google presentations?
You need a better background to have a catchy presentation on your recording video. To change it, look at the top of Google Slides. After that, click the Change Back Ground > Select the Color > Done buttons on the drop-down button.
Question 2. How to import PowerPoint presentations into Google Slides?
You only need to go to the File section of Google Slides. After that, click the Import Slides on the drop-down button of it. Select the slide you want to download and click the Select button. Afterward, click the Import Slides button on the bottom right part of the tool.
There are many ways to record on Google Slides. You can use Chrome extensions and FoneLab Screen Recorder accordingly. To know more about these tools, download them now!
FoneLab Screen Recorder allows you to capture video, audio, online tutorial, etc on Windows/Mac, and you can easily customize size, edit the video or audio, and more.
- Record video, audio, webcam and take screenshots on Windows/Mac.
- Preview data before saving.
- It is safe and easy to use.