How to Crop Screenshots on Mac in 5 Most Recommended Ways
 Updated by
 Greetings! How do I crop a screenshot on Mac? I took screenshots on my Mac screen, and they turned out in full screen. We will send these screenshots to our colleagues, and I would like to redact the other information in the picture. Please assist me with this issue. Thanks!
Our Mac screens sometimes contain sensitive information about us. Taking a screenshot might leak this information to others who see or receive the screenshot. If that’s the case, it is better to take a specific portion of the screen or crop it after the screenshot.
How to screenshot on Mac and crop? Let us explain how the process works using five proven and tested methods in this post.

Guide List
Part 1. How to Crop A Screenshot on Mac During Screenshot
Some may find taking screenshots and cropping them afterward inconvenient or a waste of time. Why not take a crop screenshot by capturing a specific portion of your Mac screen? This section has three methods to explain how to take a cropped screenshot on a Mac. You may scroll down below to discover them.
1. Shift + Command + 4
There are shortcut key commands that can take a screenshot on your Mac. Shift + Command + 4 is one of them. This shortcut key command allows you to take a screenshot of a specific portion of the Mac screen. The Mac cursor is the primary tool or feature that will be used for taking the screenshot. The steps below will guide you on how to screenshot on Mac with crop using Shift + Command + 4.
Press the Shift + Command + 4 shortcut key commands. After that, you will see the cursor with the Target sign. Please use your Trackpad by pressing it to select the portion of the screen you need to capture. After that, release the Trackpad to take the screenshot. The picture will be accessible on the Desktop afterward.

2. Shift + Command + 4 + Space Bar
Another screenshot shortcut key command on your Mac is Shift + Command + 4 + Space Bar. You will add a single keyboard key, and the process will change. It is a reminder that you need to ensure that the keys you press are correct to avoid incorrect commands on your Mac. Anyway, Shift + Command + 4 + Space Bar is a shortcut key command to take a screenshot of a window on the Mac. The process of this tool is almost similar to the previous one. Take a screenshot on a Mac with crop using Shift + Command + 4 + Space Bar.
Press the Shift + Command + 4 + Space Bar shortcut keys on your Mac keyboard. Then, the cursor from the Mac will turn into a Camera button. You do not need to drag the cursor because you only need to click the window you need to screenshot. Then, the screenshot will be automatically accessible on the Desktop.
3. FoneLab Screen Recorder
Did you know you can use a third-party tool to take a crop screenshot on a Mac? FoneLab Screen Recorder is that tool! This third-party tool is primarily designed to capture screen recordings on your Mac and Windows. The best thing about it is its Screen Capture feature, which helps you take a screenshot. It captures the Mac and Windows screens in high quality. Furthermore, you may use this tool to edit the screenshot using its basic editing features. The steps below will guide you in utilizing the tool.
FoneLab Screen Recorder allows you to capture video, audio, online tutorial, etc on Windows/Mac, and you can easily customize size, edit the video or audio, and more.
- Record video, audio, webcam and take screenshots on Windows/Mac.
- Preview data before saving.
- It is safe and easy to use.
Step 1Click the Free Download button on the tool's main website. Then, set up the downloaded file on the computer. Install and launch it afterward.

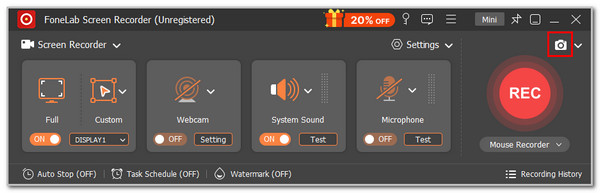
Step 2The tool’s screen recording and screenshot features will appear on the screen. Please select the Camera button at the top right of the tool. Then, use the cursor to trace the Mac screen portion you need to capture. Then, release the cursor to take the screenshot.
Step 3The screenshot preview will be prompted on the screen. Click the Save option in the small window to save the screenshot on your Mac.

Part 2. How to Crop A Screenshot on A Mac After Taking A Screenshot
Suppose that the screenshots are also stored in your Mac’s album. How do you crop a screenshot on a Mac? You can use the Preview and Photos program on your Mac. Their detailed processes are posted below.
1. Preview Program
The Preview program on your Mac is used for opening and editing images and PDFs. This tool can crop your screenshots in an instant. The steps below are your guide.
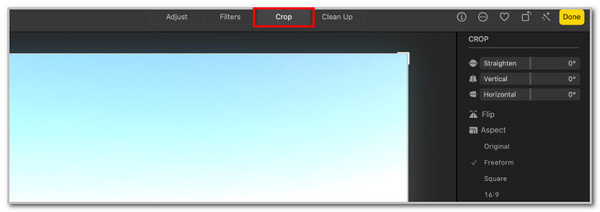
Open the screenshot in your Mac's Preview. Access the Markup Toolbar and click the Crop button at the top center. Select the area you need to keep and press the Command + K keys to capture the screen. Press Command + S to save the screenshot.

2. Photos Program
The Photos program on your Mac can also be used to crop your screenshots. This program is responsible for storing your images from your Mac album. How do you crop a screenshot on a Mac using the Photos app? The steps below will reveal this process.
Open the Photos app and access the screenshot you need to crop. After that, click the Edit button in the Toolbar section. Click the Crop button at the top of the main interface and crop the screenshot according to your preferences. Click the Done button at the top right to complete and save the screenshot.
Part 3. FAQs about How to Screenshot Crop on Mac
Where are screenshots saved on a Mac?
Multiple locations and folders can be used to save Mac screenshots. The tool or feature used for taking the screenshot decides where to store it. The default location of the screenshots on your Mac is its Desktop. However, some tools or features have their own folder for these screenshots. You might access them through the clipboard or the Screenshots folder from the Mac Finder.
How do I find deleted screenshots on a Mac?
Some Mac users are bound to delete multiple screenshots accidentally. The best thing about Mac is that it has a Trash Bin tool to easily retrieve them. Open the Trash Bin tool on your Mac, and the recently deleted files will appear on the screen. Please locate the screenshots and select them by dragging the cursor. Finally, control-click the deleted screenshots and click the Put Back button. This way, the deleted screenshots will be retrieved from their original locations.
We have explained how to screenshot and crop on a Mac in this article. The five ways for the procedure are presented for your convenience. You can take a specific screenshot on the Mac screen or crop it after that. FoneLab Screen Recorder is also introduced in this article. It is the most advantageous tool for taking a screenshot because it offers basic editing tools after the process. Download the tool to explore it more!