- Convert AVCHD to MP4
- Convert MP4 to WAV
- Convert MP4 to WebM
- Convert MPG to MP4
- Convert SWF to MP4
- Convert MP4 to OGG
- Convert VOB to MP4
- Convert M3U8 to MP4
- Convert MP4 to MPEG
- Embed Subtitles into MP4
- MP4 Splitters
- Remove Audio from MP4
- Convert 3GP Videos to MP4
- Edit MP4 Files
- Convert AVI to MP4
- Convert MOD to MP4
- Convert MP4 to MKV
- Convert WMA to MP4
- Convert MP4 to WMV
2 Ultimate Ways to Trim Video on Mac Easily
 Updated by Lisa Ou / Feb 24, 2023 16:30
When recording your screen, there are times that the screen lags at the beginning of it. Fortunately, you can edit out those parts of your video. In this case, you can transform the video without the dull and excess moments at its begging or end.

There are many techniques to remove those parts of your video on Mac. Trimming is one of them. To become professional with it, use FoneLab Video Converter Ultimate. Aside from that, this post will show you the built-in tool to trim videos on Mac. You will benefit a lot from continuing to read the article. Move on.

Guide List
Part 1. How to Trim Video on Mac with FoneLab Video Converter Ultimate
Trimming the video can cause a minor loss of quality for your video. However, that will not happen once you use FoneLab Video Converter Ultimate. It is the best video trimmer on Mac that you will ever experience. It will not ruin the original file but enhance it more. Aside from that, you can merge video files and add subtitles to them. You can also freely choose the aspect ratio you prefer for your video. Examples include widescreen, Instagram, portrait, standard, cinema, etc. You can also use its pre-designed themes to add scenery to your video. Are you ready to learn how to trim videos on Mac? Scroll down.
Video Converter Ultimate is the best video and audio converting software which can convert MPG/MPEG to MP4 with fast speed and high output image/sound quality.
- Convert any video/audio like MPG, MP4, MOV, AVI, FLV, MP3, etc.
- Support 1080p/720p HD and 4K UHD video converting.
- Powerful editing features like Trim, Crop, Rotate, Effects, Enhance, 3D and more.
Step 1Download FoneLab Video Converter Ultimate on your Mac. After that, launch it on the laptop, and you will see its colorful interface. Choose the MV button on the main interface of the software. Later, upload the video you want to trim by dragging it. You can also click the Add button on the bottom left corner of the tool.
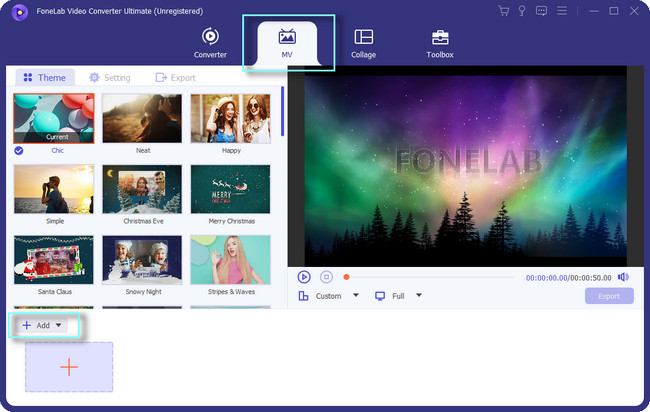
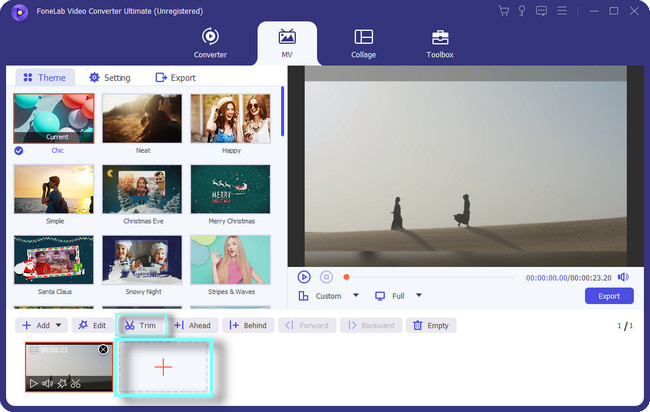
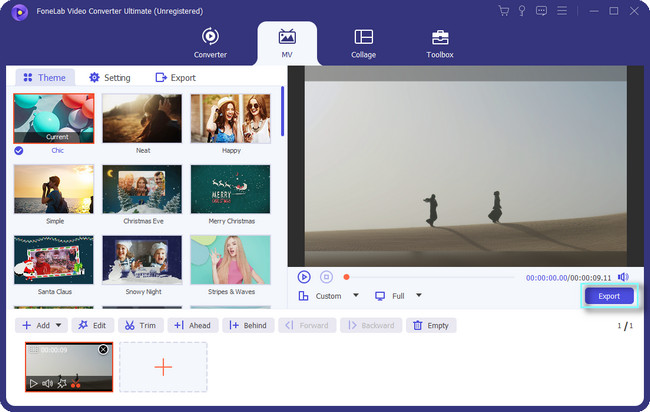
Step 2You will see the video on the right side of the software. If you want to add more videos, click the Plus Sign button at the bottom of the tool. After that, you can select its aspect ratio by clicking the Custom button below it. Aside from that, you can choose the Theme of your video to out an effect. Once the video is ready to be trimmed, click the Trim button.
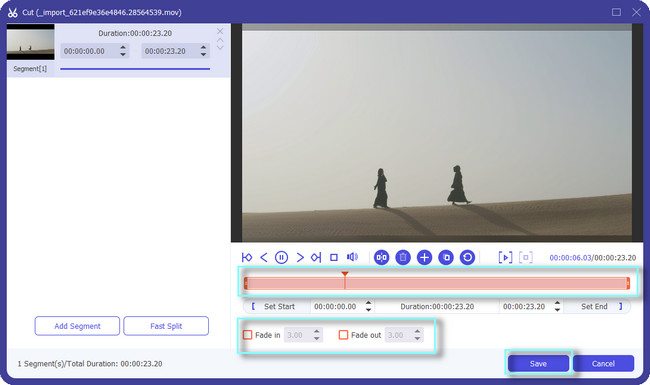
Step 3Below the video, you will see the Set Start and Set End. To trim the video, click and adjust its Slider on your desired duration. After processing the file, you can set the Fade In and Fade Out of the video. You only need to check the box of the features and set the time interval you prefer. Click the Save button to apply all the changes to your video.
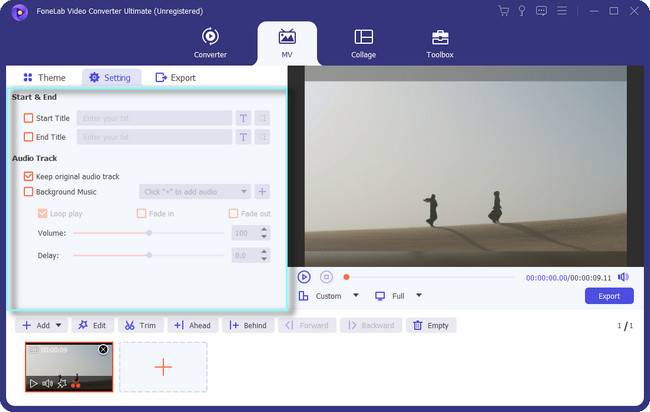
Step 4On the left side of the tool, you can adjust the setting of your video. You can customize its Start Title, End Title, Audio Track, and more. You can change the volume of your video. In addition, you can also add background music to it.
Step 5Once you are okay with the video result, click the Export button at the bottom right side of the tool. After that, wait for the exporting process to end. Later, locate the video on the path or location of the video you chose.
Learning to cut videos on FoneLab Video Converter Ultimate is the easiest. Aside from this tool, you can learn how to trim videos on Mac using its built-in tool. However, you need to install codecs to playback your video. Are you still willing to use the tool? Please, scroll down below.
Video Converter Ultimate is the best video and audio converting software which can convert MPG/MPEG to MP4 with fast speed and high output image/sound quality.
- Convert any video/audio like MPG, MP4, MOV, AVI, FLV, MP3, etc.
- Support 1080p/720p HD and 4K UHD video converting.
- Powerful editing features like Trim, Crop, Rotate, Effects, Enhance, 3D and more.
Part 2. How to Trim Video on Mac with QuickTime
QuickTime is the most extensible multimedia framework that you can utilize on Mac. It supports many file formats, like pictures, videos, animations, and more. For instance, you want to watch movies with your friends on Mac. QuickTime is the best option because it supports HD videos.
Some people ask: can you cut the videos you play on QuickTime? The answer is yes! Using this flexible tool, you can trim the video. However, you need to install extra codecs for a better and smooth experience in QuickTime. Aside from that, it does not support playback for some files. It includes AVI, WMK, FLV, MKV, etc. Do you still want to learn how to trim the middle of videos on QuickTime? Move on.
Step 1Using the Launchpad of Mac, locate its search bar. After that, type in QuickTime. As you input a word, the laptop will suggest tools depending on the term you type. After that, double-click QuickTime, then launch it. Once you see the QuickTime Player at the top of the laptop, you successfully run it.

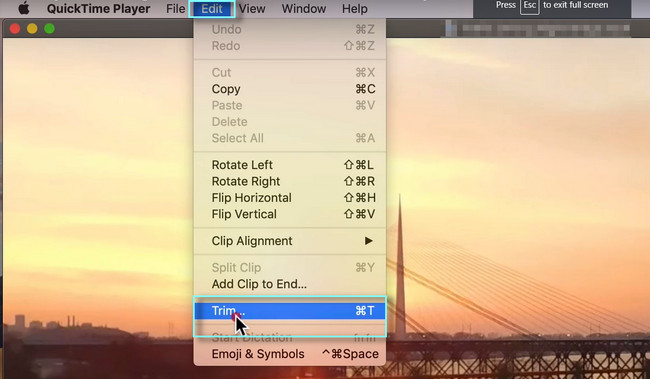
Step 2Open or play the video you want to trim on your Mac. After that, choose the Edit button among all the sections at the top of the laptop. On its drop-down button, select the Trim button. After that, the other editing features of the tool will pop up on the screen.
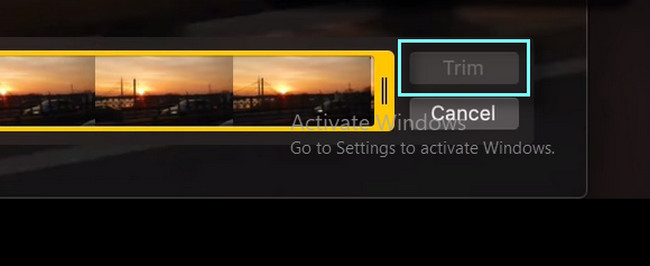
Step 3At the bottom of the video, you will see the Slider on it. In this case, you can trim the video at the beginning and end. It depends on your preference. After that, click the Trim button, and the tool will process the video for a few minutes. All you need to do is wait until the process end.
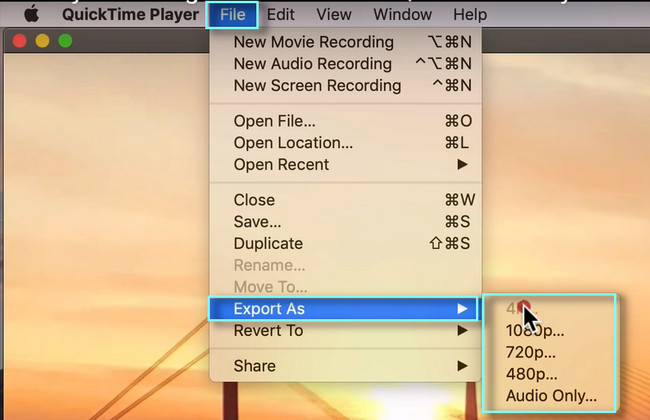
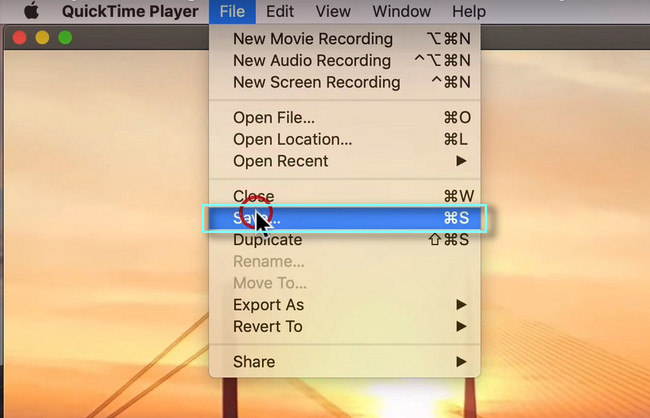
Step 4After you trim it, click the File button at the top of the laptop’s interface. Later, you will see its drop-down button. Choose the Export As button among all of the choices. Click the resolution you prefer for your video on the right side of the options.
Step 5At the top of the tool, choose the Save button. The laptop will save the video on one of its albums. You can locate the album on the Mac to watch the video.
Video Converter Ultimate is the best video and audio converting software which can convert MPG/MPEG to MP4 with fast speed and high output image/sound quality.
- Convert any video/audio like MPG, MP4, MOV, AVI, FLV, MP3, etc.
- Support 1080p/720p HD and 4K UHD video converting.
- Powerful editing features like Trim, Crop, Rotate, Effects, Enhance, 3D and more.
Part 3. FAQs about Trimming Video on Mac
What is the difference between trimming and cutting a video?
Both of them are used to delete parts of the video. However, you are only deleting the end or beginning of the video when you trim. On the other hand, cutting is when you delete some parts of the video somewhere else. It can be at the file's beginning, middle, or ending.
Why do shorter videos perform better after you trim them?
If you upload the video on social media, they will perform and have many views. The reason why is that other people do not prefer long videos. They get bored. Aside from that, they will have a higher retention rate. In this case, you can gain more views for your video. That is why you need to trim your video accordingly.
Video Converter Ultimate is the best video and audio converting software which can convert MPG/MPEG to MP4 with fast speed and high output image/sound quality.
- Convert any video/audio like MPG, MP4, MOV, AVI, FLV, MP3, etc.
- Support 1080p/720p HD and 4K UHD video converting.
- Powerful editing features like Trim, Crop, Rotate, Effects, Enhance, 3D and more.
FoneLab Video Converter Ultimate can trim your video perfectly. Do not miss the chance to use this best tool. Download it now on your Mac or Windows. Enjoy using it!