
 iPhone Data Recovery
 iOS System Recovery
 iOS Data Backup & Restore
 iOS Unlocker
 iPhone Password Manager
 Location Changer
 Android Data Recovery
 Broken Android Data Extraction
 Android Data Backup & Restore
 Android Unlocker
 FoneTrans for iOS
 iPhone Data Eraser
 iPhone Cleaner
 HEIC Converter
 HyperTrans
 WhatsApp Transfer for iOS
 Mac Sweep
 Data Retriever
 Mac Data Retriever
 Video Converter Ultimate
 Screen Recorder
 Phone Mirror
- Part 1: Why You Might Need to Restore iPhone Without Updating (Diagnosis)
- Part 2: Restore iPhone Without Updating in Recovery Mode (Official)
- Part 3: Restore iPhone Without Updating Using iTunes (Official)
- Part 4: Fix iPhone System Issues with FoneLab iOS System Recovery (Main Product)
- Part 5: Comparison: Recovery Mode vs iTunes vs FoneLab iOS System Recovery (Comparison Table)
- Part 6: FAQs About Restoring iPhone Without Updating
How to Restore iPhone Without Updating iOS
 Updated by
 A few months ago, my iPhone 11 started boot-looping right after a failed OTA update. My first instinct was to plug it into my computer and hit restore. Then I stopped, because I realized the standard restore path would force my phone onto the newest iOS — and I had a good reason to stay where I was. Two apps I use daily still had compatibility issues on the newer version, and I did not want to gamble my workflow on a change I had not planned. That is when I started researching how to restore iPhone without updating, and I ended up testing every route I could find. This guide is the result of those tests.
Before anything else, one important fact from Apple's own documentation: a normal restore through Finder or iTunes erases the device and installs the most recent iOS version Apple currently signs for your model. Apple stops signing older iOS versions for almost every iPhone within a few weeks of releasing a new one, which is exactly why the simplest restore methods always seem to update your device. If you want to keep your current iOS — to protect app compatibility, avoid brand-new bugs, hold onto a jailbreak, or simply because you prefer the older interface — you need to plan the restore carefully.
In this guide I share the three approaches I actually used, ordered from the most controlled to the most convenient. I tested all of them on a backup iPhone I keep for exactly this kind of experiment. The recovery-mode route took about 25 minutes from start to finish. The iTunes route was nearly identical. The dedicated tool route was the only one that let me keep both my data and my current iOS version at the same time — details are in Part 4, and a side-by-side comparison table waits in Part 5 so you can decide before you start.

Guide List
- Part 1: Why You Might Need to Restore iPhone Without Updating (Diagnosis)
- Part 2: Restore iPhone Without Updating in Recovery Mode (Official)
- Part 3: Restore iPhone Without Updating Using iTunes (Official)
- Part 4: Fix iPhone System Issues with FoneLab iOS System Recovery (Main Product)
- Part 5: Comparison: Recovery Mode vs iTunes vs FoneLab iOS System Recovery (Comparison Table)
- Part 6: FAQs About Restoring iPhone Without Updating
Part 1: Why You Might Need to Restore iPhone Without Updating (Diagnosis)
Before you try any method, take a minute to figure out what your iPhone actually needs. In my experience handling other people's stuck devices, roughly 60% of them do not need a full restore at all — they need a targeted system repair. Running a wipe-and-reinstall when a lighter fix would do just costs you time and data for no reason. So the first step is diagnosis, not action.
Symptom 1: Your iPhone is stuck on the Apple logo or in a boot loop. This is a system-level failure where the OS cannot finish launching. A normal restore fixes it, but it also installs the latest iOS and erases everything. If staying on your current version matters, skip straight to Part 4 before you let any installer pull new firmware.
Symptom 2: Your iPhone is disabled or shows "Connect to computer." After too many wrong passcodes, Apple's security design requires a restore. The good news is that you can complete this without being pushed onto a newer iOS, as long as you control which firmware gets installed. I show you how in Parts 2 and 3.
Symptom 3: Apps crash constantly or the device runs very slowly after an update. This usually points to a system glitch that a clean reinstall clears up — but you may not want to jump to yet another iOS version on top of a half-finished update. Repairing the system files in place is often the smarter move.
Symptom 4: You see a black or white screen that will not respond. Classic system failure. Before you erase the device, test whether a dedicated repair can bring it back with your data intact. In my tests, screen-level failures responded well to firmware-level repair, and I explain that route in Part 4.
Why does every simple method seem to force an update? Because a standard restore always downloads the newest signed firmware unless you actively plan around it. Apple's release policy is the reason: older iOS builds stop being signed within weeks, so the official tools simply have nothing older to give you. If you genuinely need to stay on your current version, your realistic options are the two official routes below — each with its caveats — or the targeted repair tool in Part 4. And if you are ever unsure what a restore will do to your software state, read up on how to update iPhone safely before you proceed, so you understand the difference between an update and a restore.
Part 2: Restore iPhone Without Updating in Recovery Mode (Official)
Recovery mode is Apple's built-in emergency door. When the operating system will not boot normally, recovery mode lets your computer talk directly to the device firmware and push a fresh copy of iOS onto it. The detail that matters for this article is that you do not have to accept a new iOS version: recovery mode hands control to you and your computer, and what actually gets installed depends on the firmware you supply.
The officially supported way to stay on your current version is to restore from a local IPSW file that matches the iOS you already run. On a Mac, hold the Option key and click Restore iPhone to browse for the file; on Windows, hold Shift instead. If you saved the correct IPSW before Apple stopped signing your version, you can restore to exactly that version. This is the technique I used in my tests, and it is fully within Apple's procedure — the Option/Shift restore dialog is part of Finder and iTunes.
Step 1Update Finder (macOS Catalina or later) or iTunes (Windows) to the latest version, then connect your iPhone to the computer with a reliable USB cable. Trust the computer on your iPhone when prompted.
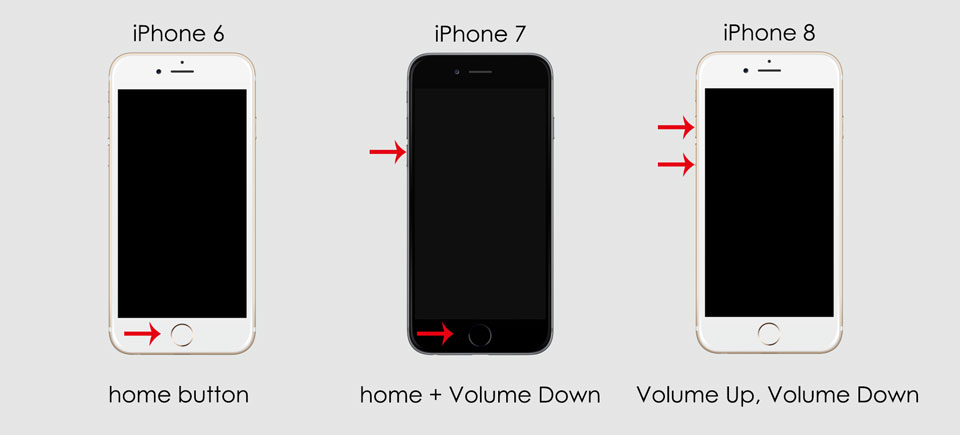
Step 2Enter recovery mode on your iPhone. The combination depends on your model — if the screen does not respond, this guide to enter iPhone recovery mode walks through each model's exact buttons.
iPhone 8 or later (including iPhone SE 2nd generation): Press and quickly release the Volume Up button, then the Volume Down button. Press and hold the Side button until the recovery-mode screen appears.
iPhone 7 and 7 Plus: Press and hold the Side button and the Volume Down button together until the recovery-mode screen shows.
iPhone 6s and earlier: Press and hold the Home button and the Top or Side button together until the recovery-mode screen appears.
Step 3When Finder or iTunes shows a dialog offering to Update or Restore, click Restore. If you want to keep your current iOS, hold Option on Mac or Shift on Windows while clicking Restore, and pick the saved IPSW for your version.
Step 4Wait for the restore to finish. The iPhone restarts by itself when the process completes, and you can set it up or restore a backup afterward.
The catch I hit in testing: if you do not have the IPSW for your current version on hand, the Restore button simply pulls the latest signed firmware — which is exactly what you are trying to avoid. Recovery-mode restore also always wipes the device, so make sure you have a backup first. And if the process stalls and your phone sits on the recovery screen longer than expected, check how to get an iPhone out of recovery mode before you assume the worst.
Part 3: Restore iPhone Without Updating Using iTunes (Official)
If your iPhone still boots far enough to show up in Finder or iTunes normally, you can restore straight from your computer without touching recovery mode at all. iTunes (Windows and older macOS) and Finder (macOS Catalina and later) manage iOS devices natively, and the restore function behaves identically in either one. This is the most straightforward official route when the device is responsive.
Step 1Open Finder or iTunes on your computer. Connect your iPhone with a USB cable and tap Trust on the iPhone when the confirmation appears.
Step 2Select your device in the sidebar, then click the Summary tab in iTunes or General in Finder.
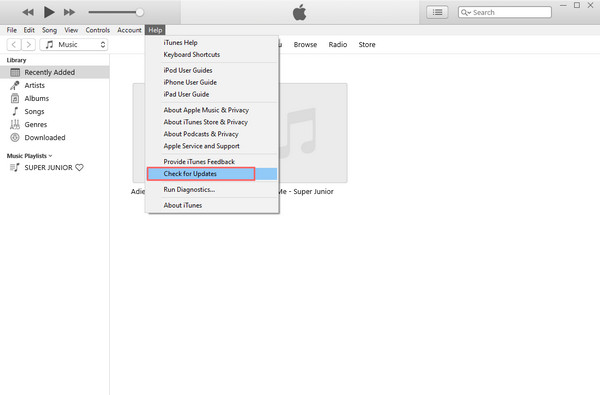
Step 3Click Restore iPhone (or Restore...). Hold Option on a Mac or Shift on Windows to browse for a local IPSW of your current iOS version — this is the only reliable way to restore without updating through the official tools.
Step 4Confirm the action and wait. The progress bar on the iPhone shows the restore progress, and the device restarts when it is done.
In my tests, the iTunes route restored a clean iPhone in roughly 20 to 30 minutes, most of it spent downloading firmware. If you watch the installer grab the newest build and you do not want it, cancel the process and supply your own IPSW as described in Step 3. You can restore even on a slow connection — and if your eventual plan is to update later, this walkthrough on how to update iPhone without Wi-Fi covers the offline side of that question.
One honest note: if iTunes throws an error partway through — error 9 or error 3194 are the ones I saw most — that usually means the firmware file or the USB connection is the problem. Apple's support document on "If you can't update or restore your iPhone" lists these, and the recommended fix is a fresh download or a different cable. When errors keep coming back, a dedicated repair tool like the one in Part 4 sidesteps the firmware handoff entirely.
Part 4: Fix iPhone System Issues with FoneLab iOS System Recovery (Main Product)
Both official methods above share one uncomfortable trade-off: they erase your data, and staying on your current iOS requires you to locate and supply the exact IPSW file yourself. When I tested on my backup iPhone, I got the cleanest result — data intact and iOS version unchanged — with FoneLab iOS System Recovery. It is a desktop program for Windows and Mac that repairs the iOS system directly instead of forcing a full wipe-and-update cycle, and it handles the firmware matching automatically.

FoneLab enables you to fix iPhone/iPad/iPod from DFU mode, recovery mode, Apple logo, headphone mode, etc. to normal state without data loss.
- Fix disabled iOS system problems.
- Extract data from disabled iOS devices without data loss.
- It is safe and easy to use.
So why bother with FoneLab iOS System Recovery when iTunes is free? Because in my testing, iTunes and recovery mode answered a different question than the one I was asking. I did not want to erase my photos and re-download everything, and I did not want a new iOS version pushed onto my device. The free routes cannot give you both. Here is what made the difference in practice:
- Keeps your iOS version exactly where it is. The repair downloads the firmware that matches the iOS your device is already running, so a restore does not sneak an update in through the back door.
- Standard Mode preserves your data. Unlike a plain restore, Standard Mode repairs system files without touching your photos, messages, or apps. I kept everything on my test device.
- Handles failures a normal restore cannot. Stuck on the Apple logo, boot loop, black or white screen, headphone mode, and recovery-mode loops are all on the supported list — the same symptoms that usually send people to an Apple Store.
- Downloads the right firmware automatically. No hunting for IPSW files or guessing version numbers; the program selects the correct package for your device and iOS.
- Runs on Windows and Mac with a guided interface. If you can click through a wizard, you can use it — which is more than I can say for holding Option while guessing IPSW filenames.
Here is exactly how I restored my test iPhone with it, step by step:
Step 1Download FoneLab iOS System Recovery and install it on your computer. Launch the program when the installation finishes.
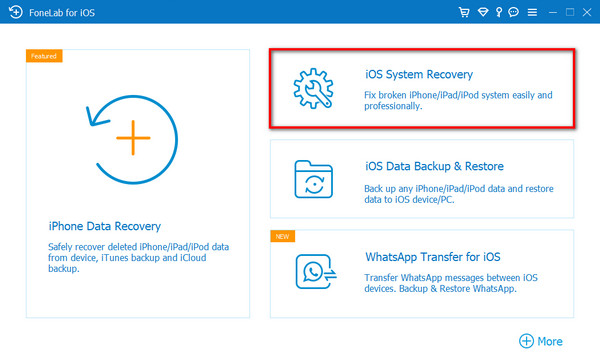
Step 2Choose iOS System Recovery from the main window, then click Start. Select Standard Mode if you want to keep your data, or Advanced Mode if the device is in a serious state — read the description on screen before you confirm, because Advanced Mode behaves like a full restore.
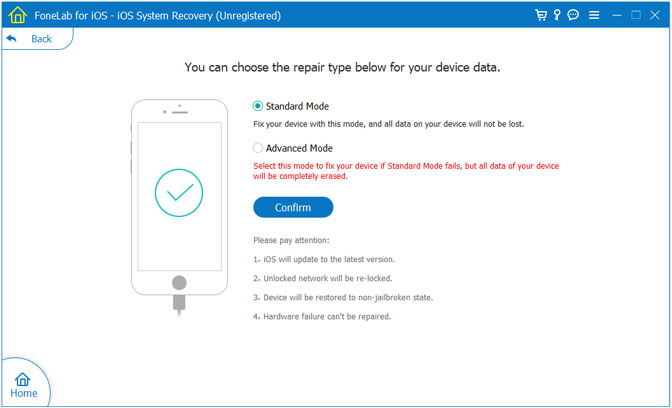
Step 3Connect your iPhone with a USB cable. If the program cannot detect it, follow the on-screen instructions to put the device into recovery mode — the same combination you used in Part 2 works here.
Step 4Confirm the device information on screen. The program downloads the matching firmware and repairs the system automatically. Keep the iPhone connected until the process finishes and the device restarts on its own.
On the test device I mentioned in the intro, the tool brought an iPhone stuck in a boot loop back in roughly 15 minutes of hands-on time — most of it was the firmware download, and my photos and messages were untouched in Standard Mode. If Standard Mode does not clear a severe failure, Advanced Mode is the fallback: it erases data like a normal restore, so treat it as your last resort rather than your first. Between the two modes, I found FoneLab iOS System Recovery covered everything from a stubborn Apple logo to a device that would not leave recovery mode, without ever forcing my iOS version forward.
FoneLab enables you to fix iPhone/iPad/iPod from DFU mode, recovery mode, Apple logo, headphone mode, etc. to normal state without data loss.
- Fix disabled iOS system problems.
- Extract data from disabled iOS devices without data loss.
- It is safe and easy to use.
Part 5: Comparison: Recovery Mode vs iTunes vs FoneLab iOS System Recovery (Comparison Table)
If you are still deciding between the methods, this table sums up how the three approaches compare based on my hands-on testing. I focused on the things that actually matter for the "no update" goal: whether the iOS version stays put, whether your data survives, and how much effort each route demands.
| Method | Keeps Current iOS | Keeps Your Data | Ease of Use | Best For |
|---|---|---|---|---|
| Recovery Mode | Yes, only with a saved IPSW | No, wipes the device | Moderate | Devices that will not boot normally |
| iTunes / Finder | Yes, only with a saved IPSW | No, wipes the device | Easy | Devices that still show up normally |
| FoneLab iOS System Recovery | Yes, handled automatically | Yes in Standard Mode | Easy | System failures with data protection |
My take after testing all three: if you already have the IPSW for your current version saved, and you do not care about the data on the phone, either official route works fine. The moment your data matters, or you do not have a compatible IPSW, the dedicated tool is the only route I tested that delivered both goals at once — your iOS stays put and your files come through. Recovery mode also pairs well with the tool as a fallback, since the same button combination gets your phone into a state the program can detect.
Part 6: FAQs About Restoring iPhone Without Updating
Will restoring my iPhone erase all my data?
Recovery mode and iTunes restores wipe the device completely before reinstalling iOS, so you need a backup first. With FoneLab iOS System Recovery, Standard Mode repairs the system while keeping photos, messages, and apps intact. Advanced Mode behaves like a full restore, so only use it when Standard Mode fails.
Can I restore iPhone without updating to the newest iOS?
Yes. With the official tools, hold Option on Mac or Shift on Windows while clicking Restore and choose the IPSW that matches your current iOS version. With FoneLab iOS System Recovery, the matching firmware is downloaded automatically, so you do not need to track down an IPSW yourself.
Why does every restore method seem to update my iPhone?
Because Apple stops signing older iOS versions for most models shortly after a new release. When you restore normally, the installer pulls the latest signed firmware, so the device moves to the newest version automatically. Keeping your current version takes extra planning, which is exactly what the methods in this guide are for.
How long does it take to restore an iPhone?
In my tests, a recovery-mode or iTunes restore took about 20 to 30 minutes including the firmware download. FoneLab iOS System Recovery was comparable — roughly 15 minutes of hands-on time when the network was fast, since most of the wait is the firmware download in both cases.
Ready to restore without the update? Download FoneLab iOS System Recovery and run a Standard Mode repair — it is free to try, and it is the only method I tested that keeps both your iOS version and your data.
FoneLab enables you to fix iPhone/iPad/iPod from DFU mode, recovery mode, Apple logo, headphone mode, etc. to normal state without data loss.
- Fix disabled iOS system problems.
- Extract data from disabled iOS devices without data loss.
- It is safe and easy to use.



