- Convert AVCHD to MP4
- Convert MP4 to WAV
- Convert MP4 to WebM
- Convert MPG to MP4
- Convert SWF to MP4
- Convert MP4 to OGG
- Convert VOB to MP4
- Convert M3U8 to MP4
- Convert MP4 to MPEG
- Embed Subtitles into MP4
- MP4 Splitters
- Remove Audio from MP4
- Convert 3GP Videos to MP4
- Edit MP4 Files
- Convert AVI to MP4
- Convert MOD to MP4
- Convert MP4 to MKV
- Convert WMA to MP4
- Convert MP4 to WMV
Detailed Guide on How to Overlay An Image on iPhone
 Updated by Lisa Ou / Dec 11, 2023 16:30
Photo editing is a hobby many people try from time to time, but most spend time only exploring the basic editing techniques. For instance, cropping or adding a simple filter to an image. But how would you feel about leveling up your skills? Well, let this article help you discover a new editing function and learn how to put a picture on top of another picture.

Overlaying an image on your iPhone will give you advantages to improve the photos you edit. By learning this editing feature, your images will no longer be another simple edited photo. You will get to explore your artistic abilities, and it may be your gateway for seeking more advanced editing functions. It may also be the start of uncovering your editing talent.
That said, check out the proper strategies and procedures below to overlay an image on your iPhone. This article also contains the leading alternatives if you find the primary method difficult to navigate. In each part you browse, you will encounter detailed steps that will serve as your guideline to finish the editing process successfully. Please read ahead to begin.

Guide List
Part 1. How to Overlay An Image on An iPhone with Built-in Features
Regarding overlaying an image, the iPhone offers a built-in method to navigate the function. Hence, no installation is needed, as the required app, Shortcuts, is already built into the device’s operating system. The Shortcuts app is used to perform tasks on your device quickly. As its name indicates, it helps users get things done faster with the task automation you create. Hence, you can also use it to create an automation for image overlaying.
However, even if its name makes it seem like you will only experience a convenient process, that’s not the case in all situations. On your first use, expect to face lengthy navigation since you will have to set up the shortcut for the image editing function first. Setting it up requires several options to tap, so prepare yourself for a bit of a time-consuming procedure.
Utilize the trouble-free guidelines below to overlay image on your iPhone:
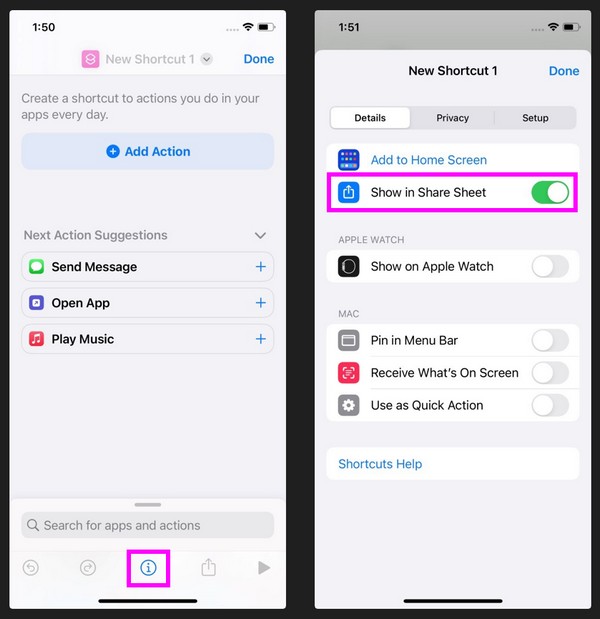
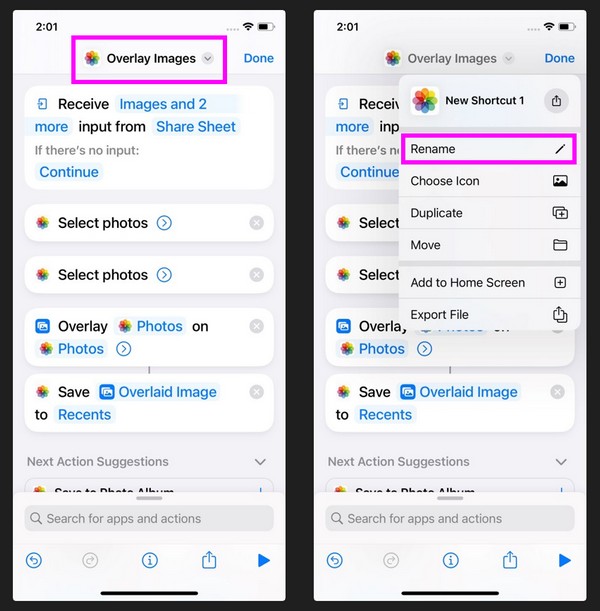
Step 1View your iPhone Home screen to find and tap the Shortcuts app. Once its prime interface is presented, tap the plus (+) icon at the screen’s top right area.
Step 2Select the (i) icon at the bottom of the following screen. Then, enable the Show in Share Street slider to access the feature on the Photos app later quickly.
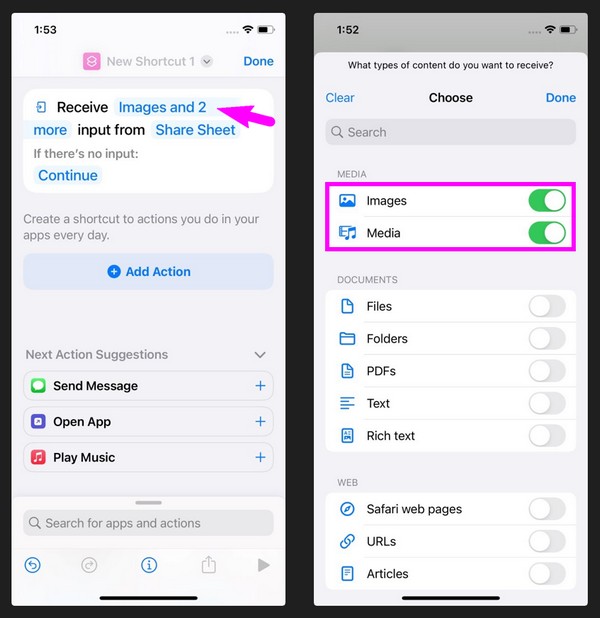
Step 3Next, tap the word Images and 2 more on the screen, then enable the Images and Media sliders on the next. Also, ensure all the other sliders are disabled except for the two.
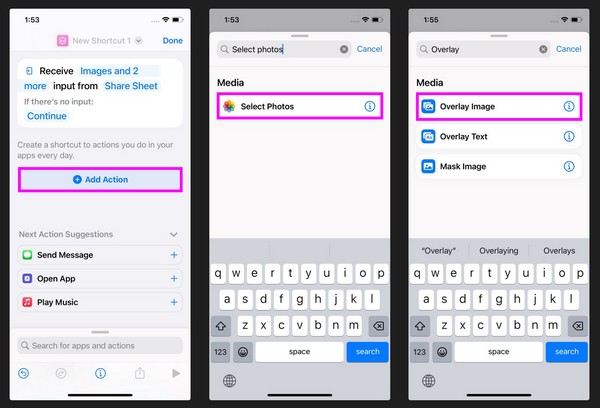
Step 4Once enabled, select Add Action and type “Select photos” in the text field. On the results, choose the Select Photos tab, then repeat the process to add another Select Photos. Next, type “Overlay Images” in the field and pick Overlay Images on the results.
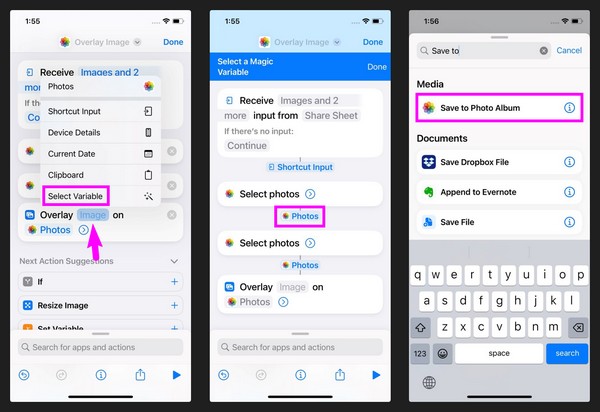
Step 5Once you complete the actions on the screen, long-tap the word Image in the Overlay section, then pick Select Variable from the selections. Following that, tap the first Photos under ‘Select photos.’ Then, type and select Save to Photo Album in the text field.
Step 6Finally, select your shortcut name at the top and rename it “Overlay Images” or anything suitable for the shortcut. Click Done and the task will be saved as a shortcut.
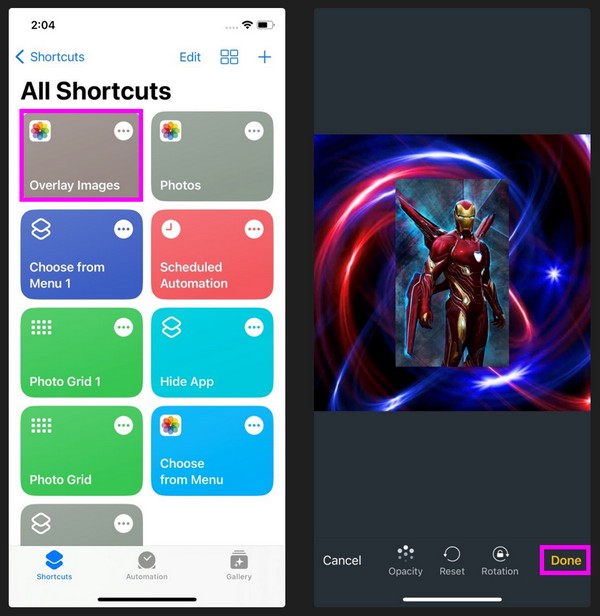
Step 7Now, navigate the Shortcuts app’s primary interface to see the Overlay Images shortcut you just created. When prompted to choose images, select the photos you wish to overlay. Then, use the overlay feature to edit them. When finished, tap the Done tab to save your newly edited image.
Don’t worry, though. After you create the shortcut, accessing the editing function the next time will be much more convenient. You only have to put additional effort into your first use to enjoy the feature effortlessly in the following days.
Part 2. 2 Leading Alternatives to Overlay An Image on iPhone
We understand if you find the official technique to overlay your image inconvenient. That’s why we added the top alternatives as a bonus if you wish to use a different editing method. The apps below offer an overlay feature to edit and improve your photos.
Top 1. Snapseed
Snapseed is an efficient photo editor developed by Google. It can be obtained on the App Store, so you won’t have difficulty installing it on your iPhone. It is a professional editor with several features, including overlaying iPhone images. Hence, Snapspeed is a reliable alternative to avoid going through the built-in editing procedure above.
Meanwhile, this editing app supports JPG and RAW files. Besides the overlay, its features include crop, rotate, perspective, white balance, healing, text, vignette, brush, curves, lens blur, expand, black and white, frames, and more. Thus, it will be helpful if you’d like to explore more photo editing functions to improve your images.
Have regard to the user-friendly directions below to use the photo overlay app Snapseed:
Step 1Head to your iPhone App Store to locate and get the Snapseep app. Launch the editor and click the plus (+) icon on its initial interface. When your photos are presented, select the first image you intend to use as the bottom layer.
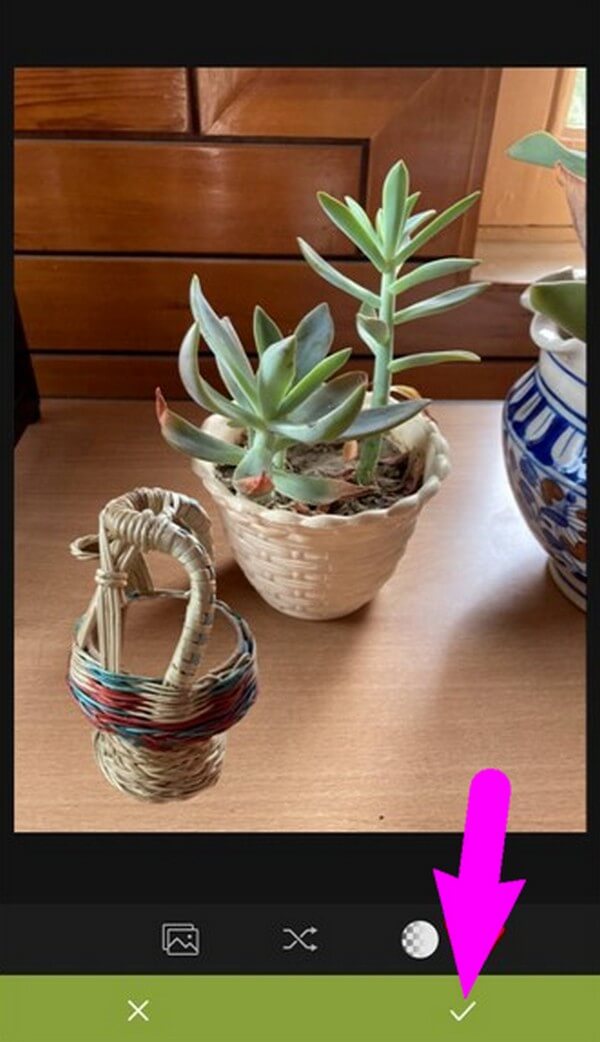
Step 2Once the picture is displayed on the app screen, select Tools at the bottom and tap Double Exposure > Photo with plus icon > Overlay. Then, manage the overlay feature according to your editing preference. When done, click the check icon, then Export to save.
Top 2. HashPhotos App
Another effective app for overlaying an image on an iPhone is the HashPhotos app. Like the previous image editor, this app is also offered on the App Store, ensuring its safety and security for installation. It has various features that can improve your images, including the overlay function. Also, the app is effortless to navigate, thanks to its simple interface.
Aside from that, the HashPhotos app provides more image editing functions, such as crop, flip, rotate, filters, frame, shape mask, tilt shift, eraser or background remover, adjust brightness, contrast, hue, saturation, vibrance, etc. It also allows you to create a private album and use a passcode or Touch ID to access it, making the app more secure.
Conform to the manageable steps below to overlay image on iPhone using the HashPhotos app:
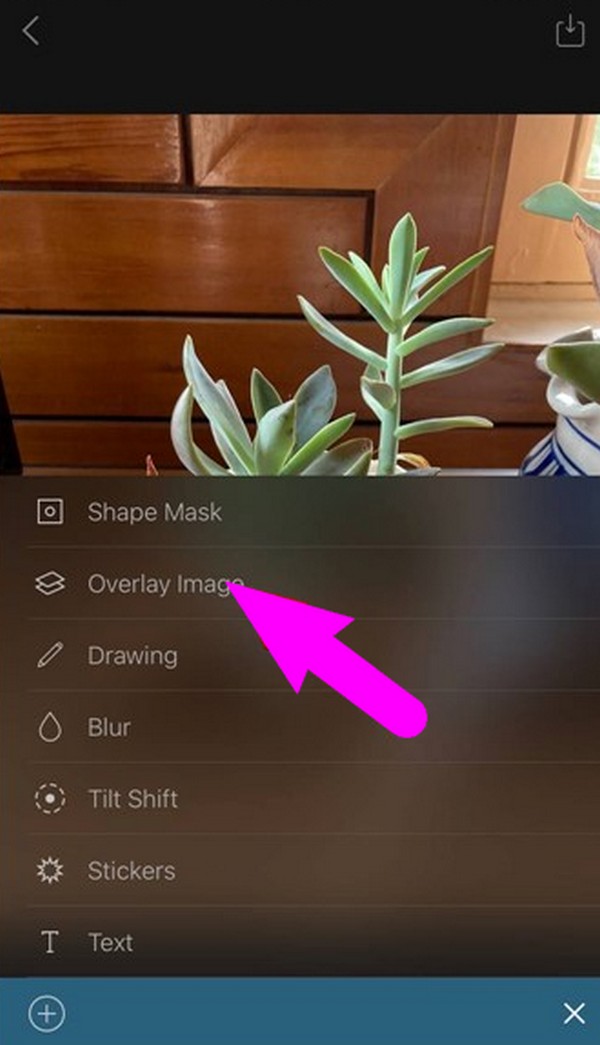
Step 1Obtain the HashPhotos app from the App Store, then run it on your iPhone. Next, import the image you will use as a bottom layer, then select the three-bar icon > plus icon > Overlay Image.
Step 2Adjust the overlay function depending on your preference. Finally, tap the checkmark to save your newly-edited photo.
Part 3. FAQs about How to Overlay An Image on An iPhone
1. What is an overlay on an iPhone?
If this is your first time hearing about overlay, it is a photo editing feature that allows you to put a photo at the top of another image.
2. Is there an image editor on iPhone?
Yes, there is. When editing a photo on an iPhone, you can access the Photos app or Shortcuts tool to use the built-in editing functions.
Video Converter Ultimate is the best video and audio converting software which can convert MPG/MPEG to MP4 with fast speed and high output image/sound quality.
- Convert any video/audio like MPG, MP4, MOV, AVI, FLV, MP3, etc.
- Support 1080p/720p HD and 4K UHD video converting.
- Powerful editing features like Trim, Crop, Rotate, Effects, Enhance, 3D and more.
The information in the article is all you have to know to overlay your images on an iPhone successfully. For more helpful tips, scan the FoneLab site.