How to Screen Capture on Mac in 3 Stress-free Techniques
 Updated by
 Do you need to capture your Mac screen? We got you! This article presents 3 different methods for capturing the Mac screen. This technique is commonly used for individuals who want to take a snapshot from a video, take down notes, and in other circumstances. Capturing the Mac screen using a mobile phone might reflect the screen. Kindly scroll below to see the 3 proven and tested ways to screen capture on Mac. Move on.


Guide List
Part 1. How to Capture Screen on Mac with Shortcut Key Combinations
The previous software for taking screenshots on your Mac will indeed meet all your expectations for the screenshot tool. However, some individuals want to know more methods for taking screenshots on a Mac as future references. This section will show you the 4 leading Mac screen capture shortcuts.
Before performing the shortcut key combinations on your Mac to take a screenshot, please ensure that the keys you press are included in the combination. The reason is that one wrong key can make bad changes to your Mac's features or operations. Please scroll down to see the full information about the shortcut key commands for taking screenshots on your Mac.
Command + Shift + 6
Do you use an earlier version of macOS? There is a key combination to capture the toolbar from your Mac screen. You only need to press the Command + Shift + 6 key combination to do this.
However, this procedure is no longer supported on the latest versions of macOS. Additionally, the toolbar is the only Mac portion it captures. It cannot capture other sections or programs on your Mac. Don't worry. The three more shortcut key combinations with this section are supported on the later and earlier versions of macOS for screen capture on a Mac.
Command + Shift + 4
Most Mac users only want to capture a portion of their Mac screen for documentation, presentation, and other activities related to their school or work. The Command + Shift + 4 key combination is the best screenshot feature or combination you can use.
This key combination allows you to use the Mac cursor to select the Mac screen portion you want to screenshot. It saves the screenshot from the Mac Dock to easily locate or edit it, depending on your preference. Additionally, this key combination is the most used shortcut for individuals who want to hide something from the Mac screen due to privacy concerns.
Command + Shift + 4 + Space Bar
Command + Shift + 4 + Space Bar is a key combination that allows you to30 capture a screen on a Mac window. This shortcut is commonly used by Mac users who browse the web using their browsers. It will enable you to capture a window in one click. However, this shortcut sometimes fails to detect the Mac window and captures excess parts of the screen.
Command + Shift + 3
Some individuals are required to take a screenshot of the entire screen of their Mac, especially if they're watching in full-screen mode. The best thing about Mac is that it allows you to capture the whole screen using the Command + Shift + 5 key combination. The best thing about it is that the Mac will automatically save the screenshot from its Dock. In this location, you can operate different functions for the screenshot, like editing and sharing it with other devices.
Part 2. How to Screen Capture on Mac with Mac FoneLab Screen Recorder
Due to the quantity of the screenshot features of Mac, it is sometimes hard to choose the best. Why not try Mac Fonelab Screen Recorder? It works perfectly on your Mac without causing lag in its performance while taking a screenshot. This third-party tool captures the Mac screen in high quality. Furthermore, this tool can also be used to record your Mac screen. It also has basic editing tools that can be used after taking the screenshot. Please follow the steps below to discover how this best screen capture software for Mac is being used.
FoneLab Screen Recorder allows you to capture video, audio, online tutorial, etc on Windows/Mac, and you can easily customize size, edit the video or audio, and more.
- Record video, audio, webcam and take screenshots on Windows/Mac.
- Preview data before saving.
- It is safe and easy to use.
Step 1Please click the Free Download option on the website of this software. After that, wait for the downloading process to be finished and set it up afterward. Install and open the software on your computer to start the screen capture process.

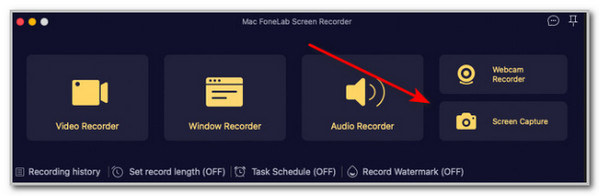
Step 2The tool shows you the screen recording and screen capture tools that it can offer. Please look at the side and click the Screen Capture button. This way, use the Mac cursor to select the portion of your Mac screen that you want to screen capture.
Step 3The toolbar will appear on the screen, and you may use the editing tools to edit the screenshot before saving it on your Mac. After that, please choose the Save button on the right side of the toolbar to keep the screenshot on your Mac.

Part 3. How to Screen Capture on a Mac with QuickTime Player
QuickTime Player can play different media files from your Mac. This program is also bound to record your Mac screen activities or take a screenshot. The best thing about this tool is that it can be accessed using shortcut key commands, which is Command+Shift+5.
However, some Mac users are having confusion about the operations of QuickTime Player. The reason is that its screen recording and screenshot tools have no labels. They tend to accidentally switch the functions of the tools, which causes them an interruption in the screenshot process. How to capture screen on Mac QuickTime Player? The steps are provided below.
Step 1Open the QuickTime Player on your Mac and click the File tab at the top of the main interface to see more options. Then, please click the New Screen Recording button from the list to see the screen recording or screenshot options for the tool. Alternatively, you can press the Command + Shift + 5 key combination on your Mac to see the toolbar that QuickTime Player offers.
Step 2The tool shows you the screen recording and screenshot features it offers using the toolbar. You can use the three screenshot features on the left side for capturing the entire screen of your Mac, a window, or a portion of its screen. You may take the picture below as your guide. Finally, please click the Capture button to take a screenshot of the Mac screen.

Buttons Functions
- The tool captures the entire Mac screen.
- The tool screenshots the window from your Mac.
- The tool allows you to capture a specific portion of your Mac screen using its cursor.
Part 4. FAQs about How to Screen Capture on a Mac
Why is my screenshot not working?
There might be a permission denied from the tool you use for taking a screenshot on your Mac. Also, there could be broken keys from the physical keyboard of your Mac if you are accessing the screenshot tools using shortcut key commands.
Is it illegal to take screenshots without permission?
It is illegal to take a screenshot without the permission of the content owner or to use it for bad intentions. It is still better to ask permission when the content of the screenshot is not yours.
How to screen capture on a Mac? This article focuses on this question! It shows the 3 different yet easy ways to capture your Mac screen, including Mac Fonelab Screen Recorder. Taking screenshots on your Mac is necessary for documentation and other reasons. It is better to learn how to do it now!