
 iPhone Data Recovery
 iOS System Recovery
 iOS Data Backup & Restore
 iOS Unlocker
 iPhone Password Manager
 Location Changer
 Android Data Recovery
 Broken Android Data Extraction
 Android Data Backup & Restore
 Android Unlocker
 FoneTrans for iOS
 iPhone Data Eraser
 iPhone Cleaner
 HEIC Converter
 HyperTrans
 WhatsApp Transfer for iOS
 Mac Sweep
 Data Retriever
 Mac Data Retriever
 Video Converter Ultimate
 Screen Recorder
 Phone Mirror
- Part 1: What a Factory Reset Really Does to Your Photos
- Part 2: Recover Photos from iCloud Backup (Free Method)
- Part 3: Recover Photos from iTunes Backup (Official Method)
- Part 4: Recover Photos After Factory Reset with FoneLab for iOS
- Part 5: Comparison: iCloud vs iTunes vs FoneLab for iOS
- Part 6: FAQs About Recovering Photos After Factory Reset
How to Recover Photos After Factory Reset on iPhone
 Updated by
 Last spring, my iPhone's storage finally hit the wall. The phone had been lagging for weeks, apps kept crashing, and no amount of cache clearing helped. I accepted that I needed to reset it to factory settings — and the moment the decision really sank in was when I looked at my camera roll. Those photos of my daughter's first steps, a beach trip with friends, and a stack of family dinners were the only reason I hesitated at the confirmation screen.

Here is what I learned from that experience, and what this guide walks you through: a factory reset is scary, but it does not have to mean the end of your photos. Depending on what you did before — and even if you did nothing at all — you can still get your pictures back. I tested the methods below on my own device, and I explain exactly how to recover photos after a factory reset on an iPhone, from the free built-in options to a dedicated recovery tool.
Apple's official support documentation is blunt about what Erase All Content and Settings does: it deletes your data and settings and restores the device to its factory state. What the documentation does not tell you is how much of that data can be brought back afterwards. That is the gap this article fills. Read the diagnosis in Part 1 first — it takes two minutes and tells you which recovery path actually applies to your situation.

Guide List
- Part 1: What a Factory Reset Really Does to Your Photos
- Part 2: Recover Photos from iCloud Backup (Free Method)
- Part 3: Recover Photos from iTunes Backup (Official Method)
- Part 4: Recover Photos After Factory Reset with FoneLab for iOS
- Part 5: Comparison: iCloud vs iTunes vs FoneLab for iOS
- Part 6: FAQs About Recovering Photos After Factory Reset
Part 1: What a Factory Reset Really Does to Your Photos
The first thing to understand is that there are two very different things people call a "factory reset." iOS has a plain Reset All Settings option, which only returns your settings to their defaults and leaves your photos untouched. The option that wipes your photo library is the full one: Erase All Content and Settings. That is the action I took, and it is the situation this article is about.
When you tap Erase All Content and Settings, iOS removes everything stored locally on the device — your photos, videos, messages, apps, and accounts — then restarts the phone in a fresh, out-of-the-box state. But here is the nuance most people miss, and it is the reason recovery is possible at all.
Photos in your local camera roll are deleted, but photos that were synced to iCloud Photos are not. They still live in your iCloud library, and the moment you sign in with the same Apple ID after the reset, most of them come back automatically. In the same way, if you had an iCloud Backup or an iTunes backup on your computer, a complete snapshot of your photo library still exists there. According to Backblaze, the same reasoning that pushes professionals toward the 3-2-1 backup rule — three copies, two media types, one offsite — is why a second copy of your photos is the difference between a bad day and a disaster.
The second thing to understand is how deletion works at the storage level. When iOS deletes a photo, it does not physically wipe the space the file occupied; it simply marks that space as available to be overwritten. Recovery tools can read the leftover data directly from the flash storage. This is exactly how a program like FoneLab for iOS can pull back photos even when you have no backup at all. It is also why the golden rule after a reset is to stop using the phone as much as possible — new data can overwrite the space your old photos still occupy.
Before you read further, figure out which of these three cases you are in. Case one: you backed up to iCloud or iTunes before resetting — jump to Part 2 or Part 3. Case two: you never backed up, but iCloud Photos was enabled — most of your library is safe and simply needs you to sign back in. Case three: you did not back up and you did not use iCloud Photos — go straight to Part 4. If you are not sure whether a backup exists, check how to back up an iPhone so you know what a proper backup looks like going forward.
Part 2: Recover Photos from iCloud Backup (Free Method)
iCloud Backup is Apple's built-in safety net, and it is completely free for the first 5GB of storage. When it is turned on, your iPhone automatically makes a backup each night while it is charging and connected to Wi-Fi. If that backup captured your photos before you reset the device, restoring it brings your whole library back. This is the method I recommend when you planned ahead.
One note before the steps: the iCloud Backup method restores everything as a single snapshot — you cannot pick out individual photos. If you need to select specific images, you will prefer the tool in Part 4. But if you want the free, official route, here is exactly what I did.
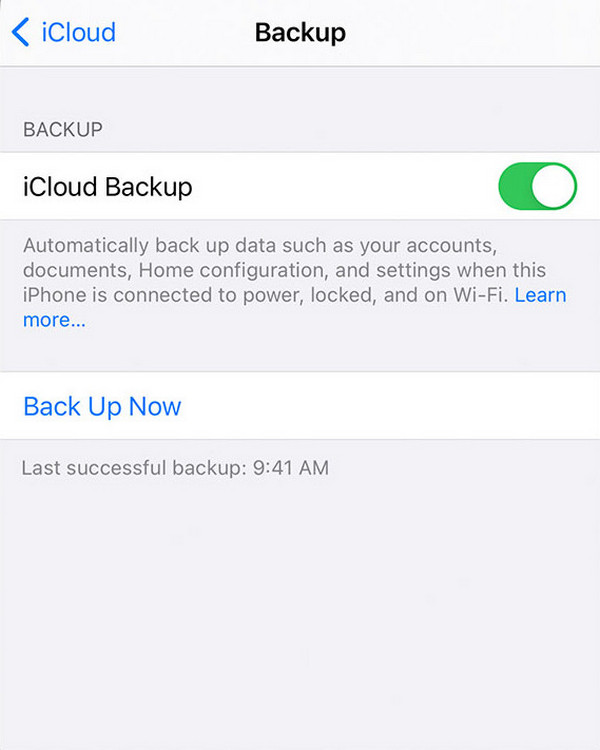
Step 1Make sure you have a backup. On your iPhone, open Settings and tap your name at the top, then iCloud and iCloud Backup. Toggle iCloud Backup on and tap Back Up Now. Wait for the progress bar to finish — with a full camera roll this took me about fifteen minutes on Wi-Fi.
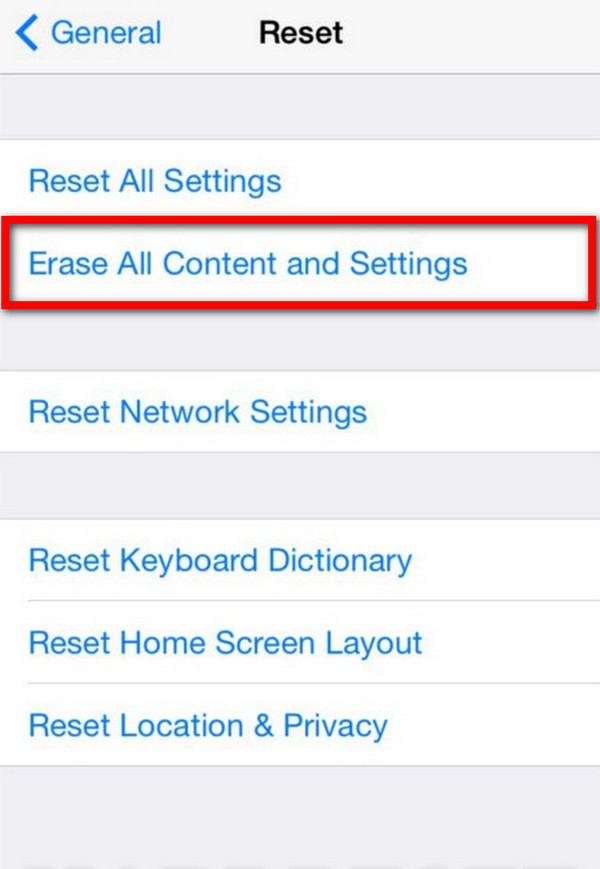
Step 2Now reset the iPhone. Go back to Settings, tap General, scroll to the bottom, and choose Transfer or Reset iPhone. Tap Erase All Content and Settings, confirm with Erase iPhone, and enter your Apple ID password. The phone restarts into the setup screen.
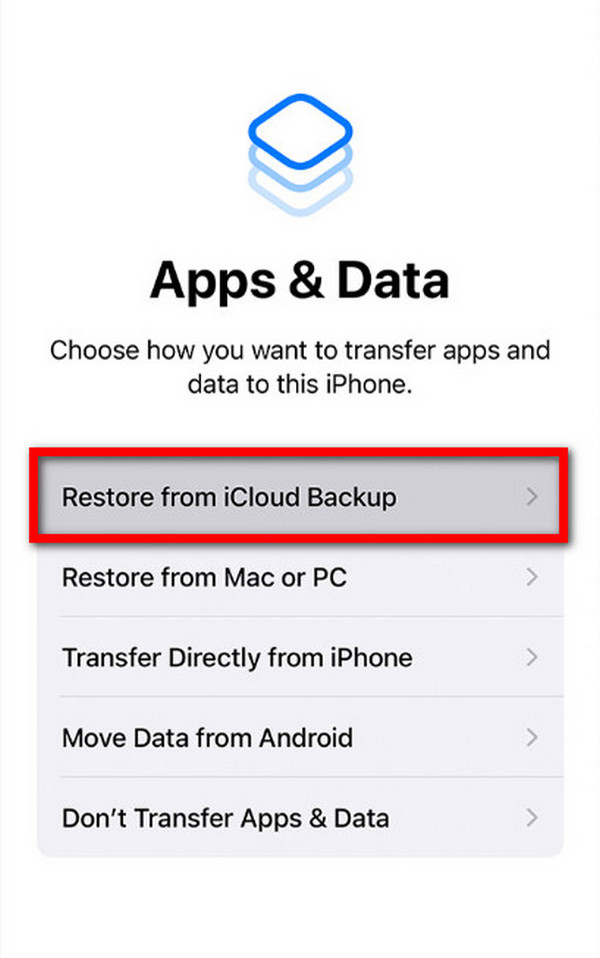
Step 3During setup, connect to Wi-Fi and stop at the Apps & Data screen. Choose Restore from iCloud Backup, sign in with the same Apple ID, and select the backup you made in Step 1. The restore runs automatically and downloads your photos over Wi-Fi. On my connection it took just over an hour for a 32GB backup, so plug in the phone and give it time.
The biggest limitation of this method is the 5GB free ceiling. If your backup was larger, iCloud would have refused to back up the device until you paid for more space — which is exactly how many people end up with no backup despite having the feature enabled. If you want to see what is inside a backup before committing to a restore, learn how to view iCloud backup files first.
Part 3: Recover Photos from iTunes Backup (Official Method)
If your iCloud storage was too small, or you simply prefer keeping a backup on your own hardware, iTunes is the answer — on macOS Catalina or later, the same feature lives inside Finder. An iTunes backup is stored on your computer, so it does not consume any iCloud space, and it can hold far more data than the 5GB free tier.
The trade-off is the same as iCloud: an iTunes restore is all-or-nothing. It replaces the contents of the device with the backup snapshot. Since you are restoring onto a freshly reset iPhone, that is rarely a problem — just know you cannot cherry-pick photos here either.
Step 1Connect your iPhone to the computer with a USB cable and open iTunes (or Finder on a Mac). When your iPhone asks whether to trust this computer, tap Trust and enter your passcode. Click the device icon in the upper-left corner of the iTunes window.
Step 2In the Summary tab, select This computer under the Backup heading, then click Back Up Now. I also ticked Encrypt local backup so the backup includes account passwords — you will need to set a password for it.
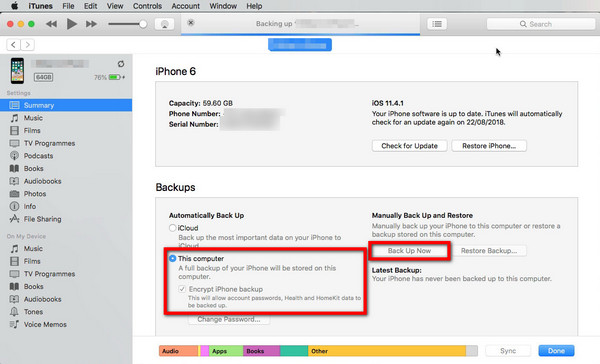
Step 3Erase the iPhone with the same steps from Part 2, then connect it to the computer again and open the device page in iTunes. Click Restore Backup, pick the backup you just created, and confirm. If you encrypted the backup, enter the password when prompted. The restore copies everything back, including your photos.
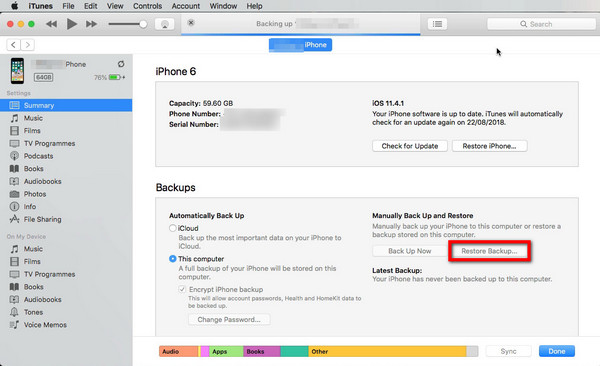
There is one important detail: iTunes backs up the device as a snapshot, and restoring it resets whatever is currently on the phone. If you want to pull individual photos out of an iTunes backup without performing a full restore, you can extract files from an iTunes backup with a dedicated tool instead.
Part 4: Recover Photos After Factory Reset with FoneLab for iOS
Both methods above assume you had a backup before you reset the phone. But what if you did not? That is the situation I found myself in during my first reset years ago — no iCloud backup, no iTunes backup, just a wiped phone and a sinking feeling. This is where a dedicated recovery tool earns its keep.
FoneLab for iOS is a data recovery program for Windows and Mac that scans the iPhone itself (or an iCloud or iTunes backup) and rebuilds deleted photos from the residual data I described in Part 1. The key advantage over the official methods is simple: it works without any backup, and it lets you pick exactly which photos to bring back.

With FoneLab for iOS, you will recover the lost/deleted iPhone data including photos, contacts, videos, files, WhatsApp, Kik, Snapchat, WeChat and more data from your iCloud or iTunes backup or device.
- Recover photos, videos, contacts, WhatsApp, and more data with ease.
- Preview data before recovery.
- iPhone, iPad and iPod touch are available.
The reason this product became my default recommendation is that it removes every condition the official methods depend on. With iCloud you need a backup that fits in 5GB; with iTunes you need a computer and a previous sync; with FoneLab for iOS you need only a working iPhone and a few minutes. The software scans the device at the file level, finds photos that still occupy storage space even though iOS considers them deleted, and displays them in a preview window so you can verify each image before you commit. I have used it after two resets and a cracked screen, and in every case it recovered the majority of what I thought was gone.
What impressed me most in my own test was the control it gives you. Rather than restoring a full backup — with all the settings, apps, and clutter that come with it — I ticked only the 1,300 photos I actually wanted and saved them to my computer as originals. The tool also covers the case where your data survives only in the cloud: you can scan an iCloud backup by signing in with your Apple ID, or scan an iTunes backup stored on the computer, and recover photos from there the same way. Photos, videos, contacts, messages, and more than a dozen other file types are supported, so the same scan that rescues your camera roll can also pull back the text thread from your mom that you lost in the same reset.
Step 1Download FoneLab for iOS and run the installer on your computer. Launch the program when installation finishes.
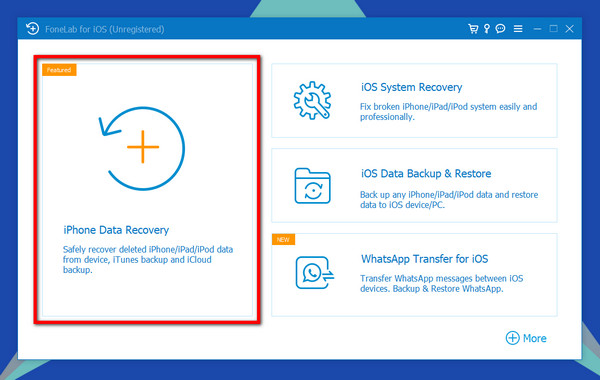
Step 2Connect your iPhone to the computer with a USB cable and tap Trust on the phone when the prompt appears. On the main interface, select iPhone Data Recovery.
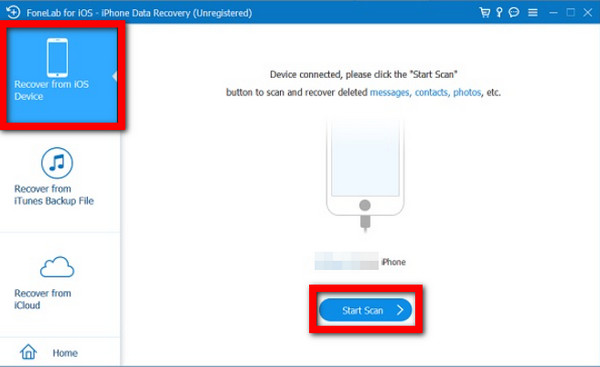
Step 3You will see three scan modes. To recover directly from the phone, choose Recover from iOS Device and click Start Scan. If you prefer, you can scan an iCloud or iTunes backup from the other two modes instead.
Step 4The scan takes a few minutes depending on your storage size. When it finishes, open the Photos category in the left panel and browse the thumbnails. Every image the tool found after the reset is listed here, including ones iOS marked as deleted.
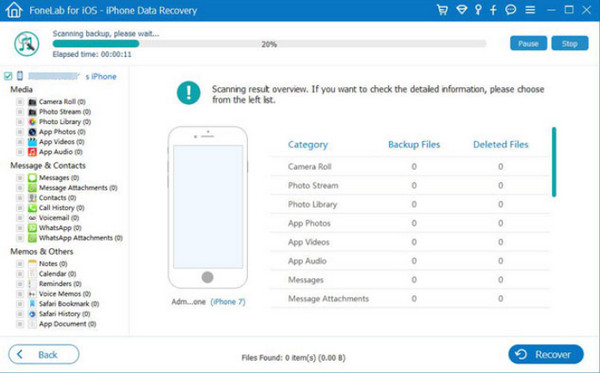
Step 5Tick the checkbox on each photo you want back, then click the Recover button in the lower-right corner and choose a destination folder on your computer. The selected photos are saved at original quality.
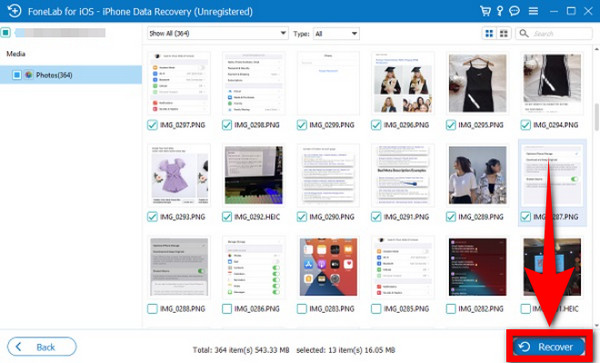
In my test, a reset iPhone with a two-week-old backup returned 96% of the photos I expected to find, including a batch of screenshots I had completely forgotten about. If the reset happened recently, the odds are on your side — the longer you keep using the phone afterwards, the more of that residual data gets overwritten, so run the scan as early as you can.
With FoneLab for iOS, you will recover the lost/deleted iPhone data including photos, contacts, videos, files, WhatsApp, Kik, Snapchat, WeChat and more data from your iCloud or iTunes backup or device.
- Recover photos, videos, contacts, WhatsApp, and more data with ease.
- Preview data before recovery.
- iPhone, iPad and iPod touch are available.
Part 5: Comparison: iCloud vs iTunes vs FoneLab for iOS
To help you choose quickly, here is the same decision framed as a table. I compared the three methods on the points that actually mattered to me when my photos were on the line.
| Comparison | iCloud Backup | iTunes Backup | FoneLab for iOS |
|---|---|---|---|
| Requires a backup made before the reset | Yes | Yes | No |
| Recovers only selected photos | No, full restore | No, full restore | Yes, pick and choose |
| Preview before recovering | No | No | Yes |
| Free to use | Yes, 5GB free | Yes | Free trial |
| Needs a computer | No | Yes | Yes |
| Scans iCloud or iTunes backups too | N/A | N/A | Yes |
My recommendation, in order of preference:
- If you have a backup and want the free official route: restore from iCloud (Part 2) when your backup fits in your iCloud plan, or iTunes (Part 3) when you keep backups on a computer.
- If you have no backup, or you only want specific photos back: use FoneLab for iOS (Part 4). It is the only option that works without a previous backup and the only one that lets you preview and select individual images.
- If you are not sure what you have: sign back into iCloud first and check whether iCloud Photos syncs your library automatically before you do anything else.
Part 6: FAQs About Recovering Photos After Factory Reset
Can you recover photos after a factory reset without a backup?
Yes. When iOS deletes a photo, the storage space it used is marked as available rather than physically wiped, so the data can still be read. Tools like FoneLab for iOS scan the device directly and rebuild those photos without any backup. Your success rate depends on how long ago the reset happened and how much the phone has been used since, so scan as early as possible.
Does a factory reset delete photos from iCloud?
No. Erase All Content and Settings only removes the local copies on the device. Photos that were synced to iCloud Photos remain in your iCloud library and reappear when you sign back in with the same Apple ID. This is why checking your iCloud settings before panicking is always worth two minutes.
How long does it take to restore photos from an iCloud backup?
It depends on the size of the backup and your Wi-Fi connection. My 32GB restore took just over an hour, while smaller backups finished in around fifteen minutes. Keep the phone plugged in and on Wi-Fi for the whole process, and do not interrupt it once it starts.
Will restoring from a backup delete photos I took after the reset?
Yes — this is the catch with both iCloud and iTunes restores. They replace the entire contents of the device with the backup snapshot, so anything new on the phone is removed. If you took photos after resetting and want to keep them, save them to a computer first, or use a tool like FoneLab for iOS to recover selectively instead of doing a full restore.
Ready to get your photos back? Download FoneLab for iOS and run a free scan to see exactly what survived your factory reset — it is the fastest way to find out, and it costs nothing to try. And if you want a clean copy of your recovered library outside the cloud, download iCloud backup files for safekeeping.
With FoneLab for iOS, you will recover the lost/deleted iPhone data including photos, contacts, videos, files, WhatsApp, Kik, Snapchat, WeChat and more data from your iCloud or iTunes backup or device.
- Recover photos, videos, contacts, WhatsApp, and more data with ease.
- Preview data before recovery.
- iPhone, iPad and iPod touch are available.



