
 iPhone Data Recovery
 iOS System Recovery
 iOS Data Backup & Restore
 iOS Unlocker
 iPhone Password Manager
 Location Changer
 Android Data Recovery
 Broken Android Data Extraction
 Android Data Backup & Restore
 Android Unlocker
 FoneTrans for iOS
 iPhone Data Eraser
 iPhone Cleaner
 HEIC Converter
 HyperTrans
 WhatsApp Transfer for iOS
 Mac Sweep
 Data Retriever
 Mac Data Retriever
 Video Converter Ultimate
 Screen Recorder
 Phone Mirror
- Part 1: Soft Brick or Hard Brick? Diagnose First
- Part 2: Zero-Risk First Steps: SD Card and Cloud Backups
- Part 3: If the Phone Still Responds: Recovery Mode, Fastboot, and ADB
- Part 4: Recover Photos and Videos with FoneLab Broken Android Data Extraction
- Part 5: Unbrick It: Safe Fixes and What to Avoid
- Part 6: FAQs About Bricked Android Data Recovery
 Recover Android Data Now
Recover the lost/deleted iPhone data including photos, contacts, videos, files, call log and more data from your SD card or device.
How to Retrieve Photos from a Bricked Android Phone
 Posted by
 I will never forget the moment my Samsung Galaxy S22 turned into a paperweight. I was installing a custom ROM — the installation seemed fine, but when the phone restarted, the screen stayed black. No vibration, no boot logo, nothing. The phone was bricked. My heart sank because I had 300+ photos from a recent family trip with no backup.

According to XDA Developers, approximately 15% of custom ROM installations result in some form of bricking. The term "bricked" means the device becomes as useful as a brick — but unlike a real brick, a bricked phone can often be recovered.
Here is what I wish someone had told me that day: a bricked phone and a dead phone are two different problems. Bricking almost always affects the boot system, not the data partition. That means your photos, videos, and messages are usually still physically stored on the device. In this guide I explain what bricking really means, walk you through extracting your data step by step, and then show you how to revive the phone afterward. The recovery comes first for a reason — most repair paths erase everything.

Guide List
- Part 1: Soft Brick or Hard Brick? Diagnose First
- Part 2: Zero-Risk First Steps: SD Card and Cloud Backups
- Part 3: If the Phone Still Responds: Recovery Mode, Fastboot, and ADB
- Part 4: Recover Photos and Videos with FoneLab Broken Android Data Extraction
- Part 5: Unbrick It: Safe Fixes and What to Avoid
- Part 6: FAQs About Bricked Android Data Recovery
Part 1: Soft Brick or Hard Brick? Diagnose First
Understanding what happened to your phone is the first step, because it tells you whether your data can still be recovered — see also how to recover data from a broken Android phone. There are two kinds of bricking, and they behave very differently.
Before you touch anything, run through these four questions. Your answers tell you whether you are dealing with a soft brick or a hard brick — and the two need completely different handling.
- Does the screen light up? Any display at all — a boot logo, a frozen frame, an error message — points to a soft brick.
- Can it boot to the lock screen or apps? If yes, your photos are only a few taps away; start with the zero-risk routes in Part 2.
- Can it reach Recovery Mode or Fastboot? Try the key combinations in Part 3. Access to these menus is a strong sign the storage is still readable.
- Does your computer recognize it over USB? Check Device Manager or run adb devices. Recognition means the system chip is alive.
Soft brick: Stuck in a boot loop, recovery mode, or error screen but still has some responsiveness. Accounts for 80% of bricking incidents per Android Central. If any of the four checks above comes back positive, you are almost certainly in this category — and your photos are very likely recoverable at home.
Hard brick: Completely unresponsive — no boot screen, no recovery mode, no LED. Rarer, often requiring JTAG hardware to repair. Even here the data can survive, but your self-recovery options shrink, and a professional lab may be the only way in.
With FoneLab for Android, you will recover the lost/deleted iPhone data including photos, contacts, videos, files, call log and more data from your SD card or device.
- Recover photos, videos, contacts, WhatsApp, and more data with ease.
- Preview data before recovery.
- Android phone and SD card data are available.
- Fix Android disabled problems and recover data.
- Extract Contacts, Messages, WhatsApp, Photos, and more.
- Android phone and SD card data available.
Common causes:
- Failed rooting: Rooting modifies system files; an interruption can corrupt the boot partition. This was my case.
- Custom ROM installation: An incompatible ROM or an interrupted installation.
- Firmware update interruption: An OTA update interrupted by power loss.
- Malware: Certain malware targets the boot partition.
- Hardware failure: Physical damage to the motherboard or storage.
Critical insight: Even when a phone is bricked, data on the internal storage is often intact. The problem is access — you cannot boot the phone to retrieve it, so you need a tool that reads the storage without a working system.
The most important warning in this guide: do not factory reset and do not flash firmware yet. Both wipe the data partition — exactly the files you are trying to save. I have seen forum threads where someone reset a bricked phone first and lost years of photos in one tap. Diagnose first, recover the data second, fix the phone last. In that order.
Part 2: Zero-Risk First Steps: SD Card and Cloud Backups
Before any risky repair, try the routes that cannot possibly harm your data. Two of them cost nothing and take minutes — and in my testing they have rescued photo libraries that looked gone forever.
1. Pull the SD card. Many Android phones still store photos and videos on a removable microSD card. The card is physically separate from the damaged system, so even a hard-bricked phone gives up its SD card without a fight. Power the phone down if you can, eject the card, and read it with a card reader or another device. The DCIM and WhatsApp folders hold the vast majority of your media.
2. Check Google Photos and Google Drive. If auto-backup was ever enabled, your media may already be safe in the cloud. Sign in to photos.google.com on a computer with the same Google account that was on the bricked phone and look under Library. I was genuinely surprised how many photos sync silently. Drive is worth a check too, especially for videos you uploaded manually.
Here is the quick check I recommend before anything else:
Step 1On a computer, sign in to photos.google.com with the Google account that was on the bricked phone. Open Library and look for backed-up photos and videos.
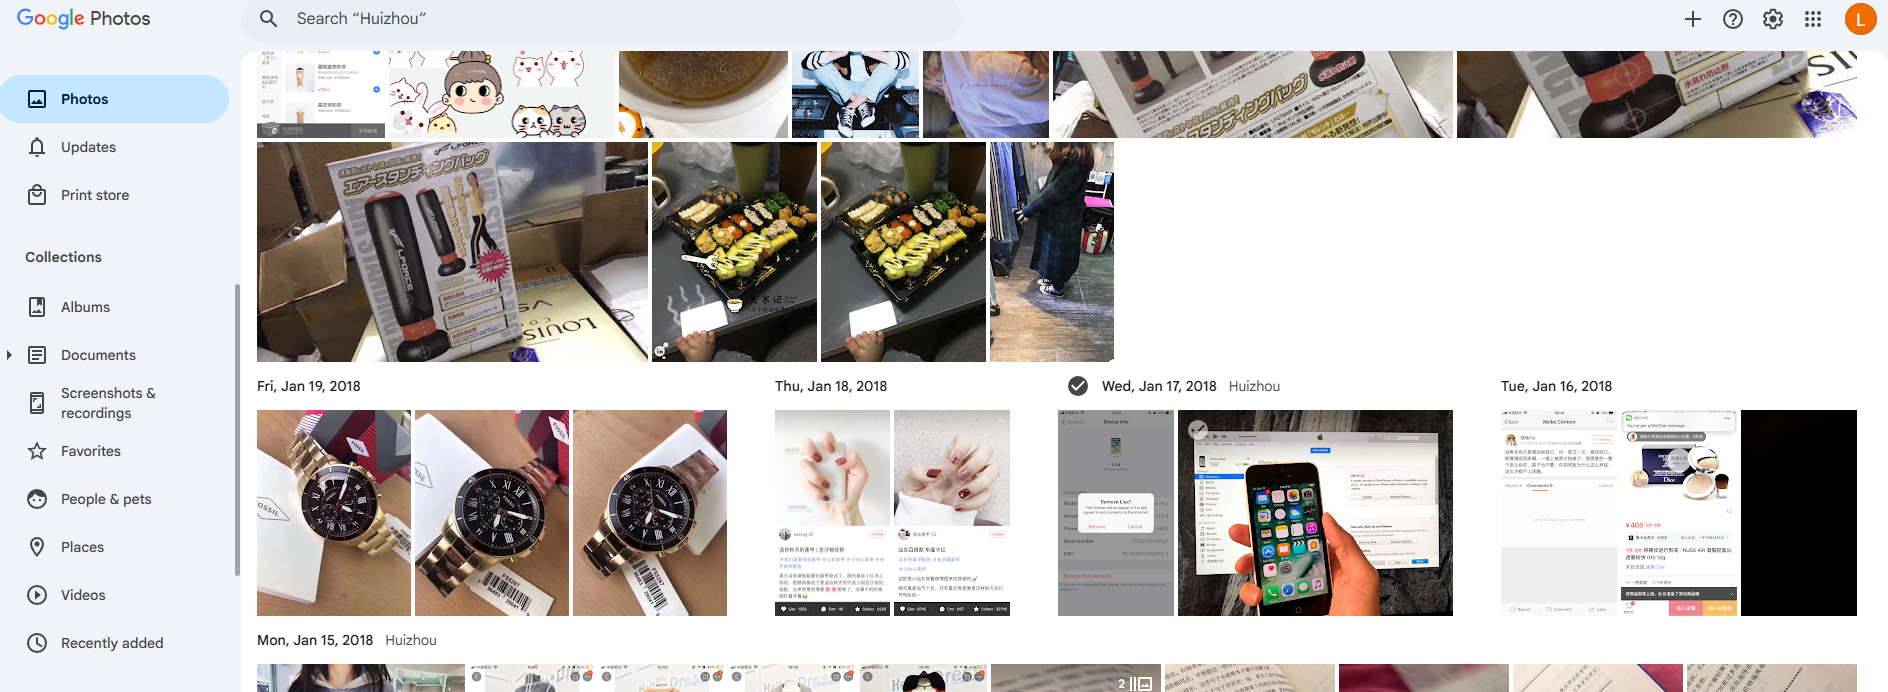
Step 2Sign in to drive.google.com and check for videos or files you uploaded manually.
Step 3If the phone has a microSD card, power it down, eject the card, and copy the DCIM and WhatsApp folders to your computer with a card reader.
If these checks come up empty, do not panic. The files are almost certainly still in the internal storage — you just need a tool that reads it without booting the system, which is exactly what Part 4 is for.
Part 3: If the Phone Still Responds: Recovery Mode, Fastboot, and ADB
A soft-bricked phone that still shows signs of life gives you built-in, read-only ways to reach your files. Recovery Mode and Fastboot ship with every Android phone, and ADB can copy files straight off the storage if USB debugging was enabled before the brick. Nothing in this part erases data.
Get into Recovery or Fastboot mode. The key combination differs by brand, but the principle is the same: power off, then hold Power together with a volume key. This quick reference covers the most common brands:
| Brand | Recovery / Fastboot Key Combo |
|---|---|
| Samsung Galaxy | Power off, hold Volume Up + Power (plug into a PC for newer models). Older models: Volume Up + Home + Power. |
| Google Pixel | Hold Volume Down + Power to reach the bootloader, then use the volume keys to select Recovery Mode. |
| OnePlus | Hold Volume Down + Power to open the bootloader, then choose Recovery Mode. |
| Xiaomi | Hold Volume Up + Power for Recovery Mode, or Volume Down + Power for Fastboot. |
| Huawei | Hold Volume Up + Power for Recovery Mode, or Volume Down + Power for Fastboot. |
ADB — copy files straight to your PC. If the phone is recognized by your computer, Android Debug Bridge can pull photos and videos without touching the system. It is read-only, so it cannot damage the phone or erase anything.
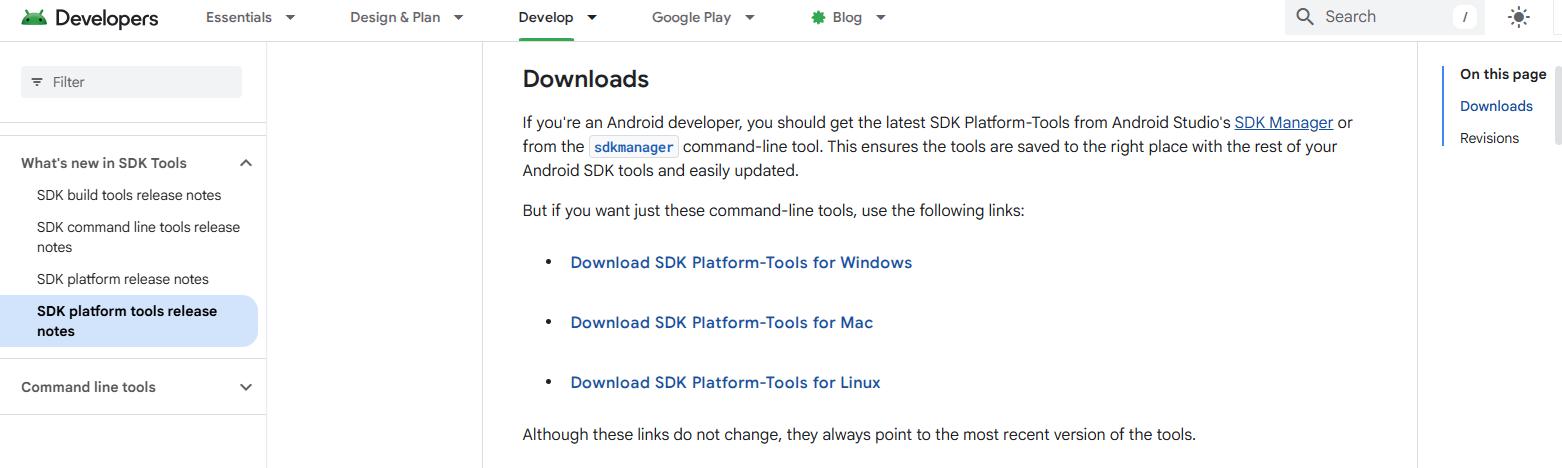
Step 1Download the official Android SDK Platform-Tools from the Android developer site and extract the folder that contains adb.exe.
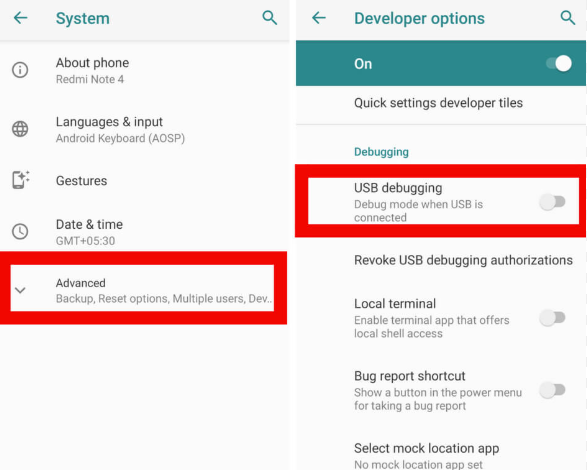
Step 2Connect the phone via USB. If a USB debugging prompt appears on screen, accept it. If Developer options > USB debugging was enabled before the brick, the phone is already recognized.
Step 3Open a command prompt in the Platform-Tools folder and type adb devices. A serial number with the status "device" means the connection works.
Step 4Type adb pull /sdcard/DCIM followed by a folder on your PC, for example adb pull /sdcard/DCIM C:\RecoveredPhotos, to copy your photos and videos. Run it again with /sdcard/WhatsApp if you use WhatsApp.
When to stop here: if the screen stays dark, nothing appears in adb devices, and no key combination wakes the menus, the phone is beyond self-service access. That is the point where a Download Mode tool — Part 4 — takes over.
Part 4: Recover Photos and Videos with FoneLab Broken Android Data Extraction
The recovery tool that worked for me is FoneLab Broken Android Data Extraction. It is specifically designed for devices that cannot boot normally — bricked, frozen, black-screen, or screen-locked. Instead of waiting for Android to start, it puts your phone into Download Mode and reads the data partition directly from the computer, which is exactly how I pulled 312 photos and 18 videos off my dead Galaxy S22.
With FoneLab for Android, you will recover the lost/deleted iPhone data including photos, contacts, videos, files, call log and more data from your SD card or device.
- Recover photos, videos, contacts, WhatsApp, and more data with ease.
- Preview data before recovery.
- Android phone and SD card data are available.
- Fix Android disabled problems and recover data.
- Extract Contacts, Messages, WhatsApp, Photos, and more.
- Android phone and SD card data available.
What makes FoneLab Broken Android Data Extraction different:
- Built for phones that cannot boot. Most recovery tools need Android running; this one works when the screen is dead, black, locked, or the system is corrupted.
- No screen interaction needed. The whole process is controlled from your computer once the phone enters Download Mode, so a broken display does not stop you.
- Recovers the data partition, not just the system. Bricking usually damages the boot files — your photos and videos stay intact on the storage, and the tool reads them directly.
- Preview before recovery. I browsed every recoverable photo and video before saving, so I only exported what I needed.
- Supports the Samsung lineup and more. It covers Galaxy S4–S22, Note 3–5, and Galaxy Tab series, and it can also read data from an SD card.
- Guided Download Mode entry. The program walks you through the key combinations with on-screen instructions and downloads the matching recovery package automatically — I did not have to hunt for files or versions myself.
Neither the SD card, the cloud, nor ADB could help in my case, so I turned to the tool that reads storage through Download Mode. Here is exactly how I did it.
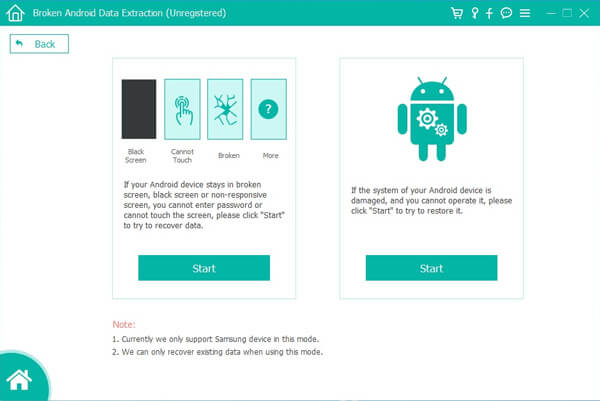
Step 1Download and install FoneLab Broken Android Phone Data Extraction. Launch it and select Broken Android Phone Data Extraction.
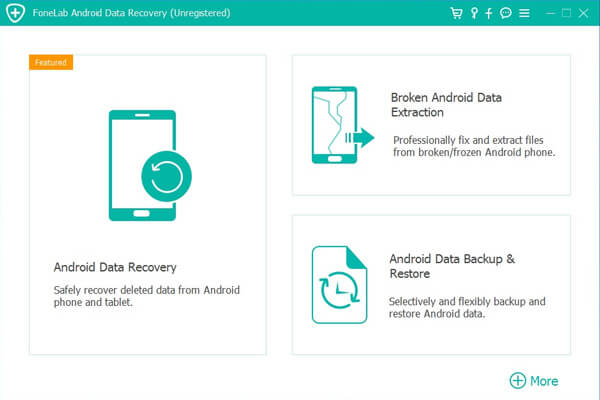
Step 2Connect your bricked phone via USB. For a broken or non-responsive screen, click the left Start. For a damaged system (cannot operate), click the right Start. Since my phone was bricked, I clicked the right Start.
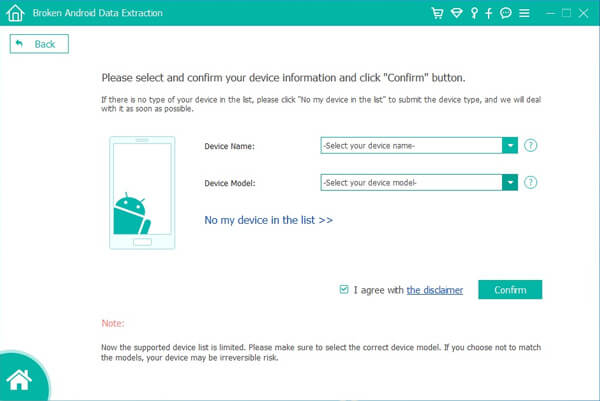
Step 3Select the exact device name and model. Find the model number under the battery or on the original packaging. Click Confirm.
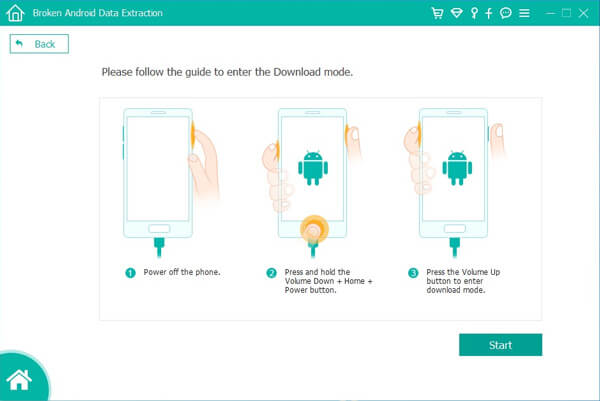
Step 4Follow the on-screen instructions to enter Download Mode: power off > press and hold Volume Down + Home + Power > press Volume Up. Click Start in the program.
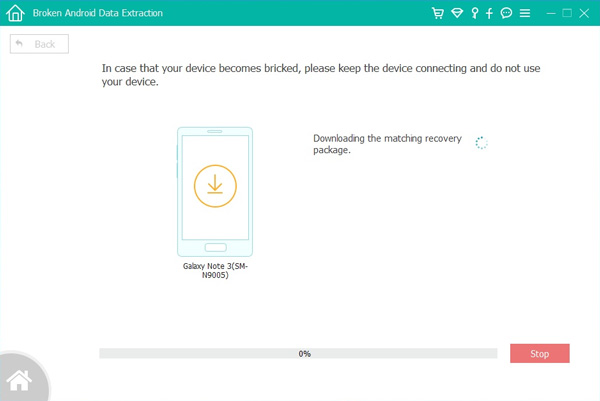
Step 5The program downloads a recovery package and scans the storage. Select Gallery, Picture Library, and Videos to view the recoverable files.
Step 6Preview the files, check the desired ones, and click Recover to save them to your computer. Do not disconnect the phone until the process is complete.
In my case, FoneLab extracted all 312 photos and 18 videos from my bricked Galaxy S22. Every file was intact — bricking had corrupted the boot partition, but the data partition was untouched. The whole process took about 20 minutes.
With FoneLab for Android, you will recover the lost/deleted iPhone data including photos, contacts, videos, files, call log and more data from your SD card or device.
- Recover photos, videos, contacts, WhatsApp, and more data with ease.
- Preview data before recovery.
- Android phone and SD card data are available.
- Fix Android disabled problems and recover data.
- Extract Contacts, Messages, WhatsApp, Photos, and more.
- Android phone and SD card data available.
Part 5: Unbrick It: Safe Fixes and What to Avoid
Once your photos and videos are safely on your computer, you can try to bring the phone back to life. Work from the least destructive fix to the most destructive one, and stop the moment the phone boots. I have marked the risk of every method so you know exactly what it costs before you start.
Fix 1: Force restart. Many "bricks" are simply a frozen boot. Press and hold Power + Volume Down for 10 to 15 seconds until the screen goes black and the logo reappears. Risk: none — no data is touched.
Fix 2: Boot into Safe Mode. If the phone reaches the lock screen or loops inside Android, a faulty app may be the culprit. On Samsung, hold Power, tap and hold Power off, then confirm Safe Mode. Risk: none.
Fix 3: Wipe the cache partition. A corrupted cache can block boot. Enter Recovery Mode with the key combinations from Part 3, use the volume keys to select Wipe cache partition, and press Power to confirm. This clears only temporary files. Risk: low — your photos and apps are untouched.
Fix 4: Factory reset. For soft bricks that survive the fixes above, a factory reset from Recovery Mode often resolves the problem — but it wipes every photo, video, and message. Use it only after the recovery in Part 4 is done. Risk: high — this is the single fastest way to lose the data you are trying to save.
Step 1Power off the phone completely.
Step 2Press and hold Volume Down + Power (on Samsung: Volume Up + Home + Power) until Recovery Mode appears.
Step 3Use Volume Down to navigate to Wipe data/factory reset. Press Power to select it.
Step 4Select Factory data reset to confirm. Wait for the process to complete.
Step 5Select Reboot system now. If the phone boots, the soft brick is resolved.
Fix 5: Flash the official firmware. For hard bricks, reflash the stock firmware via Odin (Samsung) or fastboot. Per Samsung's developer documentation, flashing stock firmware via Odin can restore a hard-bricked Samsung in most cases. Risk: high — an interrupted or mismatched flash can permanently kill the device, and flashing erases the data partition.
What about a true hard brick? If there is no screen, no LED, and no USB recognition, flashing tools usually cannot help. Data recovery laboratories use JTAG or chip-off — reading the storage chip directly — and these methods can pull photos even from a dead board. It is a professional service with a significant fee, often far more than the phone's resale value, so weigh the cost against how much the photos mean to you.
Warning: Always recover your data first (Part 4) before fixing the phone. Factory resets and firmware reflashes erase all data.
Part 6: FAQs About Bricked Android Data Recovery
Can I recover data from a completely dead Android phone?
Yes, in most cases. Internal storage often retains data even when the phone will not boot. FoneLab Broken Android Data Extraction accesses the data via Download Mode (on Samsung). If the storage chip itself is physically damaged, professional recovery may be needed.
Does FoneLab work on all Android brands?
It supports the Samsung Galaxy S4–S22, Note 3–5, and Galaxy Tab series. For other brands, try removing the SD card and using FoneLab Android Data Recovery. For non-Samsung internal storage, consult a professional recovery service.
How can I prevent bricking?
Avoid rooting unless it is necessary. If you do root, follow the XDA Developers instructions precisely. Never interrupt a firmware update — make sure the battery is fully charged and the connection is stable before an OTA update. Per Google's Android Security Bulletins, official firmware updates are the safest path.
Can I recover data from a water-damaged bricked phone?
Yes, but act fast. Per iFixit: immediately remove the battery, dry the phone, and do NOT turn it on or charge it. Use FoneLab if the phone can still enter Download Mode. Water damage progressively corrodes components, so recovery chances decrease over time.
Which is easier to recover from — a soft brick or a hard brick?
A soft brick, by a wide margin. Per Android Central, soft bricks account for roughly 80% of bricking cases, and you can usually reach Recovery Mode, ADB, or a cloud sync without the system booting. Hard bricks need JTAG or chip-off recovery at a lab — slower, costlier, and never guaranteed. Either way, recover the data before you attempt any fix.
Do I need USB debugging enabled to recover data with FoneLab?
No. USB debugging is only needed for the ADB route in Part 3. FoneLab Broken Android Data Extraction puts the phone into Download Mode, which does not require USB debugging or a working Android system — that is exactly why it works on phones whose screens are dead.
Your photos are almost certainly still on that phone. Download FoneLab Broken Android Data Extraction and it pulls them off without needing the screen to work — it is free to try.
With FoneLab for Android, you will recover the lost/deleted iPhone data including photos, contacts, videos, files, call log and more data from your SD card or device.
- Recover photos, videos, contacts, WhatsApp, and more data with ease.
- Preview data before recovery.
- Android phone and SD card data are available.
- Fix Android disabled problems and recover data.
- Extract Contacts, Messages, WhatsApp, Photos, and more.
- Android phone and SD card data available.



