- Part 1. How to Fix Liquid Detected in Lightning Connector by Cleaning It
- Part 2. How to Fix Liquid Detected in Lightning Connector through Rebooting
- Part 3. How to Fix Liquid Detected in Lightning Connector through Updating Software
- Part 4. How to Fix Other iOS Devices Issues with FoneLab iOS System Recovery
- Part 5. FAQs about How to Fix Liquid Detected in Lightning Connector
How to Fix Liquid Detected in Lightning Connector Easily
 Updated by Lisa Ou / March 14, 2024 09:30
Good day! We were having late-night talks with my husband while drinking some alcohol. I place my iPhone and iPad on the table where the ice is placed. I plan to charge them quickly once they run out of battery. However, charging is not available because liquid has been detected in the lightning connector! I am now panicking because I do not know what to do. Can you help me fix this serious issue of mine? Thank you so much in advance!
Liquid on the lightning connector, also known as the charging port, is a serious matter that may damage your iOS devices. Without further ado, please see the methods to fix the mentioned issue immediately. Move on.


Guide List
- Part 1. How to Fix Liquid Detected in Lightning Connector by Cleaning It
- Part 2. How to Fix Liquid Detected in Lightning Connector through Rebooting
- Part 3. How to Fix Liquid Detected in Lightning Connector through Updating Software
- Part 4. How to Fix Other iOS Devices Issues with FoneLab iOS System Recovery
- Part 5. FAQs about How to Fix Liquid Detected in Lightning Connector
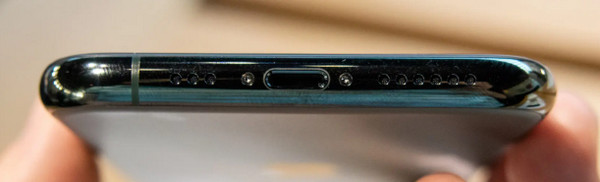
Part 1. How to Fix Liquid Detected in Lightning Connector by Cleaning It
Since there are drops of water inside the lightning connecter, you should first put the charging port facing down using your hands. It prevents the liquid from entering the other parts of your iOS devices. Later, get a cloth to absorb the water on the charging port. Wipe it until you see nothing on the surface, and keep the iOS device from facing down. Please ensure that you wait for the iOS devices to be dried before charging them.
And you can also try to clean iPhone charging port.
FoneLab enables you to fix iPhone/iPad/iPod from DFU mode, recovery mode, Apple logo, headphone mode, etc. to normal state without data loss.
- Fix disabled iOS system problems.
- Extract data from disabled iOS devices without data loss.
- It is safe and easy to use.
Part 2. How to Fix Liquid Detected in Lightning Connector through Rebooting
Sometimes, the Liquid Detected in Lightning Connector error still exists even though no water is left after you wipe the charging port. But what seems to be the problem if you keep seeing the error message? Bugs and glitches on the iOS device operating system, of course! Get rid of them by rebooting your device. You only need to follow the detailed steps below by scrolling down. Below.
Restart iPhone
| Model | Procedure |
| Without Home Button | Push the Volume or the Side button once you locate them. Release them if you have already seen the Power-off slider. Toggle it quickly to turn off the iPhone. Turn it on again by pushing and holding the Side button. If successful, you will notice the Apple Logo screen. |
| With Home and Side Buttons | Push the Side button once you locate them. Release them if you have already seen the Power-off slider. Toggle it quickly to turn off the iPhone. Turn it on again by pushing and holding the Side button. If successful, you will notice the Apple Logo screen. |
| With Home and Top Buttons | Push the Top button once you locate them. Release them if you have already seen the Power-off slider. Toggle it quickly to turn off the iPhone. Turn it on again by pushing and holding the Top button. If successful, you will notice the Apple Logo screen. |
Restart iPad
| Model | Procedure |
| Without A Home Button | Press the Volume button and wait for the Power-off slider to appear before you let it go. Toggle it afterward to turn off the iPad. Turn it on once again by pushing the Top button. Let it go once the Apple Logo appears if you restarted your iPad. |
| With A Home Button | Press the Top button and wait for the Power-off slider before you let it go. Toggle it afterward to turn off the iPad. Turn it on once again by pushing the Top button. Let it go once the Apple Logo appears. |
Part 3. How to Fix Liquid Detected in Lightning Connector through Updating Software
You can also fix bugs and glitches causing the Liquid Detected in Lightning Connector error message by updating the iOS or iPadOS version. The good thing is that the iPhone and iPad have the same interface and procedure for updating the iOS version. Please follow the detailed steps below that we have prepared for you. Move on.
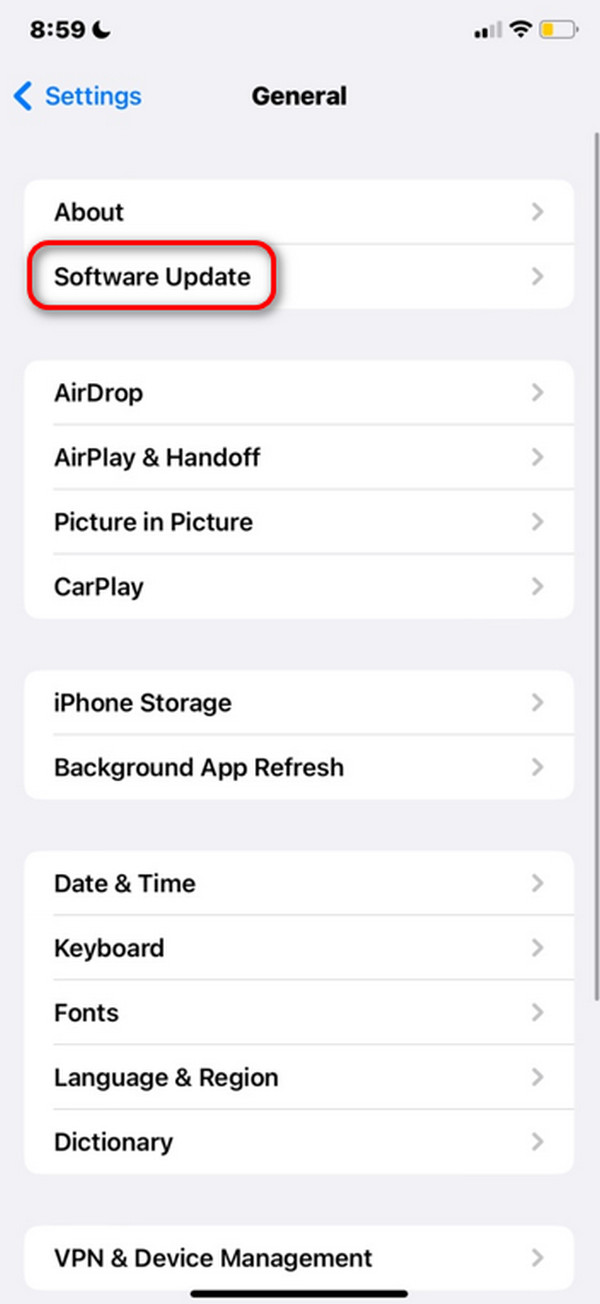
Step 1Open your iPhone or iPad and choose the Settings app to be opened. After that, swipe down on the screen and choose the General button. Later, more options will be shown on the iPhone and iPad screen. Please select the Software Update button at the top of the main interface on the next screen.
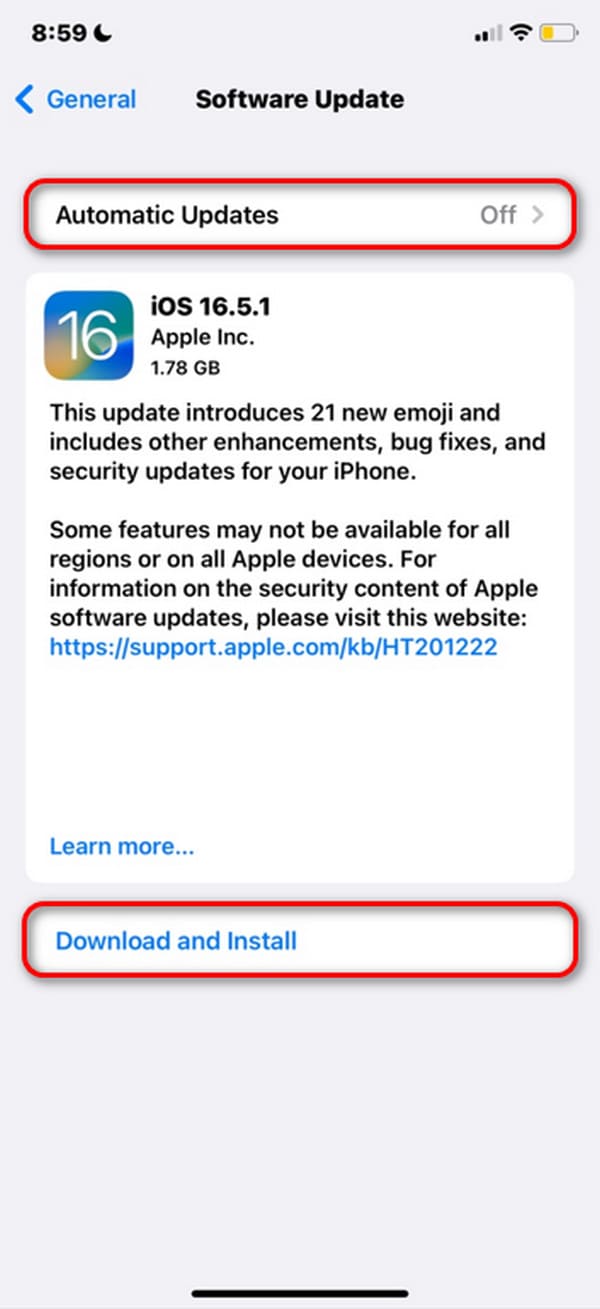
Step 2You will see if there are available updates on your iPhone or iPad. Please select the Download and Install button at the bottom. The updating process will start afterward. And if you want automatic iOS version updates, turn on the Automatic Updates button at the top.
Part 4. How to Fix Other iOS Devices Issues with FoneLab iOS System Recovery
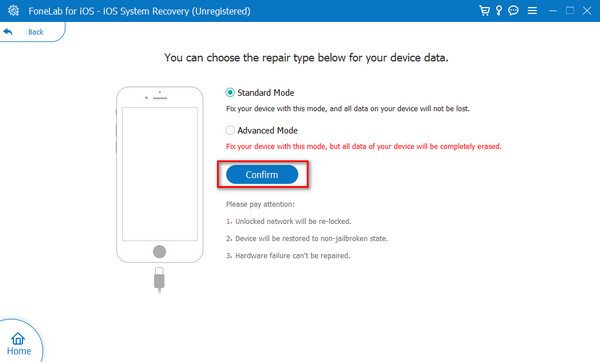
You can also try FoneLab iOS System Recovery to fix the problem on your iOS devices. You can use the 2 repair modes of this software: Standard Mode and Advanced Mode. Standard Mode will repair your iOS devices and not delete even a single piece of data. However, Advanced Mode will fix the issue, but it will delete all the stored data. Please know more information about the tool. Please scroll down below.
FoneLab enables you to fix iPhone/iPad/iPod from DFU mode, recovery mode, Apple logo, headphone mode, etc. to normal state without data loss.
- Fix disabled iOS system problems.
- Extract data from disabled iOS devices without data loss.
- It is safe and easy to use.
Step 1Download the tool by ticking the Free Download button. Later, set it up and launch it on your computer.

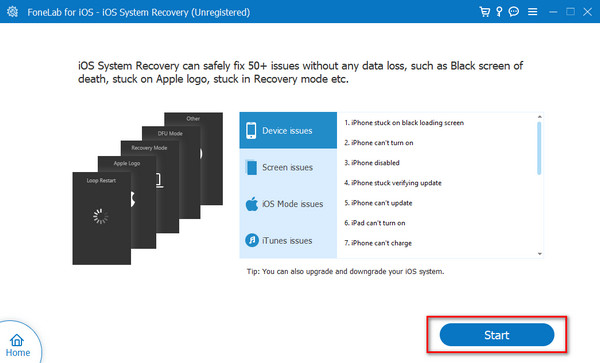
Step 2The 50+ issues this software supports will be shown on the screen. Please click the Start button to continue.
Step 3Get A USB cable and plug it into the iOS devices to connect it to the computer. Later, choose one of the repair modes and click the Confirm button to proceed.
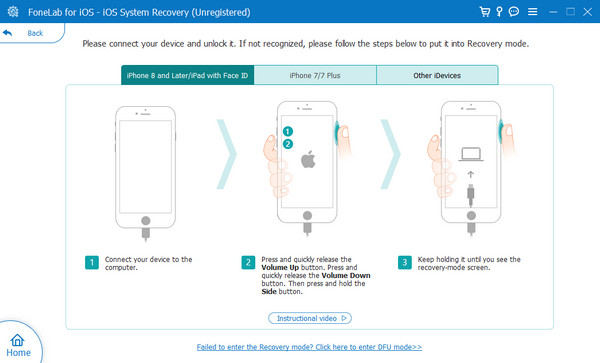
Step 4Enter your iPhone and iPad into recovery mode by following the onscreen instructions. Later, click the Repair or Optimize button to start fixing the iOS device.
FoneLab enables you to fix iPhone/iPad/iPod from DFU mode, recovery mode, Apple logo, headphone mode, etc. to normal state without data loss.
- Fix disabled iOS system problems.
- Extract data from disabled iOS devices without data loss.
- It is safe and easy to use.
Part 5. FAQs about How to Fix Liquid Detected in Lightning Connector
How long should I wait before attempting to charge my iPhone again?
It depends on the severity of the issue on your iOS device's lighting connector. However, the estimated and recommended time interval before you plug the lightning cord is 12 hours or 1 day. It is to ensure that the charging port is entirely dry.
What if the message persists even after drying the port?
If the charging issue is not available for liquid detected and persists after this post's troubleshooting methods, it is better to ask for Apple Support services. Other issues may be happening on the iOS device, or the issue may worsen and affect the other parts.
The Liquid Detected in Lightning Connector error is one of the serious issues that may happen on your iOS devices. Immediate troubleshooting procedures are recommended to be executed. This article posted the 3 top and safest picks you will ever experience. In addition, it gave bonus tips to fix other malfunctions on your iOS devices, which is FoneLab iOS System Recovery. Do you have more questions left behind? Please do not hesitate to leave them in the comment section below. Thank you!
FoneLab enables you to fix iPhone/iPad/iPod from DFU mode, recovery mode, Apple logo, headphone mode, etc. to normal state without data loss.
- Fix disabled iOS system problems.
- Extract data from disabled iOS devices without data loss.
- It is safe and easy to use.