A Detailed Guide About iPhone Reachability You Should Not Miss
 Posted by Somei Liam / April 14, 2023 09:00
 At school, I can only use my iPhone during lunch breaks. But since it has a large screen, I'm having a hard time using it with only one hand while eating. So my friend told me about a Reachability feature on iPhone, but I'm not sure what it is or how to use it. Can someone help me comprehend how to use Reachability on iPhone 12? In advance, thank you.
If you are new to iPhone or not fond of exploring your iPhone's Settings, you may have not yet encountered the Reachability feature. Studying your device now and then gives you the advantage of maximizing its full potential. This includes discovering the iPhone's helpful features, like Reachability. This article will also provide you with assistance in discovering what it is and how to enable and use it. In addition, we prepared effective fixes for when you encounter issues when using the feature. To begin your journey in learning iPhone's Reachability, go on below.


Guide List
Part 1. What is iPhone Reachability
Reachability on iPhone 12 and other models is a built-in feature that can make your iPhone usage easier. Enabling it allows you to lower the screen's top portion, making it reachable for your thumb. Thus, it’s beneficial when you only have one hand available on using your device. So whatever you’re doing on your other hand, it’s not a problem.
On the other hand, the Reachability feature on iPhone is used for more than just convenience. It can also be helpful when experiencing an issue with your device. For instance, the top half of the screen is not working. You can enable this feature, so you no longer need to tap anything on the upper portion. You only need to level it down to operate the activities on your iPhone.
Reachability is available on iPhone 6, 6 Plus, and later iPhone models. You can use it in any app, no matter what you do on your device. Hence, you can expect to find it in all the latest versions of the iPhone. And it will be useful in your everyday life using your device.
FoneLab enables you to fix iPhone/iPad/iPod from DFU mode, recovery mode, Apple logo, headphone mode, etc. to normal state without data loss.
- Fix disabled iOS system problems.
- Extract data from disabled iOS devices without data loss.
- It is safe and easy to use.
Part 2. How to Enable iPhone Reachability
As you now understand the use of the Reachability feature on iPhone, it’s time to level up your knowledge by learning how to enable and apply its usage on your device. You only need to access Settings to turn it on, and then, it will be eligible for use when your iPhone is in Portrait orientation.
Bear in mind the unchallengeable steps of an example of how to use Reachability on iPhone 11:
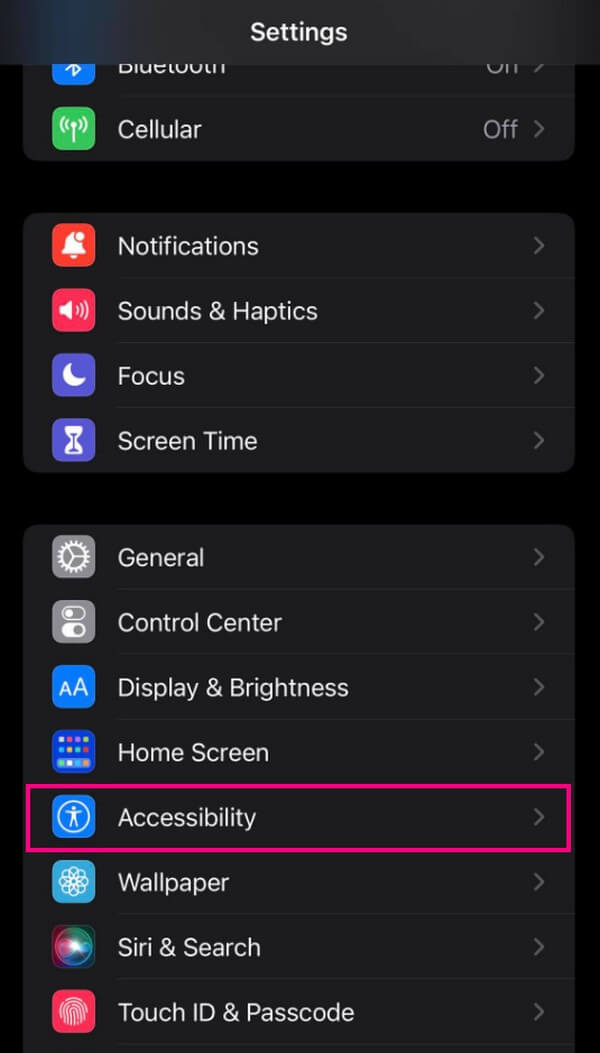
Step 1Unlock your iPhone and go to Home. Once you see the Settings app, open it to see the options and features you can modify. Scroll down a little until the Accessibility option is on the screen, then tap it.
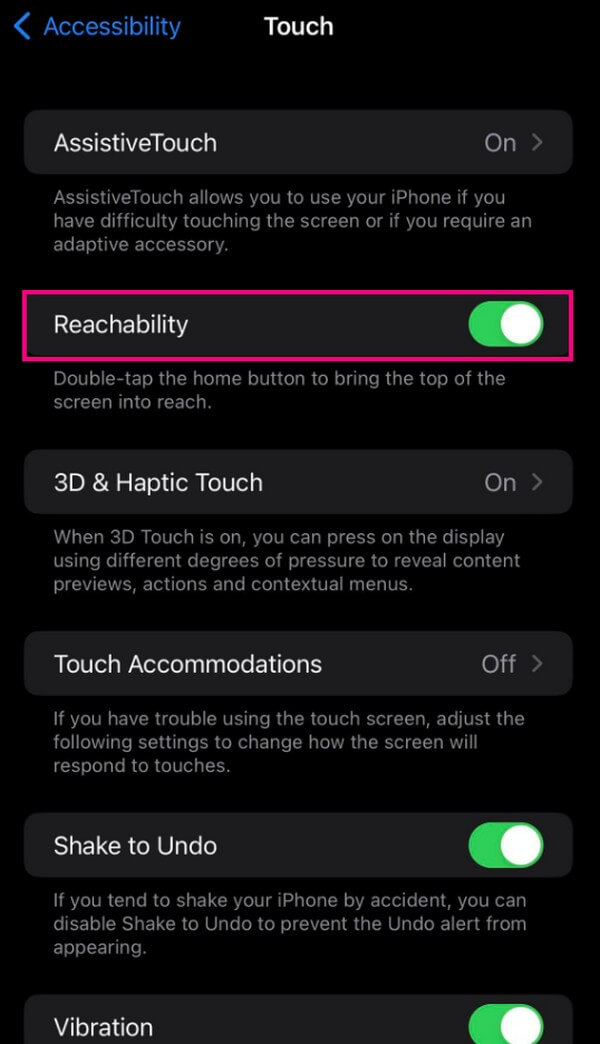
Step 2On the following screen, look down on the Physical and Motor section. Touch is the first option you will see on the list. Tap it to move on to the next screen. Another set of options will then appear, including Reachability. Toggle on the slider that aligns with it to enable the feature.
Step 3After turning Reachability on, you can now use it on your iPhone. Go back to your Home screen and double-tap the Home button lightly. This will lower the upper half portion of your device, making it easier to operate it with one hand.

Part 3. How to Fix iPhone Reachability
Meanwhile, know that even a feature that makes your iPhone usage convenient could cause an inconvenience from time to time. This means you may still encounter some difficulty using the Reachability feature, and we can look at a few factors why this happens. Perhaps, a bug, lagging, technical issues, etc. But regardless of the cause, you can try the following methods to resolve the problem.
Method 1. Reboot iPhone
The first course of action you can try is the most straightforward method. Rebooting an iPhone or almost any device is an effective way to repair simple issues. As mentioned above, this includes lagging, bugs, and other unknown problems. Aside from that, rebooting can also improve your iPhone’s performance. That is because the device system refreshes whenever you perform this method.
Below are the trouble-free instructions to fix Reachability on iPhone 11 by doing a reboot, regardless if it has a Home button or not:
Step 1Push down on your iPhone’s Volume Up key and release immediately.
Step 2Push down on your iPhone’s Volume Down key and release immediately.
Step 3Press down your iPhone’s Power key and hold it for a little longer. Wait for the screen to be black and the Apple logo to show up. After that, you can release the key.
As mentioned earlier, this method can only fix simple issues, so if you didn’t achieve the desired result, kindly move on to the next solution.
Method 2. Try FoneLab iOS System Recovery
If rebooting didn’t fix the issue with your iPhone’s Reachability, maybe you need a tool that has the ability to repair more complex problems. Hence, we introduce FoneLab iOS System Recovery. This repair program can fix various issues, from simple to technical, and it doesn’t only fix one but almost all your iPhone system issues. Thus, FoneLab iOS System Recovery will bring the Reachability feature back to its normal state in no time.
FoneLab enables you to fix iPhone/iPad/iPod from DFU mode, recovery mode, Apple logo, headphone mode, etc. to normal state without data loss.
- Fix disabled iOS system problems.
- Extract data from disabled iOS devices without data loss.
- It is safe and easy to use.
Refer to the effortless directions to fix iPhone 12 Reachability with FoneLab iOS System Recovery:
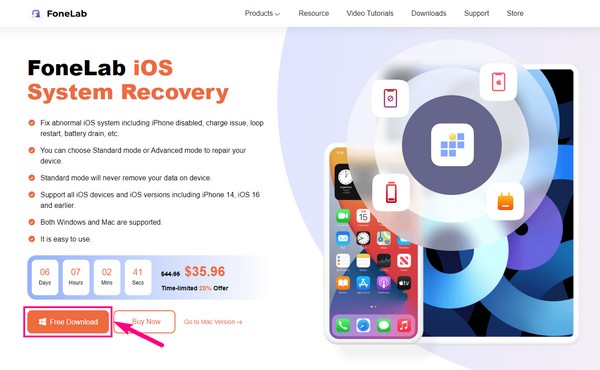
Step 1Acquire the FoneLab iOS System Recovery installer file by entering the program’s official site. Just click Free Download on the left area of the page, then authorize it to make changes to your device. Once authorized, you can start the installation smoothly and quickly. It will be finished in around a minute; then, it’s time to launch the repair tool on your computer.
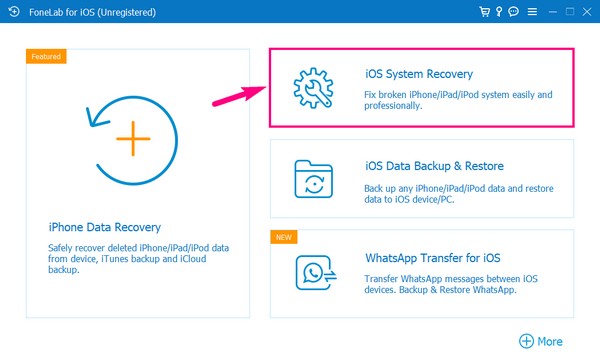
Step 2The key features will be displayed on the primary interface, including iOS devices’ data recovery, system recovery, backup and restore, and WhatsApp transfer. For this problem, choose the iOS System Recovery feature, which professionally fixes iPhone, iPad, and iPod Touch system issues. Then click Start on the following interface.
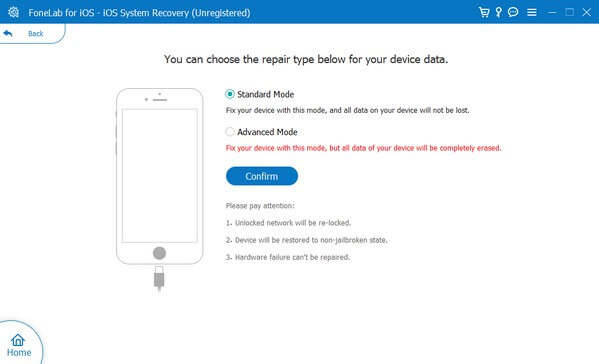
Step 3You have two choices for recovering your device system. The first is Standard Mode, which fixes the issues on your iPhone system without experiencing data loss. On the other hand, Advanced Mode repairs your system with the complete erasure of your data, cleaning your device. Choose the repair type you want for your iPhone carefully, then click the Confirm tab below.
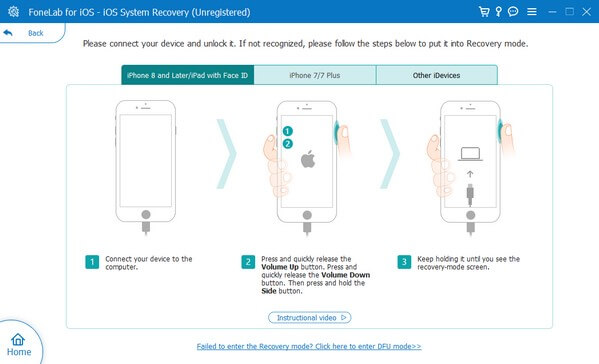
Step 4Instructions for entering the Recovery Mode will follow on the next interface. Select your iPhone model to see the appropriate steps for your device. After that, the firmware will start downloading. You may need to wait for a short moment, but it won’t take long. Be attentive to the instructions that follow to achieve a successful repair procedure.
FoneLab enables you to fix iPhone/iPad/iPod from DFU mode, recovery mode, Apple logo, headphone mode, etc. to normal state without data loss.
- Fix disabled iOS system problems.
- Extract data from disabled iOS devices without data loss.
- It is safe and easy to use.
Method 3. Reset iPhone
If the methods above don’t work or you don’t prefer any of them, you are left with no choice but to reset your iPhone. Doing this method will return your iPhone to its default Settings.
Hence, this is the perfect solution if you unintentionally altered anything on your device that caused the Reachability to malfunction.
Act in accordance with the manageable steps to fix the iPhone half screen or Reachability feature by resetting the iPhone:
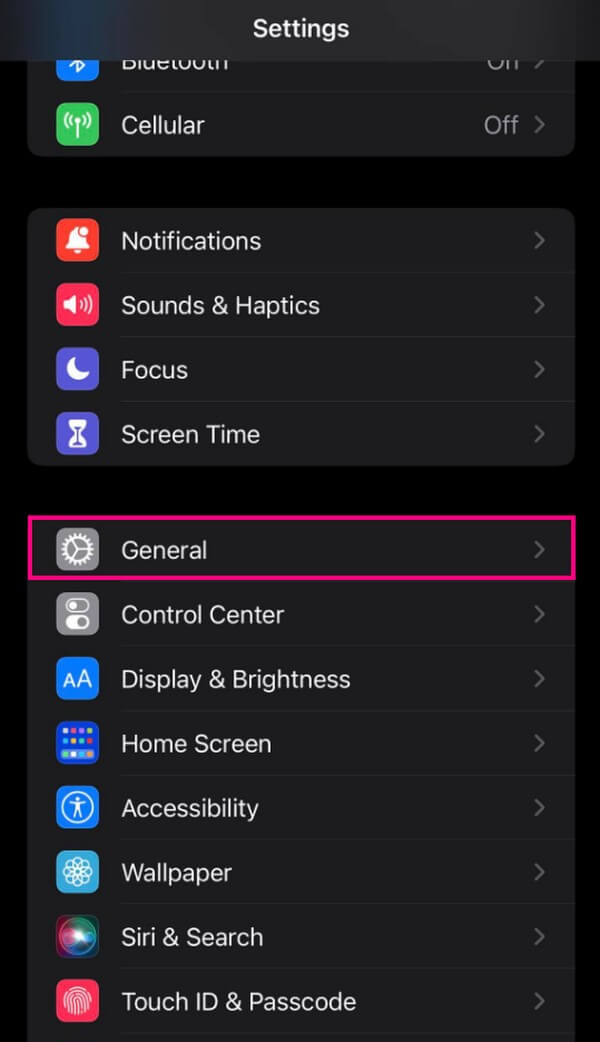
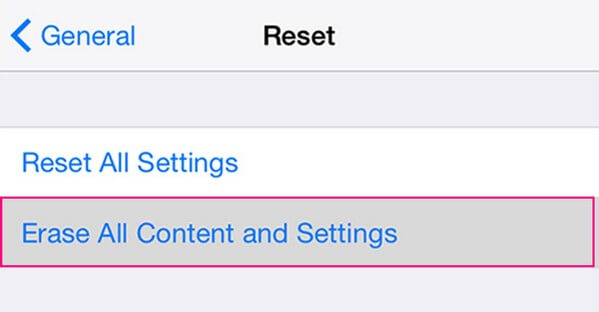
Step 1Enter the Settings application on your iPhone device, then slide down and proceed to open the General option when you see it.
Step 2From the list of options, tap Transfer or Reset iPhone > Reset.

Step 3Hit Erase All Content and Settings when asked which reset option to perform. This will erase your iPhone and bring it back to all its defaults.
You must note that resetting your iPhone will erase all its data. Preparing a backup is important if you don’t want to lose your device content. Or you can use other methods in this post.
FoneLab enables you to fix iPhone/iPad/iPod from DFU mode, recovery mode, Apple logo, headphone mode, etc. to normal state without data loss.
- Fix disabled iOS system problems.
- Extract data from disabled iOS devices without data loss.
- It is safe and easy to use.
Part 4. FAQs about iPhone Reachability
1. How do I turn off Reachability on the iPhone?
The Reachability feature automatically turns off when you're not touching anything on your iPhone for a few seconds after turning it on. But if you want to return the screen to full screen immediately, double-tap the Home screen lightly again. Alternatively, tap the black screen at the top.
2. Is Reachability enabled by default?
Yes, it is on most iPhones. When you buy a brand new iPhone, its Reachability feature is automatically enabled from the start. If you wish to disable it, tap Settings > Accessibility > Touch, then toggle the Reachability slider off.
That is all you must know about iPhone Reachability. If you're looking for more answers about your device's features, use, and fixes, see if the articles and solutions on the FoneLab iOS System Recovery website can help you.
FoneLab enables you to fix iPhone/iPad/iPod from DFU mode, recovery mode, Apple logo, headphone mode, etc. to normal state without data loss.
- Fix disabled iOS system problems.
- Extract data from disabled iOS devices without data loss.
- It is safe and easy to use.