- Part 1. How to Transfer Files Between iPhone and Mac with FoneTrans for iOS
- Part 2. How to Transfer Files Between iPhone and Mac with AirDrop
- Part 3. How to Transfer Files Between iPhone and Mac with iCloud
- Part 4. How to Transfer Files Between iPhone and Mac with iTunes
- Part 5. How to Transfer Files Between iPhone and Mac with Finder
- Part 6. FAQs about How to Transfer Files Between iPhone and Mac
5 Efficient Techniques to Transfer Files Between iPhone and Mac
 Updated by
 The iPhone is frequently used every day compared to a Mac. It certainly stores various files that might take up much of its storage space. Transferring is a technique some individuals use to free up storage space on the iPhone. Mac can be used to transfer iPhone files for work, study, backup, etc. Have you also considered making this procedure?
Eyes here! We gladly introduce the 5 dependable techniques to transfer files between iPhone and Mac. These are classified into USB and wireless transferring procedures. More details about them are revealed below.


Guide List
- Part 1. How to Transfer Files Between iPhone and Mac with FoneTrans for iOS
- Part 2. How to Transfer Files Between iPhone and Mac with AirDrop
- Part 3. How to Transfer Files Between iPhone and Mac with iCloud
- Part 4. How to Transfer Files Between iPhone and Mac with iTunes
- Part 5. How to Transfer Files Between iPhone and Mac with Finder
- Part 6. FAQs about How to Transfer Files Between iPhone and Mac
Part 1. How to Transfer Files Between iPhone and Mac with FoneTrans for iOS
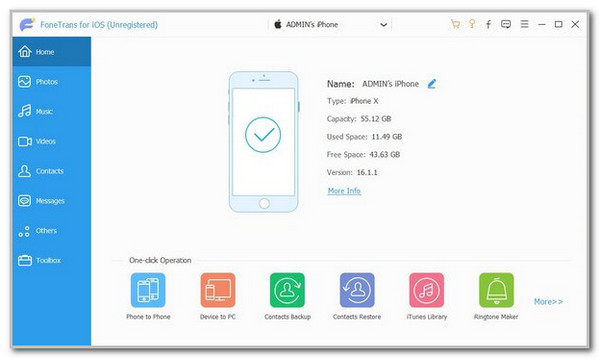
Due to the countless options for transferring files between iPhone and Mac, you might be confused and unable to decide which one to consider. We suggest FoneTrans for iOS. This tool can transfer files to devices like Mac, iPhone, iPad, and Windows. Downloading the software on your computer will not take up much of your storage space. In addition, it can transfer multiple data types simultaneously, such as photos, music, ringtones, voice memos, videos, and more.
What makes this tool the best is that it never modifies or deletes transferred data from one of its supported devices to another. Follow the provided steps below to experience the tool's smooth procedure.
With FoneTrans for iOS, you will enjoy freedom to transfer your data from iPhone to computer. You can not only transfer iPhone text messages to computer, but also photos, videos and contacts can be moved to PC easily.
- Transfer photos, videos, contacts, WhatsApp, and more data with ease.
- Preview data before transferring.
- iPhone, iPad and iPod touch are available.
Step 1Download the tool on your Mac by choosing the Free Download button on the software's website main screen. Then, set it up and launch it.

Step 2Plug the iPhone into the Mac using a USB cable. Then, select the data type you need to transfer from your iPhone to your Mac. The tool will scan them afterwards.
Step 3From the left, select the files that need to be transferred. Then, click the Computer button at the top of the main interface to transfer iPhone files to Mac.
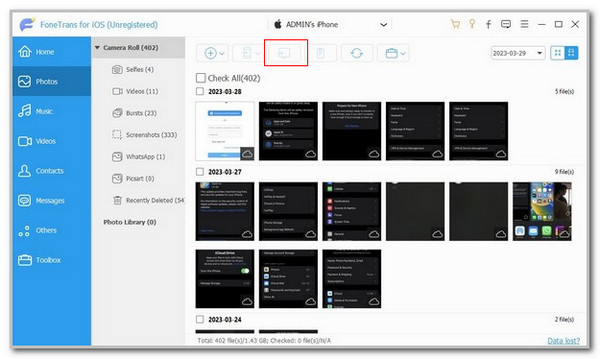
Note: This tool can also transfer files from Mac to iPhone. Clicking the iPhone button at the top instead of the Computer button will make the process achievable.
Part 2. How to Transfer Files Between iPhone and Mac with AirDrop
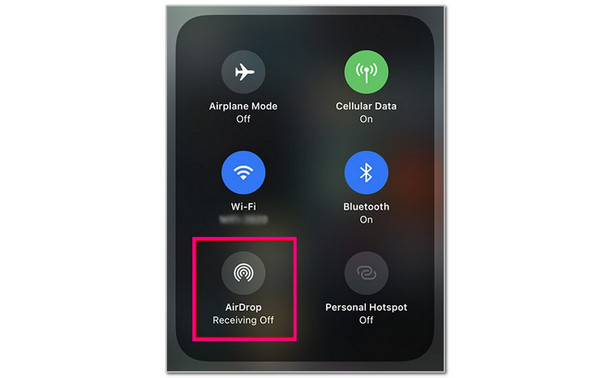
Considering AirDrop to transfer iPhone files to a Mac is also possible. It is a wireless, built-in sharing feature that Apple devices possess. This feature can also do the reverse, where you can also transfer file from Mac to iPhone. Bluetooth and Wi-Fi are the features associated with the AirDrop function. Below are the steps to transfer files from an iPhone to a Mac using this wireless sharing feature.
Swipe down the iPhone Control Center and tap AirDrop to enable it. On your Mac, go to Finder and choose Go. Later, click AirDrop. Ensure that you set Allow to Be Discovered By to Everyone. Select the files you prefer to transfer from your iPhone or Mac. Then, tap the AirDrop Name of the Apple device to start the transfer.
Part 3. How to Transfer Files Between iPhone and Mac with iCloud
Transferring files can be done through the syncing procedure. iCloud is first on the list of methods that can undergo the process. This sync feature can help you access iPhone files on Mac, or other Apple devices. See below how the sync procedure works using iCloud.
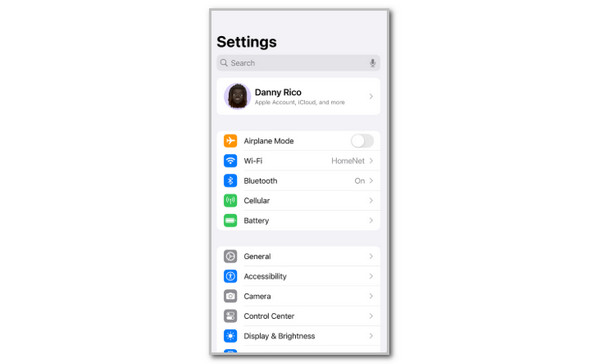
On iPhone, go to Settings and tap your account name. Tap iCloud and toggle on the sliders of the files you want to sync from the iPhone to the Mac. On the other hand, click System Settings on Mac and choose Apple ID. Then, select iCloud from the screen and toggle on the data type's slider to start syncing.
Doing the procedure above vice versa will help you discover how to transfer files from Mac to iPhone. It is the opposite process of this post's main topic.
Part 4. How to Transfer Files Between iPhone and Mac with iTunes
iTunes can be used as an Apple device sync tool for its different data types. It can sync music, movies, photos, videos, contacts, etc. You may use this tool if your Mac runs macOS Sonoma 14 or earlier versions. See how to access files from an iPhone to a Mac using iTunes.
Plug the iPhone into the Mac and open iTunes. Under the Settings section, select the data you want to send on the left. Later, click Sync [Data Type] and choose Sync to complete the process.

Part 5. How to Transfer Files Between iPhone and Mac with Finder
Finder also has the ability to sync your iPhone to your Mac through Wi-Fi. Ensure that the iOS version is 5 or later to be compatible with the feature. Please discover how to access iPhone files on Mac through Finder Wi-Fi syncing.
Plug the iPhone into the Mac. After launching the Finder program, select the iPhone name on the left. Select General on the right of the main interface. Go to the Options section and check the Show This iPhone When on Wi-Fi box. Click Apply to confirm the process afterward.

Part 6. FAQs about How to Transfer Files Between iPhone and Mac
How do I transfer image files from Android to Mac without an app?
A USB cable transfer is the most recommended approach to transferring Android files to a Mac. One reason is that most applications are not supported by the same operating system. Get your USB cable and plug the Android phone into the Mac. After that, open Image Capture on the Mac and select the Android phone name from the sidebar section. Locate the files you prefer to transfer on Mac and choose Download or Download All to complete the process.
Why can't I AirDrop photos from my iPhone to my MacBook?
AirDrop functions with the wireless features of the iPhone and MacBook. The primary issue is that AirDrop can't send photos from an iPhone to a MacBook because Wi-Fi or Bluetooth is turned off. In addition, you are surely aware that AirDrop has multiple receiving visibility options. The Contacts Only might be enabled. The Mac receiver cannot detect your iPhone AirDrop in this case if it is the first time transferring to it.
All in all, this post includes 5 of the easiest approaches to transferring files between iPhone and Mac. The transfer could be done via USB or wireless connection. FoneTrans for iOS makes the procedure much more convenient because it can simultaneously transfer multiple files from iPhone to Mac. Do you have more thoughts about the topic? You may post your queries at the end of this post. Thank you!