How to Move Photos from Mac to External Hard Drive Easily
 Updated by
 Would it be possible to transfer photos from Mac to external hard drive? My Mac keeps showing me a notification saying my storage is almost full, and now I can't even store new photos. I've tried deleting a few old files, but it barely made a difference. I don't want to erase anything anymore, so I hope somebody can suggest a way to transfer instead. Thank you!
Have you ever felt the panic of potentially losing precious photos due to limited storage or device failure? If so, you're not alone since many Mac users face this challenge, especially when their internal drive is nearly full. Running out of space doesn't just risk losing files; it can also slow down your Mac, making everyday tasks frustrating. So, you must wonder what to do.
Well, stress no more, as transferring photos to an external hard drive is a proven and effective solution. The only dilemma you should consider is which transfer method would be the best and most convenient for you. After all, we have already prepared the most painless yet efficient ways to transfer image files from your Mac to external storage. Continue below for guidelines.

Guide List
Part 1. How to Transfer Photos from Mac to External Hard Drive
After testing and compiling the most convenient transfer techniques from a Mac to an external hard drive, you can learn their procedures below, along with the necessary details. Mac's built-in features are available; thus, besides their effectiveness, you can also guarantee each way's safety and reliability. That said, kindly move forward and start transferring.
Way 1. Transfer Photos from Mac to External Hard Drive through Finder
Finder is the initial transfer platform for managing photos from the Mac to an external hard drive. As the default file manager on Mac, it offers a seamless way to transfer images to an external hard drive without requiring an additional program. Also, thanks to macOS's intuitive design, you can expect the transfer procedure to be user-friendly, even for beginners. On the other hand, Finder not only allows you to select and transfer photos to your external drive manually, but it also ensures it will preserve your images' original quality. Additionally, it gives you complete control over file organization since your photos are stored in its folders.
Abide by the worry-free directions below to move photos from Mac to external hard drive through Finder:
Step 1Link the external hard drive to the Mac, then launch Finder on the desktop. On the program's interface, find and open the folder containing the pictures you plan to transfer.
Step 2Next, mark them and press Command + C to copy the files. Once copied, select the name of your external hard drive in the left column of Finder, and then open or create a folder where you want to store your photos. Finally, press Command + V to transfer them accordingly.
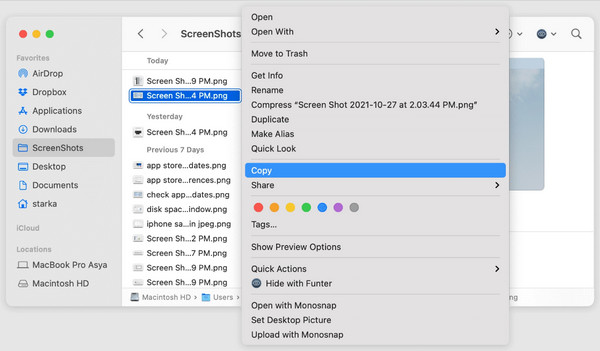
While using Finder to transfer files provides users with convenience, it does come with some limitations. For instance, it won't sort your photos by date, album, or event unless you manually create folders and arrange them. Hence, this can be time-consuming if you have a large number of photos in different folders on your Finder.
Way 2. Transfer Photos from Mac to External Hard Drive via Time Machine
Meanwhile, Time Machine is also a good option for saving your Mac photos to an external hard drive. This built-in macOS feature transfers your entire photo library and maintains versioned backups. Thus, it allows you to restore previous versions of your files when it's time to view or use them again on your Mac. Like the last technique, this process is straightforward, and once you run it, Time Machine will work in the background to keep your photos safely duplicated. However, please know that although this feature is convenient for a complete backup or transfer, it doesn't offer selective photo transfers. So, use this only if you'd like to include the other files.
Imitate the uncomplicated operation below to transfer or export photos from Mac to external hard drive via Time Machine:
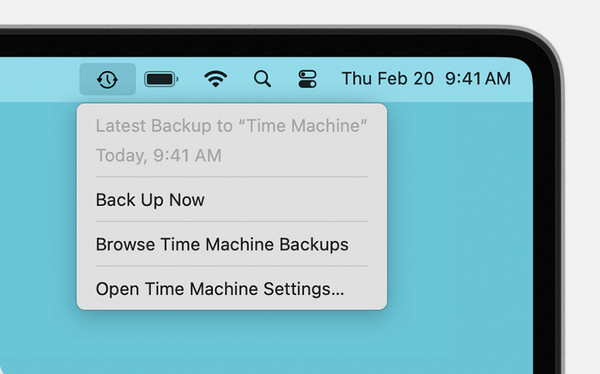
Step 1Like before, attach the external hard disk to your Mac, then open Time Machine by clicking Apple menu > System Settings. Then proceed to General > Time Machine.
Step 2Once asked, set up a backup disk and pick your external hard drive as the storage location. Afterward, you may select Options to choose between automatic and manual backups. When ready, tick the Back Up Now option to transfer your photos to the drive.
Besides transferring image files from a Mac computer to an external hard drive, you may also like to learn how to transfer your photos from an iOS device to your Mac. It can be beneficial if you suddenly run out of space on your iPhone, iPod Touch, etc., later. You must only transfer pictures and other files to the Mac, which will serve as additional storage.
Part 2. Bonus Tip - Transfer Photos from iOS Devices to Mac
When it comes to seamlessly moving photos from your iPhone to a Mac, FoneTrans for iOS stands out as an efficient solution. But although it works professionally, this tool simplifies the transfer process, allowing you to easily transfer your valuable images and even other data types from an iOS device to a Mac computer. Aside from that, we guarantee it will maintain the original and best quality of your data, whether photos, audio files, videos, or other data types.
With FoneTrans for iOS, you will enjoy freedom to transfer your data from iPhone to computer. You can not only transfer iPhone text messages to computer, but also photos, videos and contacts can be moved to PC easily.
- Transfer photos, videos, contacts, WhatsApp, and more data with ease.
- Preview data before transferring.
- iPhone, iPad and iPod touch are available.
On the other hand, another attribute that makes FoneTrans for iOS truly exceptional is its intuitive design. Even if you are a first-time program user, you won't have to face challenging steps because its self-explanatory interface is enough to guide you throughout. Plus, it supports iPhones, iPads, and iPod Touch, making it a versatile choice for all Apple users. So, if you have to transfer data from these devices to your Mac, this tool is perfect.
Recognize the proper navigation below as a sample for transferring images from an iOS device to a Mac with FoneTrans for iOS:
Step 1Open the FoneTrans for iOS site through your website and save its installer using the Free Download button. After that, install the transfer tool and click the Start button when it appears. Once the program interface displays, link your iPhone via a Lightning cable.

Step 2Your device's details, such as name, type, capacity, etc., will then be available on the screen. Prioritize the tab in the upper section to view and select your linked iPhone from the options. The tool can then display your data; thus, head to the Photos section.

Step 3Once your iPhone photos appear, mark the ones you plan to transfer. Then, hit one of the buttons at the top containing a computer symbol. The images will then transfer to your Mac.
Part 3. FAQs about How to Transfer Photos from Mac to External Drive
Why can't I transfer photos from Mac to external hard drive?
You can look at multiple possibilities. First, your external hard drive may no longer have sufficient space. Second, you may have failed to input the drive correctly or had other problems.
Does transferring the photos delete them from my Mac?
No, it doesn't. Transferring will only copy the photos from your Mac to the external hard drive. Thus, they will remain on your computer afterward.
Every method above ensures a successful transfer of your Mac photos to your desired external hard drive. Thus, follow them and don't forget the bonus tool, FoneTrans for iOS, for future use.