Transfer Data From iPhone, Android, iOS, Computer to Anywhere without Any Loss.
- Transfer Data from One Micro SD Card to Another Android
- How to Transfer Pictures from One Phone to Another
- How to Transfer Photos from Old LG Phone to Computer
- How to Transfer Photos from an Old Samsung to Another Samsung
- Transfer Contacts from Samsung to iPhone
- Transfer Data from LG to Samsung
- Transfer Data from Old Tablet to New
- Transfer Files from Android to Android
- Transfer iCloud Photos to Android
- Transfer iPhone Notes to Android
- Transfer iTunes Music to Android
Efficient Guide on How to Download Photos from iCloud
 Updated by
 Are you interested in how to download photos from iCloud to computer or mobile device? As you may know, iCloud offers free storage, but you can’t entirely rely on it when you have a lot of data because it’s only 5 GB. So, it’s unsurprising that users prefer to download their photos to their local storage, whether an iPhone, iPad, or computer instead.
Aside from storage concerns, you may also want to download your iCloud photos because it allows you to upload or edit them without downloading to different apps, for a secondary backup, or you may only find it more efficient to manage them on your device. Regardless, the following strategies will give you the best results in saving your desired photos. Use the guides for smooth downloads.


Guide List
Part 1. How to Download Photos from iCloud on Browser
The most basic and flexible approach for downloading iCloud photos is using a browser, as it doesn't require you to have a specific Apple device at hand. Visiting the official site allows you to access your cloud library from a Windows, Mac, iPhone, Android, or any device since iCloud is accessible on almost any browser, whether mobile or computer. The only requirement would be your account credentials containing the photos you wish to download. Then, the following procedure will be effortless, especially with the website’s user-oriented design.
Follow the trouble-free process below to determine how to download photos from iCloud to PC, Mac, or a mobile device:
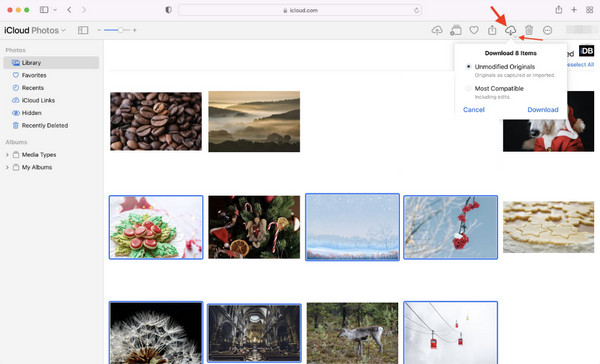
Step 1Launch a reliable browser, whether on your computer or mobile device, then access the iCloud.com site. You will be required to enter your credentials, so input them to log in.
Step 2After that, go directly to iCloud Photos, and the page will present the images it contains. Simply mark or choose the ones you intend to save, then opt for the Download option to finish.
As you can see, this manual method’s process is easy to understand and maneuver, making it ideal for beginners and even for every other user. However, no matter how excellent it is, you must still be aware of this disadvantage. You probably know that the internet is necessary when browsing any website; thus, ensure the network your device or computer is linked to is stable. If not, it could disrupt or slow down the process. Additionally, live photos aren’t available with this method.
Part 2. How to Download All Photos from iCloud by Syncing
On the other hand, syncing your iCloud photos can also help you save and access them on your device or computer. If you haven’t encountered or heard about it yet, iCloud has a syncing feature that allows users to view their chosen data type from iCloud to their devices. So if you enable the syncing option for your iCloud photos, you will be able to access them on your iPhone, iPad, etc., without a problem. Like the prior method, this requires a stable internet, especially since it won’t download only individual image files. This process will sync your entire Photos library, transfer iCloud, making the internet much more critical.
Pay attention to the simplified navigation below to grasp how to download all photos from iCloud by syncing:
On iPhone or iPad
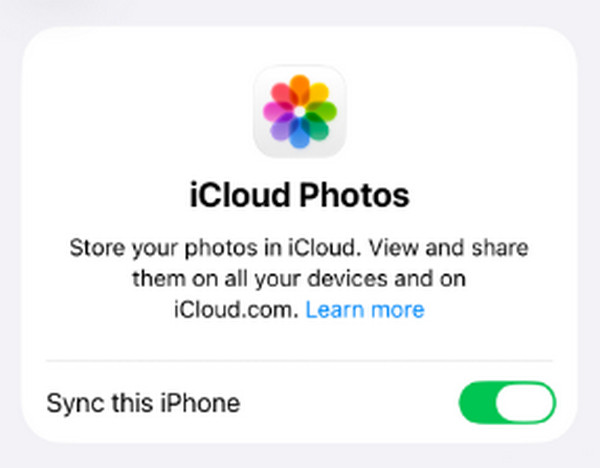
Step 1On the iPhone or iPad’s Settings, opt for your Name at the top screen and choose iCloud.
Step 2Next, tap Photos to view the syncing option on the following interface. Enable the Sync this (device) toggle on the upper part to download and access the iCloud photos on the device.
On Mac
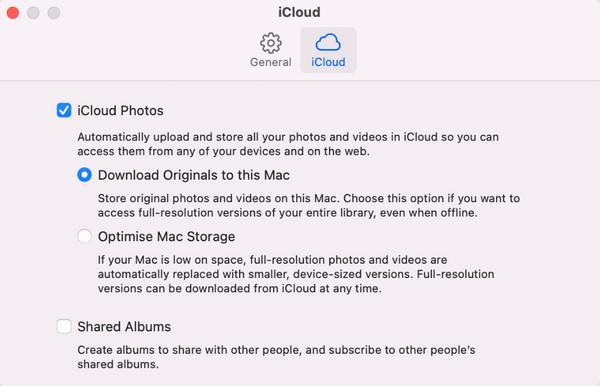
Step 1Initialize your Mac’s Photos program and click Photos > Settings > iCloud.
Step 2Once the options appear, check the iCloud Photos box to sync the media files from your iCloud to your Mac.
This method may be the most convenient if you plan to switch or transfer iCloud to new iPhone. As mentioned, it will download or save your entire iCloud Photos library at once, offering minimal navigation for several files. However, your device or computer storage must be prepared, especially if you have numerous media files in your iCloud Photos, since it might take up a lot of space.
Part 3. How to Transfer Photos from iCloud to PC with FoneLab HyperTrans
What if the iCloud photos are already on your mobile device and you wish to save them to your PC? If so, a competitive tool like FoneLab HyperTrans would be an excellent download solution. Although it requires an installation, you will find it advantageous and efficient because, unlike the last part, you will have complete control of your data. Yes, that’s correct. You will be able to pick your photos individually without the need to save or download your entire Photos library to the PC.
FoneLab HyperTrans is also in demand because of its flexibility. It doesn’t stick to saving or transferring only a single image format. Many are supported, including JPG, JPEG, PNG, HEIC, TIFF, BMP, etc. Aside from that, pictures aren’t the only data types it can transfer, as it also works for videos, messages, music files, contacts, and more. Additionally, the transfer goes both ways. It can be between your Android device, iPhone, iPod, iPad, and computer.
Transfer Data From iPhone, Android, iOS, Computer to Anywhere without Any Loss.
- Move Files between iPhone, iPad, iPod touch and Android.
- Import Files from iOS to iOS or from Android to Android.
- Move Files from iPhone/iPad/iPod/Android to Computer.
- Save Files from Computer to iPhone/iPad/iPod/Android.
Comprehend the easy task below as a pattern of how to transfer photos from iCloud to PC with FoneLab HyperTrans:
Step 1Open FoneLab HyperTrans’ website using your trusted browser, and a Free Download selection will appear. Click the button to get the file into your Downloads, and afterward, open it to start setting up the installation. Once done, start the tool and associate your device containing the iCloud photos to the computer with a Lightning cable.

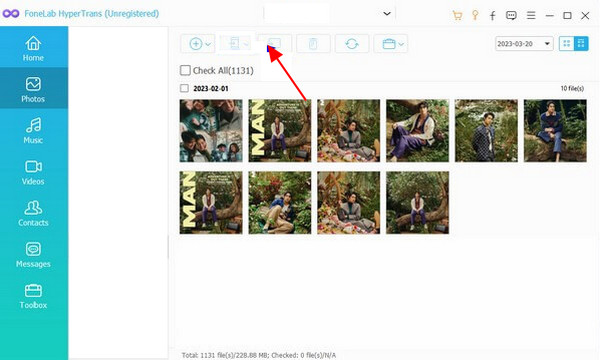
Step 2Once connected, hit the upper tab on the interface and choose your device name from the options. Later, you can click Photos in the left column and select the folder with your photos from iCloud. Then, mark the items you need to save to your PC before clicking the computer tab at the uppermost part to start transferring your chosen iCloud images.
Step 3We understand saving photos from the iCloud to a PC isn’t the only concern users have. You may also need to transfer photos from iCloud to external hard drive; thus, we encourage you to check more guidelines on the FoneLab website for successful transfer procedures.
Part 4. FAQs about How to Download Photos from iCloud
How to download more than 1000 photos from iCloud?
Use the suggested download strategies above. Whether you’re downloading a few or a thousand photos from iCloud, the processes will work, as long as your device space is enough to accommodate them.
Will my photos be deleted if I cancel my iCloud+ subscription?
The photos will stay on your iCloud as long as they don’t exceed the free 5GB limit. However, if they do, iCloud might erase them after 30 days; so, it would be best to download the files immediately.
Downloading iCloud photos is a basic process and doesn’t involve technicalities. Therefore, perform the stress-free guides above correctly, and you will successfully save the images to the device you want. Besides, FoneLab HyperTrans is available if you wish to transfer files further. Install it anytime.