Quick Way to Reset Network Settings on iPhone
 Posted by
 I have been having problems with my internet connection these past few weeks. My brother suggested that I only need to reset the network settings of my iPhone. However, I do not know how to do that because this is my first time encountering this problem. Can you help me with how to reset iPhone network settings? I am hoping for a reply from you guys. Thank you!
iPhone network settings issues? We got your back! We listed a detailed tutorial that can help you hassle-free. You only need to participate in the method properly to achieve your desired results. Please browse this post wholeheartedly.


Guide List
Part 1. What Does Resetting Network Settings on iPhone Mean
Before anything else, knowing what happens after you reset network settings on iPhone is a must. The reason is that the process cannot be undone. Once you reset the network settings on your iPhone, the previously used networks settings will be removed. In addition, the trusted certificates, like websites, will also be marked as untrusted. Also, if you use cellular data roaming, it will be turned off afterward. You will not lose essential data if you reset network settings on iPhone.
FoneLab enables you to fix iPhone/iPad/iPod from DFU mode, recovery mode, Apple logo, headphone mode, etc. to normal state without data loss.
- Fix disabled iOS system problems.
- Extract data from disabled iOS devices without data loss.
- It is safe and easy to use.
Part 2. How to Reset iPhone Network Settings
Alright. After knowing the risk of resetting network settings on an iPhone, it is time to perform it. Please see the detailed steps below about how to do a network reset on iPhone.
Use iPhone Settings App
You can use the iPhone settings to reset the iPhone network settings. Please be careful in this process and tapping buttons. You may lose all the data on your iPhone with one wrong button. You will see why after reading and performing the detailed tutorial of this post. Please browse the methods below about how to reset the network settings on iPhone.
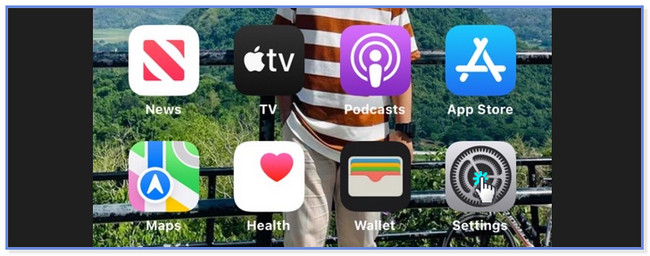
Step 1Open your iPhone and locate the Settings app on its main interface. You only need to locate the Gear icon if you cannot see it. You can refer to the screenshot below.
Step 2You will see a lot of settings and customization for your iPhone. Please swipe down and locate the General icon. Tap it once you already see it on your screen.
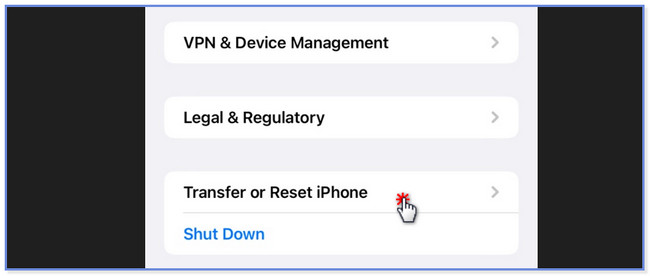
Step 3On the next screen, swipe down at the bottom of the screen. Please tap the Transfer or Reset iPhone button. Your iPhone will direct you to another screen. Please be careful on tapping the button. You may accidentally tap the Shut Down button, and your iPhone will be turned off. In this case, you will start from the beginning of the process, which wastes time.
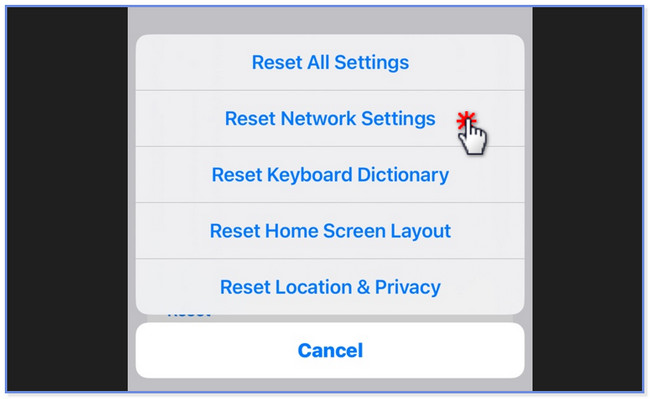
Step 4At the bottom, please tap the Reset button. After that, a list and set of options will be listed on the screen. You only need to choose the Reset Network Settings button by tapping it on your screen. Later, the phone will load for a few seconds, and the network settings of it will be reset.
Actually you can also choose the Erase All Content and Settings button. But it will delete or remove all the data including the network settings on your iPhone.
Part 3. Alternative Ways to Fix iPhone Network Issues
Here are the alternative ways to fix network issues. If you encounter the same problem, please read and perform the 2 methods below.
Option 1. Reboot iPhone
When you have minor and major issues on your iPhone, reboot is one of the first things you should do. But do you know how to perform it? First, you can check the steps in part 2 and tap the Shut Down button if you can access your Settings app.
You can also refer to the steps below to know how depending on the button on your iPhone. Move on.
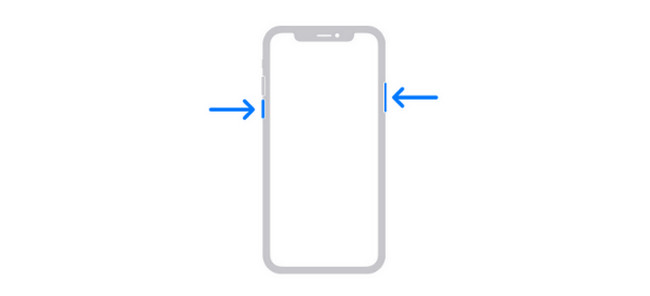
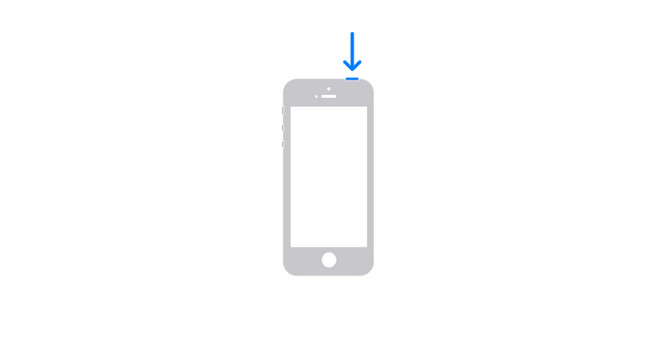
iPhone x and later: Press and hold the Volume and Side buttons together. Drag the Power-Off Slider afterward. The phone will shut down and wait for 30 seconds until it goes black. Turn on your device by pressing and holding the Side button.
iPhone 7, 8, 6, or SE (2nd or 3rd Generation): Press and hold the side button and drag the slider to the right. The phone will be turned off after 30 seconds. Turn on the phone by pressing and holding the Side button.

iPhone SE (1st Generation), 5, or earlier: Press and hold the Top button. After that, slide the slider to the right. The phone will shut down after 30 seconds. Turn it on immediately by pressing and holding the Top button.
Option 2. Use FoneLab iOS System Recovery
FoneLab iOS System Recovery can also help you reset network settings on your iPhone. Also, this tool can fix other malfunctions on your iOS system. It includes charge issues, loop restart, battery drain, and more. This tool offers you 2 repair modes, called Standard and Advanced mode. Upon reading this method, you will know the features' functions. Please proceed with the tutorial below.
FoneLab enables you to fix iPhone/iPad/iPod from DFU mode, recovery mode, Apple logo, headphone mode, etc. to normal state without data loss.
- Fix disabled iOS system problems.
- Extract data from disabled iOS devices without data loss.
- It is safe and easy to use.
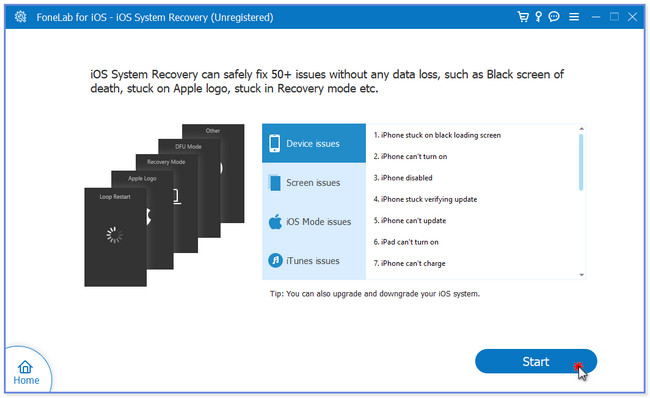
Step 1Download FoneLab iOS System Recovery on your computer. Click the Free Download button to do that. Set it up, install it, and launch it afterward. Later, choose the iOS System Recovery button on the right.

Step 2Choose the issue that you currently facing now. After that, click the Start button.
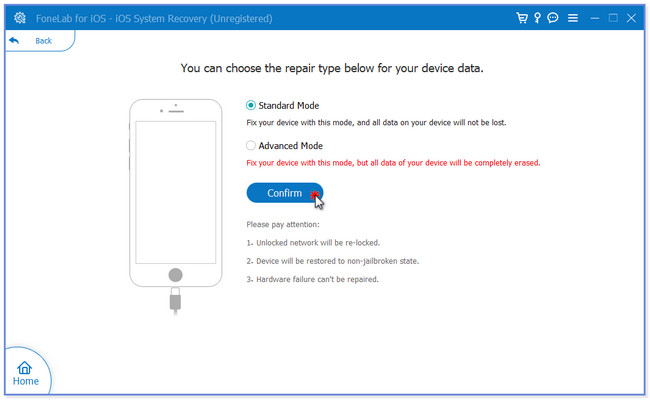
Step 3Choose Standard Mode or Advanced Mode button. If you choose Standard Mode, you will not lose data on your iPhone. But if you choose Advanced Mode, your iPhone will be in recovery mode. In this case, all of its data will be removed. Click Confirm afterward.
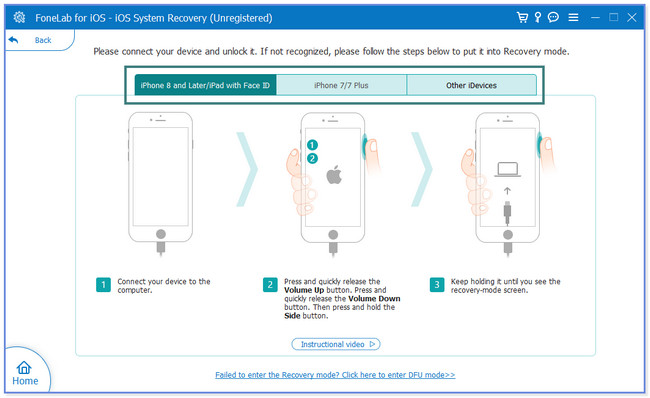
Step 4Connect the iPhone to the software. Follow the onscreen instruction. Later, click the Optimize or Repair button to start fixing your iPhone.
FoneLab enables you to fix iPhone/iPad/iPod from DFU mode, recovery mode, Apple logo, headphone mode, etc. to normal state without data loss.
- Fix disabled iOS system problems.
- Extract data from disabled iOS devices without data loss.
- It is safe and easy to use.
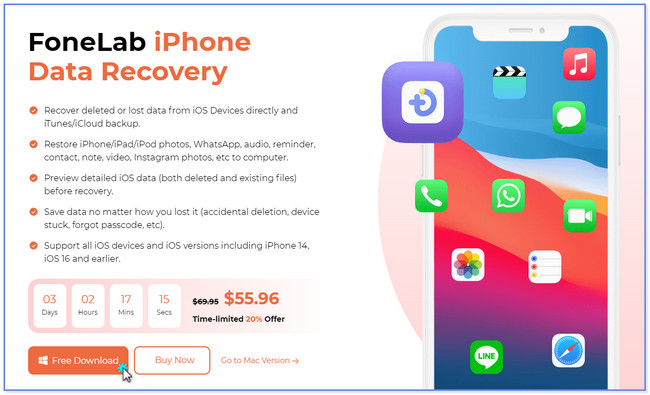
Part 4. Bonus Tip - FoneLab iPhone Data Recovery
What if you lost data in the process? Luckily, you can use FoneLab iPhone Data Recovery. You can use it to recover data from iOS devices directly. In addition, it also allows you to retrieve data from iTunes and iCloud backups.
Moreover, this tool has a preview feature that you can utilize to see the content of each of the deleted or lost files. In this case, you will be sure about the data you recover from your iPhone before the recovery. What’s more, is that the tool can recover data in many recoverable scenarios. It includes accidental deletion, forgotten passwords, device stuck, and more. Please see the quick tutorial for the software below.
With FoneLab for iOS, you will recover the lost/deleted iPhone data including photos, contacts, videos, files, WhatsApp, Kik, Snapchat, WeChat and more data from your iCloud or iTunes backup or device.
- Recover photos, videos, contacts, WhatsApp, and more data with ease.
- Preview data before recovery.
- iPhone, iPad and iPod touch are available.
Step 1Please get FoneLab iPhone Data Recovery by clicking the Free Download button. You only need to go to its official website. Afterward, set it up on your computer. You only need to click the Downloaded File at the bottom of the main interface to achieve that. Later, click the Install button to launch it on your computer automatically.
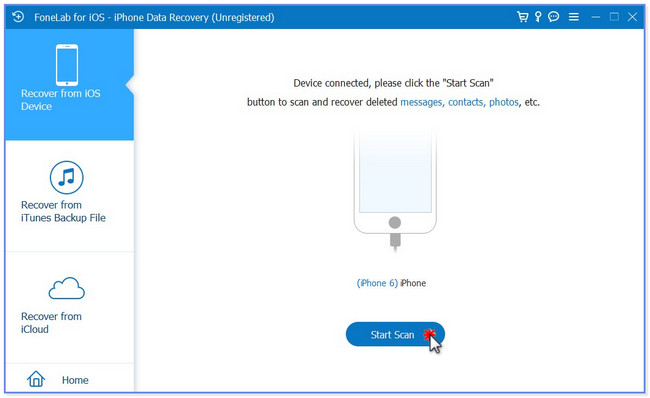
Step 2Please connect the iPhone device to the computer via a USB cable. After that, you will see the name of the iPhone on the right side. It means that you successfully connect the iPhone to the computer. Click the Start Scan button so that the software will start the scanning process for the iPhone data.
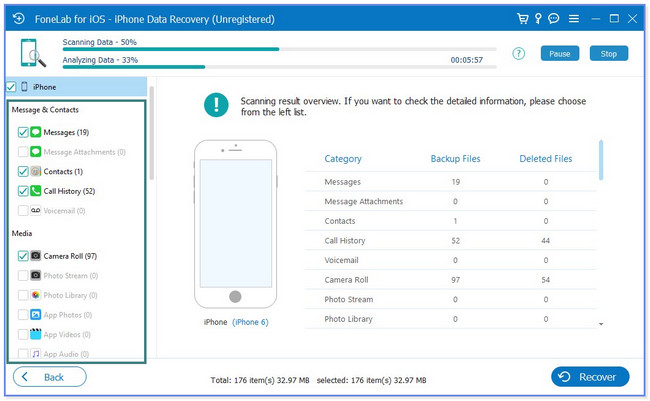
Step 3The software will show you the progress of the scanning process at the top. It will indicate it to you as a percentage. In addition, the tool will let you see the total items found at the bottom. The classifications of the data will appear on the left side. You only need to locate the folder of the files you lost. After choosing, the content will appear on the right side of the tool.
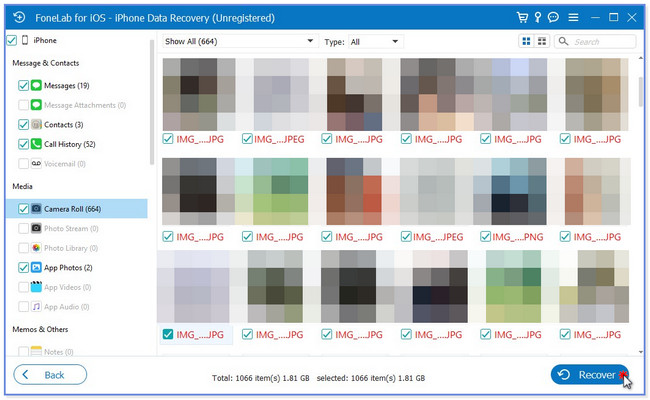
Step 4You can filter the files by clicking the Type button at the top. You can also search for a particular file by clicking the Search icon at the top right. You can also see the preview of the files using the Preview button. Add the files to the recovery process by clicking them on the right side. Afterward, click the Recover button at the bottom right corner of the software. Please wait until the recovery process ends. Later, check if the field has already been retrieved on your iPhone.
With FoneLab for iOS, you will recover the lost/deleted iPhone data including photos, contacts, videos, files, WhatsApp, Kik, Snapchat, WeChat and more data from your iCloud or iTunes backup or device.
- Recover photos, videos, contacts, WhatsApp, and more data with ease.
- Preview data before recovery.
- iPhone, iPad and iPod touch are available.
Part 5. FAQs about How to Reset Network on iPhone
1. What happens when reset network settings don't work?
An alternative solution is needed. You need to perform the factory reset or follow the methods above if that's the case. Ensure that you backup up your iPhone data because the process will delete all of them. To perform it, please launch the Settings app on your iPhone. After that, tap the General button. Tap the Transfer or Reset iPhone button on the next screen at the bottom. Choose the Erase All Content and Settings button afterward. You only need to tap the button again to confirm the action.
2. How often should I reset my network?
If there are no issues or problems with your iPhone, you do not have to reset its network settings. If you encounter problems with it, you can refer to the methods of this article.
3. How to reset cellular network on iPhone?
You can try the same way in this post to reset iPhone cellular network. And you can also try to remove the SIM card and then insert it again.
That's how simple to reset network settings on iPhone. We hope you did not have any difficulty using the detailed tutorial, especially using FoneLab iOS System Recovery.
FoneLab enables you to fix iPhone/iPad/iPod from DFU mode, recovery mode, Apple logo, headphone mode, etc. to normal state without data loss.
- Fix disabled iOS system problems.
- Extract data from disabled iOS devices without data loss.
- It is safe and easy to use.