
 iPhone Data Recovery
 iOS System Recovery
 iOS Data Backup & Restore
 iOS Unlocker
 iPhone Password Manager
 Location Changer
 Android Data Recovery
 Broken Android Data Extraction
 Android Data Backup & Restore
 Android Unlocker
 FoneTrans for iOS
 iPhone Data Eraser
 iPhone Cleaner
 HEIC Converter
 HyperTrans
 WhatsApp Transfer for iOS
 Mac Sweep
 Data Retriever
 Mac Data Retriever
 Video Converter Ultimate
 Screen Recorder
 Phone Mirror
How to Transfer Photos from Mac to Flash Drive (Updated Guide)
 Posted by Lisa Ou / May 12, 2026 09:00
 Stop losing metadata and fix "read-only" errors — I made all of them so you don't have to. By a freelance photo editor (30,000+ images transferred). Last month, I tried to offload 128GB of iPhone 17 Pro 48MP ProRAW photos from my M4 MacBook Pro (macOS Sequoia 15.5) to a Kingston USB-C flash drive. I dragged. I dropped. It looked done. Then I plugged that drive into my editor's Windows PC. Result: 67 photos out of 1,200. The rest were 52KB thumbnails with yesterday's date. The shoot was unusable. Here is exactly what went wrong — and the four methods that actually work.

Guide List
Method 1: Photos App Export (For iCloud Users)
This is the official Apple method. It saves full resolution, original date, and GPS. I should have used this last month.
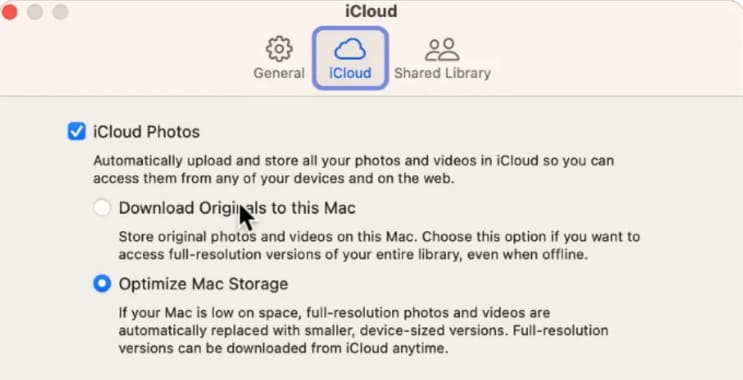
Step 1Open Photos App. Press Command + Comma. Click the iCloud tab. If Optimize Mac Storage is selected, click Download Originals to this Mac. Wait for download to finish. For 1,200 photos on 500Mbps fiber, this took me 22 minutes.
Step 2Select your photos. Press Command + A to select all, or hold Command and click specific ones.
Step 3Go to File > Export > Export Unmodified Original. Choose your flash drive as the destination. Click Export.
What you get: Original HEIC/RAW file. Original filename. Original capture date. GPS coordinates.

With FoneTrans for iOS, you will enjoy freedom to transfer your data from iPhone to computer. You can not only transfer iPhone text messages to computer, but also photos, videos and contacts can be moved to PC easily.
- Transfer photos, videos, contacts, WhatsApp, and more data with ease.
- Preview data before transferring.
- iPhone, iPad and iPod touch are available.
Method 2: Finder Drag & Drop (For Local Files Only)
Use this only if your photos are already on your Mac's Desktop, Downloads, or Documents folder. Do not use this for photos inside the Photos app.
Step 1Open two Finder windows. One with your photos folder. One with your flash drive (under "Locations" in the sidebar).
Step 2Highlight the photos. Drag them into the flash drive window. Wait for the green plus badge to appear before releasing your mouse. No green plus means you are making a shortcut, not a copy.
Step 3Right-click the flash drive and select Eject. Plug it back in. Open one random photo. Press Command + I. If Date Created changed to today's date, delete and use Method 1 instead.
Never do this: Dragging photos directly from the Photos app interface to a Finder window. This strips all metadata.
Method 3: FoneTrans for iOS (When Your Mac Has No Free Space)
This method is for a specific situation I ran into. My Mac had only 15GB free. I had 90GB of photos in iCloud. Method 1 failed because Photos needed to download originals to my Mac first, but there was no room. FoneTrans for iOS streams photos directly from iCloud to your flash drive without using your Mac's storage.
Use this when: Your Mac shows "Startup disk full." You have more photos in iCloud than free space on your Mac. Method 1 keeps failing with "Not enough storage."
Do not use this when: Your Mac has plenty of free space. You only need a few photos. Use Method 1 instead.
Step 1Download and open FoneTrans for iOS on your Mac. Sign in to your iCloud account. The app scans your iCloud library.
Step 2Select the photos or albums to transfer. If you plan to open these on a Windows PC, you can click Toolbox on the left and convert HEIC to JPG or PNG if you want.
Step 3Insert your flash drive. In FoneTrans, choose your flash drive as the export destination. The program transfers directly from iCloud to your drive. Your Mac's local storage is not used.
With FoneTrans for iOS, you will enjoy freedom to transfer your data from iPhone to computer. You can not only transfer iPhone text messages to computer, but also photos, videos and contacts can be moved to PC easily.
- Transfer photos, videos, contacts, WhatsApp, and more data with ease.
- Preview data before transferring.
- iPhone, iPad and iPod touch are available.
Method 4: Move Entire Photos Library to External Drive
This method moves your entire Photos library package (.photoslibrary) to an external drive. You keep your albums, edit history, face recognition, and iCloud sync. The Photos app runs directly from the external drive. I did this when my Mac had only 15GB left but my Photos library was 180GB.
Use this when: Your Mac is low on space but you want to keep using the Photos app normally. You need an external SSD formatted as APFS. Do not use a slow USB flash drive for this.
Do not use this when: You only need a few photos for a Windows PC. Use Method 1 or 2 instead.
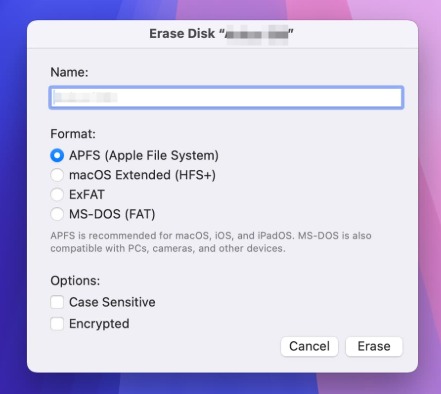
Step 1Open Disk Utility. Select your external drive. Click Erase. Choose APFS format. Click Erase.
Step 2Quit Photos app. Open Finder. Go to your Pictures folder. Find Photos Library.photoslibrary.
Step 3Drag Photos Library.photoslibrary to your external drive. Wait for copy to finish.
Step 4Double-click the library on your external drive. Photos opens with that library.
Step 5In Photos, go to Settings > General. Click Use as System Photo Library.
Step 6Go to Settings > iCloud. Confirm iCloud Photos is syncing.
Step 7Use Photos normally for 3-5 days. Then delete the original library from your Pictures folder and empty Trash.
Troubleshooting: Fix Flash Drive Errors Before Transfer
Problem 1: "The disk is read-only"
Most flash drives ship with NTFS (Windows format). Macs can see NTFS but cannot write to it.
Step 1Open Disk Utility (Command + Space, type "Disk Utility").
Step 2Select your flash drive in the left sidebar. Click the parent drive (shows brand and size), not the indented volume name.
Step 3Click Erase. Name it. Choose Format: ExFAT. Choose Scheme: Master Boot Record. Click Erase. Wait 10-20 seconds. Warning: This erases everything on the drive. Back up first.
Step 4Copy one small photo to test. Then transfer everything.
Why ExFAT: Works on Mac + Windows + TVs + cameras. No 4GB file limit. I moved an 8.3GB ProRes video without issues.
Problem 2: Flash drive doesn't show up on Desktop or Finder
This started happening to me three weeks ago on macOS Sequoia 15.5. The drive lights up but does not appear.
Step 1System Settings > Privacy & Security.
Step 2Scroll to Allow accessories to connect.
Step 3Change from Ask for New Accessories to Always.
Step 4Restart your Mac.
Step 5Plug the flash drive in before logging in.
Since I did this, every ExFAT drive I own mounts within 5 seconds.
With FoneTrans for iOS, you will enjoy freedom to transfer your data from iPhone to computer. You can not only transfer iPhone text messages to computer, but also photos, videos and contacts can be moved to PC easily.
- Transfer photos, videos, contacts, WhatsApp, and more data with ease.
- Preview data before transferring.
- iPhone, iPad and iPod touch are available.
FAQ (From My Actual Mistakes)
My photos copied but the "Date Taken" is today. What happened?
You dragged from the Photos app interface to Finder, or used "Export Photos" instead of "Export Unmodified Original." Delete and use Method 1.
My flash drive works on Mac but not on Windows PC.
Your drive is formatted as APFS. Reformat to ExFAT using the Problem 1 steps above.
Can I move photos instead of copying to save space?
Yes. Hold Command while dragging from a Finder window to your flash drive. Do not do this from Photos app.
My transfer says "Preparing to copy" and freezes for 10 minutes.
This is a known macOS Sequoia bug. Copy in groups of 200-300 photos instead of all at once.
My Mac is full. Can I still use Method 1?
No. Method 1 needs free local space. Use Method 3 (FoneTrans) instead.
Final Checklist
Before you eject your flash drive:
- Flash drive is recognized and not read-only (see Troubleshooting if issues)
- If using Photos app: "Download Originals" is ON, and used "Export Unmodified Original"
- Tested one random photo from the flash drive before unplugging
Which Method Should You Actually Use?
After transferring over 30,000 photos, here is my honest advice:
- If your Mac has plenty of free space: Use Method 1. It is free, official, and preserves everything.
- If your Mac is almost full: Use Method 3 (FoneTrans). I wasted two days trying to make Method 1 work with 15GB free. It failed every time. FoneTrans finished in 35 minutes.
- If you want to run Photos entirely from an external drive: Use Method 4. Just buy a fast SSD first.
My recommended tool: FoneTrans for iOS. It solved the problem that Apple's own Photos app could not handle: moving 90GB of iCloud photos to a USB drive when my Mac had no free buffer space. No other method on this list can do that.
I learned these lessons by losing 12 hours of work and almost missing a client deadline. You do not have to make the same mistakes. Pick your method, follow the steps, and test one photo before you unplug.
With FoneTrans for iOS, you will enjoy freedom to transfer your data from iPhone to computer. You can not only transfer iPhone text messages to computer, but also photos, videos and contacts can be moved to PC easily.
- Transfer photos, videos, contacts, WhatsApp, and more data with ease.
- Preview data before transferring.
- iPhone, iPad and iPod touch are available.



