- Part 1. How to Transfer Photos from Android to Computer with USB Directly
- Part 2. How to Transfer Pictures from Android to Computer with Microsoft Photos App
- Part 3. How to Transfer Pictures from Android Phone to Computer with Google Drive
- Part 4. Transfer Photos from Android to Computer with FoneLab HyperTrans
- Part 5. Transfer Photos from Android to Computer with Samsung Smart Switch
- Part 6. FAQs about How to Transfer Photos from Android Phone to Computer
Transfer Data From iPhone, Android, iOS, Computer to Anywhere without Any Loss.
- Transfer Data from One Micro SD Card to Another Android
- How to Transfer Pictures from One Phone to Another
- How to Transfer Photos from Old LG Phone to Computer
- How to Transfer Photos from an Old Samsung to Another Samsung
- Transfer Contacts from Samsung to iPhone
- Transfer Data from LG to Samsung
- Transfer Data from Old Tablet to New
- Transfer Files from Android to Android
- Transfer iCloud Photos to Android
- Transfer iPhone Notes to Android
- Transfer iTunes Music to Android
How to Transfer Pictures from Android to Computer in 5 Dependable Ways
 Updated by
 Pictures are indeed helpful to cherish our memories with our loved ones. An Android phone is one of the devices that can take pictures conveniently. However, its storage is not enough if you want to capture more photos in the future. Transferring your Android phone pictures to a computer is the solution for that! Transfer photos from Android to computer with this article. You can choose from its 5 proven and tested methods, depending on your needs. Kindly continue browsing it to discover the methods.


Guide List
- Part 1. How to Transfer Photos from Android to Computer with USB Directly
- Part 2. How to Transfer Pictures from Android to Computer with Microsoft Photos App
- Part 3. How to Transfer Pictures from Android Phone to Computer with Google Drive
- Part 4. Transfer Photos from Android to Computer with FoneLab HyperTrans
- Part 5. Transfer Photos from Android to Computer with Samsung Smart Switch
- Part 6. FAQs about How to Transfer Photos from Android Phone to Computer
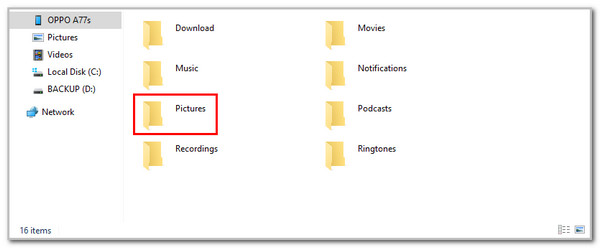
Part 1. How to Transfer Photos from Android to Computer with USB Directly
The USB cable is the top transfer method for your Android phone to a computer. You only need the help of your computer’s built-in file management tool, like Finder and File Explorer. This procedure does not require an internet connection. Perform the steps below as your guide on how to transfer pictures from Android to computer.
Plug your Android phone into your Mac or Windows computer. Open Finder or File Explorer. Then, select your Android phone from the list. Locate the photos you want to transfer from the Pictures or other folders. Select them by dragging the images. Copy them and paste them into the folder on your computer to transfer them.
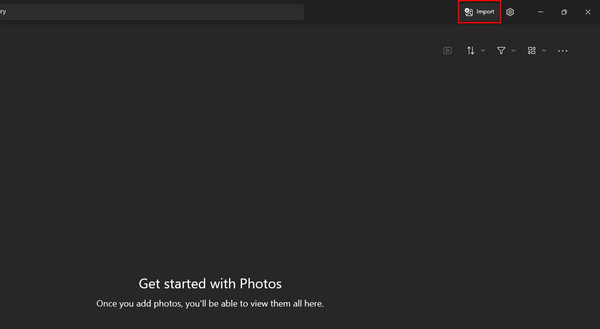
Part 2. How to Transfer Pictures from Android to Computer with Microsoft Photos App
The built-in Photos program of your PC allows you to transfer your pictures through a USB connection, too. You only need to import them into the program to access them. Please perform the steps below for the process.
Open the Microsoft Photos app. Plug the Android phone into the PC. Then, click Import at the top right. Then, select your Android phone. Finally, choose the photos you want to transfer. Click the Add Item button to start the process.
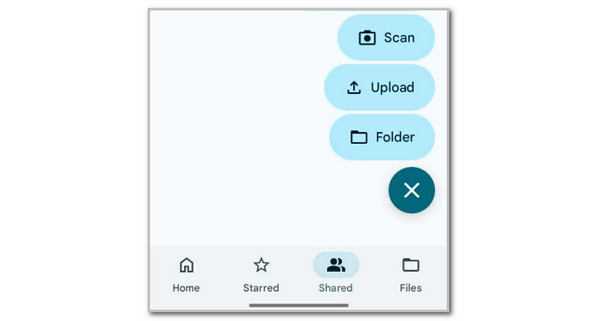
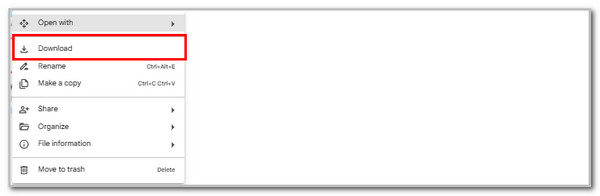
Part 3. How to Transfer Pictures from Android Phone to Computer with Google Drive
Google Drive is one of the free services Google offers to its users. This service can transfer your photos from your Android phone to your computer by importing and downloading them. However, this procedure will consume much of your time because you need to download the photos individually. Ensure that you have a Google account and a stable internet connection when doing the process. Follow the steps below.
Step 1On your Android phone, please open the Google Drive app. After that, please tap the Plus button at the bottom right of the screen. Then, select the Upload option at the bottom right. Choose the photos you want to transfer and import them.
Step 2Search for the Google Drive website on your computer. Then, sign in with the same Google account. Locate the photos you want to transfer and click the Three Dots button. Finally, click the Download button.
Part 4. Transfer Photos from Android to Computer with FoneLab HyperTrans
You can also consider: How do I transfer photos from Android to computer if I want a third-party program? There are countless third-party tools, but nothing beats FoneLab HyperTrans in terms of speed to transfer files from Android to PC. Photos are not the only data type it supports. The software also supports music, videos, contacts, and messages.
Transfer Data From iPhone, Android, iOS, Computer to Anywhere without Any Loss.
- Move Files between iPhone, iPad, iPod touch and Android.
- Import Files from iOS to iOS or from Android to Android.
- Move Files from iPhone/iPad/iPod/Android to Computer.
- Save Files from Computer to iPhone/iPad/iPod/Android.
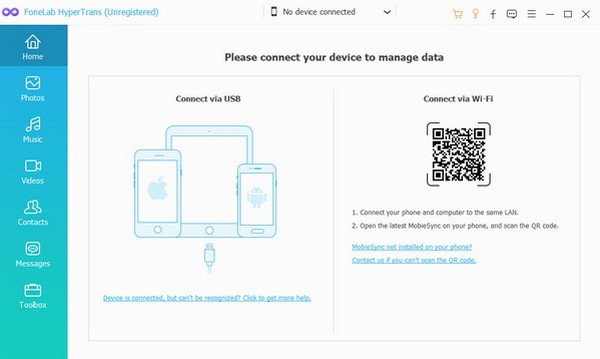
Besides that, it allows you to connect your Android phone using a USB and wirelessly. Please perform the detailed instructions below to use the tool properly.
Step 1Go to the main website of FoneLab HyperTrans. After that, click the Free Download button on the screen to get the file. Then, set it up and install it based on the requirements. Finally, the tool will be launched.

Step 2Plug the Android phone into the PC. Alternatively, you may scan the QR code from the main interface. Then, it will require you to get the latest version of MobieSync. Later, please click the Photos button on the left side of the screen. The tool will scan the available photos from your Android phone.
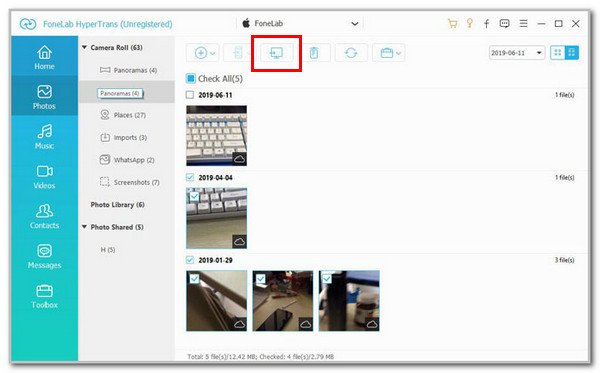
Step 3The scanned photos will appear on the main interface. Then, select the images you want to transfer. Click the Computer button at the top of the main interface. The transfer procedure will start afterward.
Part 5. Transfer Photos from Android to Computer with Samsung Smart Switch
Samsung Smart Switch is a transfer tool commonly used for transferring your Samsung devices and computers. However, this method may only be used to transfer photos from your Samsung phone to your Mac or Windows computer. Besides photos, it can also transfer your contacts, messages, call log, internet, applications, and settings through backup. Please be informed that this feature cannot copy all the apps and data from your Samsung phone. Also, some users find it inconvenient to use it sometimes due to the failed transfers they experience. How to use Samsung Smart Switch? Discover how to transfer photos from Android phone to computer using the steps below.
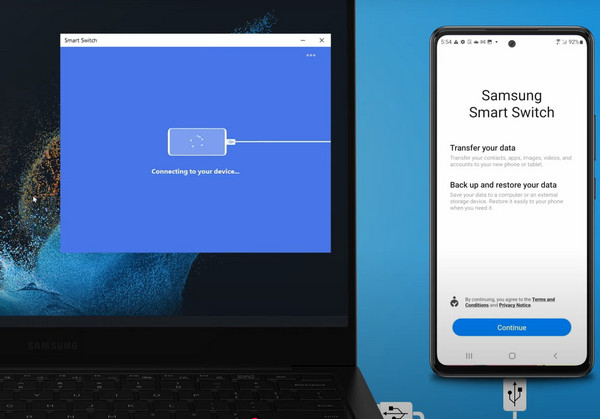
Step 1Ensure that you have Samsung Smart Switch on your computer and Android phone. After that, plug the Android phone into your computer to recognize it. Tap the Continue button on your Android phone. Tap the Allow button at the bottom right to proceed. You will see the Android phone name on the computer. Please click the Backup button at the bottom left corner.
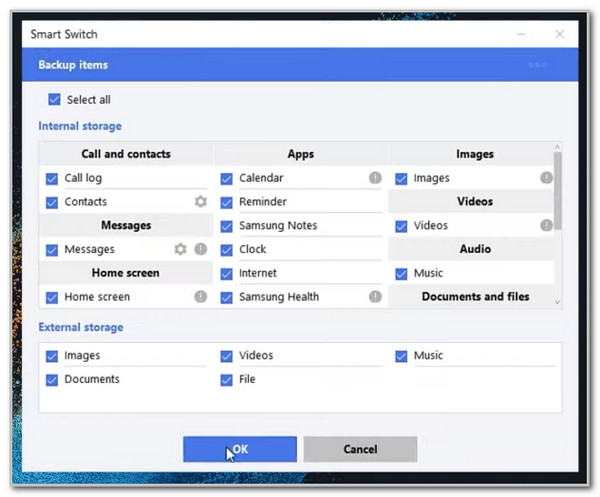
Step 2The supported data types of the mentioned feature will appear on the computer screen. Select the data you want to back up and click the OK button. The computer will start to back up your Android phone. The data will be transferred afterward. You must have the same features if you have a non-Samsung phones.
Part 6. FAQs about How to Transfer Photos from Android Phone to Computer
What is the easiest way to transfer photos between an Android and a PC?
The use of a USB cable is indeed the fastest way to transfer between an Android and a PC. Next is FoneLab HyperTrans. These methods use a USB connection, which means that you do not need an internet connection to operate them.
Is Bluetooth good for file transfers?
Bluetooth may also be used to transfer photos or other files from an Android phone to a computer. However, it is not mostly recommended. The reason is that the transfer procedure of this method is slow, which costs a lot of time for users.
This article consists of the 5 leading guides on how to transfer photos from Android to Mac computer or Windows. FoneLab HyperTrans is here to help you quickly transfer pictures or other data types from your Android phone to a PC. We recommend that you get it on your computer to explore its transfer features. Download it now!