Transfer Data From iPhone, Android, iOS, Computer to Anywhere without Any Loss.
- Transfer Data from One Micro SD Card to Another Android
- How to Transfer Pictures from One Phone to Another
- How to Transfer Photos from Old LG Phone to Computer
- How to Transfer Photos from an Old Samsung to Another Samsung
- Transfer Contacts from Samsung to iPhone
- Transfer Data from LG to Samsung
- Transfer Data from Old Tablet to New
- Transfer Files from Android to Android
- Transfer iCloud Photos to Android
- Transfer iPhone Notes to Android
- Transfer iTunes Music to Android
How to Transfer Photos from Android to Flash Drive in 3 Quick Ways
 Updated by
 Photos can be captured with an Android phone. In fact, various Android phones can capture high-quality pictures in a few seconds with no editing. This is the primary reason why some Android phone has too many photos on their storage. This way, they want to transfer their images to a flash drive to free up space.
How to transfer photos from Android to flash drive? There are multiple ways to do this process effectively. We filtered the 3 most helpful and effective procedures for transferring your photos to your flash drive. If you are interested in discovering them, kindly scroll below for the full details.

Guide List
Part 1. How to Transfer Photos from Android to Flash Drive Using USB
Transferring the Android phone photos to a flash drive can be done using an OTG adapter and a USB cable on your PC. These procedures are massively different from each other. For a better explanation about these 2 methods, kindly scroll below to show you their full details and procedure.
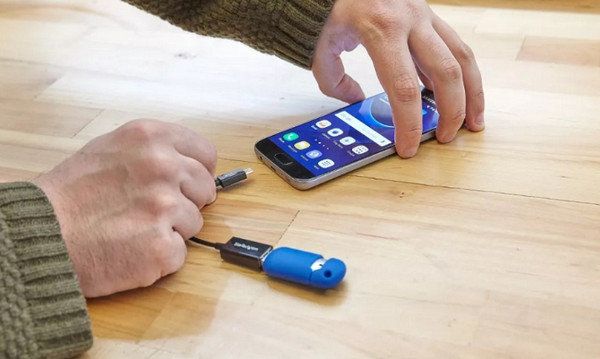
1. Use OTG Adapter
An OTG adapter serves as a connector that converts the Android phone’s charging port to a regular USB port. It includes Micro-USB and USB-C. This way, you can plug the flash drives, external hard drives, card readers, game controllers, keyboards, and other accessories into your Android phone without the need for a computer. If that’s the case, you will have a faster transfer process for your Android phone photos, instead of processing them on your PC.
However, an OTG adapter drains your Android phone battery quickly. Before transferring your photos using it, it is better to charge your Android phone first. Please follow the steps below on how to use it.
Step 1Get the Android phone, including the flash drive and OTG adapter. After that, plug the flash drive into the OTG adapter. Then, plug it into your Android phone. Next, swipe down the top of the Android phone to see the Notification Center. Tap the USB Storage Device Connection button to see more options. Ensure that it has the correct settings.
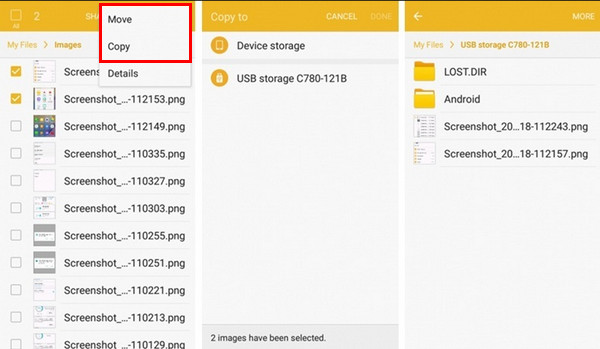
Step 2Go to the Files app and locate the photos you need to transfer. After that, tap the Three Dots button at the top right. Then, select the Move or Copy button. Select the Flash Drive location and tap the Done button to finish the process.
2. File Explorer
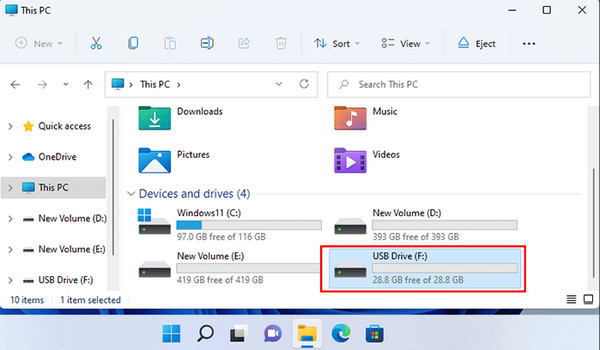
You can use a PC to transfer your photos from an Android phone to PC. File Explorer will be the primary tool that you will use on your PC. You may also transfer files from Android to PC using this method. How to transfer pictures from Android phone to USB flash drive? The steps below will be your best guide.
Plug the USB cable into the PC, including your Android phone and flash drive. Then, ensure that you have the correct settings for it. Then, select the Android phone name and copy the files you need to transfer. Click the This PC button on the left and select the flash drive name on the right. Choose a destination folder and paste the photos. Unplug the devices afterward to complete the process.
Part 2. Transfer Photos from Android to Flash Drive with FoneLab HyperTrans
You can also use a third-party tool to transfer your photos to your flash drive. FoneLab HyperTrans is one of those tools. This tool can transfer pictures and other data files to different devices. You can transfer between an Android phone, an iPhone, an iPad, and a PC. Contacts, videos, music, and messages are also supported. Please perform the steps below to know how to use the tool.
Transfer Data From iPhone, Android, iOS, Computer to Anywhere without Any Loss.
- Move Files between iPhone, iPad, iPod touch and Android.
- Import Files from iOS to iOS or from Android to Android.
- Move Files from iPhone/iPad/iPod/Android to Computer.
- Save Files from Computer to iPhone/iPad/iPod/Android.
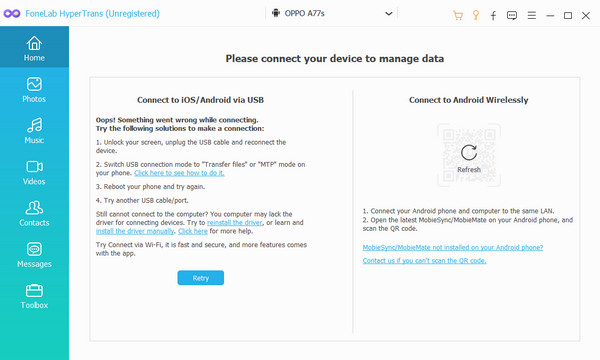
Step 1Click Free Download to get the tool. Set up and install it afterward to start the process.

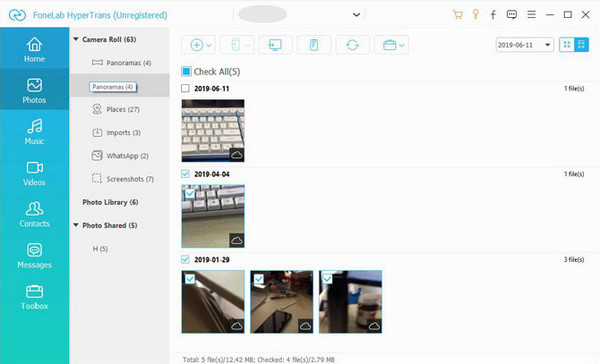
Step 2Then, plug the Android phone and flash drive into the computer. You can do it wirelessly and with a USB connection. Follow the on-screen instructions to do that. Click Photos on the left to proceed with the scanning process.
Step 3Choose the photos you need to transfer. Click Computer at the top and select the flash drive as the destination. Click Select Folder to start the transfer.
Part 3. Transfer Photos from Android to Flash Drive with Samsung Smart Switch
Samsung Smart Switch is the official Samsung device transfer feature. It helps you transfer multiple data, like contacts, messages, settings, and most especially, photos. It can be used to transfer pictures from your Samsung phone to your flash drive. How to use Samsung Smart Switch to transfer photos from a Samsung phone to a flash drive? The instructions below will guide you.
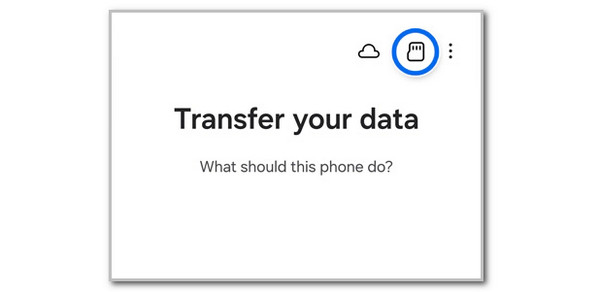
Step 1Please plug the flash drive into your Samsung phone with the help of an OTG adapter. After that, open Samsung Smart Switch. Then, tap the SD Card button at the top right of the screen.
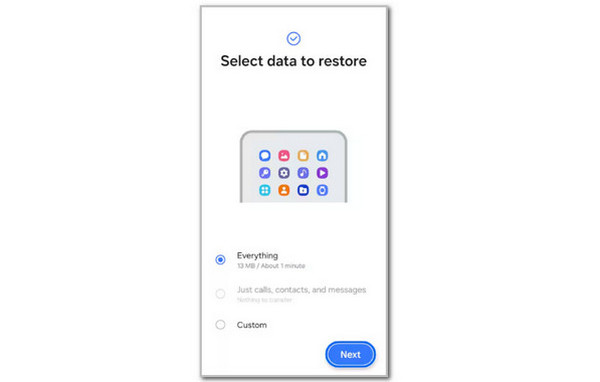
Step 2Select the USB Storage button. After that, select the Custom button and choose the photos you need to transfer. Tap the Next button at the bottom right. Follow the on-screen instructions to complete the transfer process.
Besides Samsung Smart Switch, there are other transfer features on other Android phone brands. Mi Mover for Xiaomi, Clone Phone for Oppo, EasyShare for Vivo, Phone Clone by Huawei, and more.
Part 4. FAQs about How to Transfer Photos from Android to Flash Drive
How do you move photos to SD card on Android?
This procedure is easy and almost the same as the previous methods. Get your SD card and plug it into the SD card SIM tray on your Android phone. Select the files from the Files app and tap Move. Finally, select the SD card path.
Why is the USB transfer option not showing up on Android?
The USB transfer options must be prompted after you plug the Android phone into a computer. However, sometimes it does not appear for some reason. A faulty or charging-only cable can cause it. Also, there might be a hardware issue with the USB or Android phone.
How do I know if my flash drive is compatible with my phone?
It depends on the connector type and file system format. If you use USB-C, you will need a USB-C to USB-A OTG adapter. On the other hand, Micro-USB needs a Micro-USB flash drive or OTG adapter.
This article focuses on explaining how to transfer photos from Android to flash drive. The 3 proven and tested ways are here to help you transfer photos from an Android phone to a flash drive. FoneLab HyperTrans is here if you consider using a third-party tool. This tool can transfer multiple pictures in a few seconds or minutes. Download the tool now to experience its smooth transfer process!