How to Downgrade iOS [4 Methods You Must Know]
 Posted by Lisa Ou / Nov 08, 2023 09:00
 Most of us get excited whenever Apple releases a new iOS version. It implies you will get new features for your iPhone. However, you will not get every newly released iOS version because some iPhone models might not be compatible with it anymore.
But sometimes you will find that the updated iOS version made you encounter some issues on your iPhone, like slower running speed, frozen screen, fast-drawn battery, etc. Well, what if you updated the software version of your iPhone and did not like it? Well, that's another issue to talk about. If that's the case, downgrade your iPhone iOS version!
There are multiple reasons why others want to learn how to downgrade from iOS 26, iOS 27 Beta, 17, or others. Some are experiencing compatibility, performance, bugs, and stability issues. So, see how to downgrade the iOS version below.
![How to Downgrade iOS [4 Methods You Must Know]](/images/ios-system-recovery/how-to-downgrade-ios/how-to-downgrade-ios.jpg)

Guide List
Part 1. How to Downgrade iOS Using iTunes/Finder
iTunes is designed to play and manage your songs, videos, and other data. The good news is that the program can help you learn how to downgrade iOS version. On the other hand, the downside of this program is that it is not available on all Mac models. It has been replaced on the latest macOS. Only earlier versions of macOS and Windows can access it.
FoneLab enables you to fix iPhone/iPad/iPod from DFU mode, recovery mode, Apple logo, headphone mode, etc. to normal state without data loss.
- Fix disabled iOS system problems.
- Extract data from disabled iOS devices without data loss.
- It is safe and easy to use.
As a substitute, Finder will take place. Its process for downgrading the iPhone iOS version is the same as iTunes. Their only difference is the buttons that you will click to see features. Don’t worry, and we will show their differences along the process to learn how to downgrade iOS 16 to iOS 15 correctly.
Please see the detailed steps below on how to use iTunes or Finder to downgrade the iOS version. Move on.
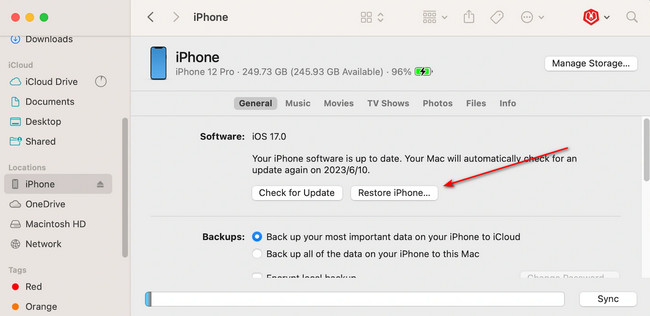
Step 1Get a Lightning Cable or USB cable. After that, use it to connect your iPhone to your Mac. Please launch Finder or iTunes on your Mac. It is recommended to back up all of your data before doing this process. Please use iCloud. On Finder, push the Option key while clicking the Restore iPhone button. On iTunes, press the Option key on your Mac keyboard only without clicking any buttons on the screen.
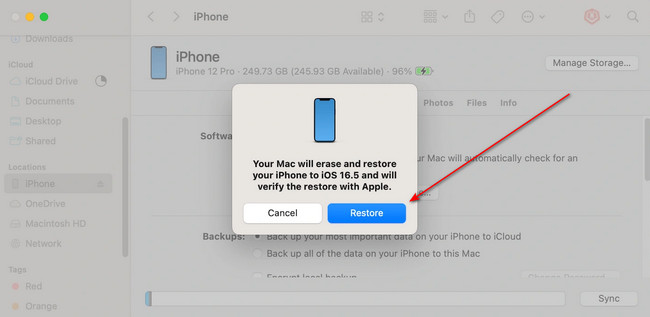
Step 2Please select the iOS Firmware files that you have downloaded. After that, a window option will appear on the Mac screen. Select the Restore button to start downgrading your iPhone iOS version. Set up your iPhone afterward.
Part 2. How to Downgrade iOS through DFU Mode
If the methods above did not successfully downgrade your iPhone, try DFU mode. However, putting your iPhone in DFU mode will erase all its data. If so, back up the data that you do not want to vanish permanently.
See below how to downgrade iPhone. Move on.
Step 1Please join your iPhone to your Mac and launch Finder and iTunes. Put your iPhone into DFU mode afterward. Follow the steps to put the iPhone in DFU mode depending on its model below.
- iPhone 8 and Later: Push and instantly release the Volume Up > Volume Down buttons. After that, push and hold the Side button until the screen turns black. Then, push and hold the Side button and Volume Down buttons at the same time. Wait for at least five seconds and release the Side button while still pushing the Volume Down button. Release it once you see the DFU notification.
- iPhone 7 and 7 Plus: Push the Side > Volume Down button on your iPhone simultaneously. Wait for 8 seconds until you notice the DFU notification on your Mac screen.
- iPhone SE, iPhone 6s, and Earlier: Push and hold the Home > Side buttons simultaneously on your iPhone. When you see nothing on the screen, release the Side button while still pushing the Home button. Release it once you see the DFU notification on the screen.
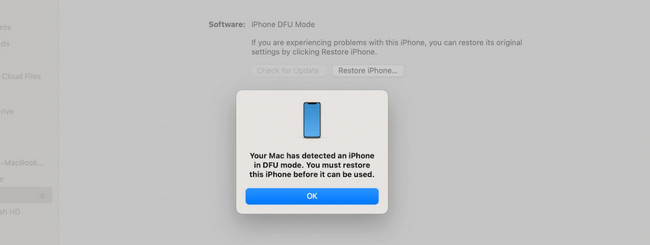
Step 2On Finder, hold the Option key while you click the Restore iPhone button. On iTunes, please keep the Shift key while clicking the Restore iPhone button. Choose the iOS firmware you prefer and click the Open button. When a window is prompted, choose the Restore button. Set up your iPhone afterward.
Part 3. How to Downgrade iOS with FoneLab iOS System Recovery
FoneLab iOS System Recovery is a third-party tool designed to fix malfunctions on your iPhone. Some of the issues it tries to fix are loop restart, charge issues, battery drain, and more. Also, one of the assets of this tool is that it enables you to downgrade iOS versions of your iPhone. The process only requires you to connect your iPhone to a computer.
FoneLab enables you to fix iPhone/iPad/iPod from DFU mode, recovery mode, Apple logo, headphone mode, etc. to normal state without data loss.
- Fix disabled iOS system problems.
- Extract data from disabled iOS devices without data loss.
- It is safe and easy to use.
On top of that, it can bypass iTunes errors. It includes the iPhone, which cannot connect to the iTunes store, cannot restore, and more. Do you want to use FoneLab iOS System Recovery to downgrade the iOS version of your iPhone? See the detailed steps below.
Step 1Download the tool by going to its official website and clicking the Free Download button. Alternatively, click the button here in this article because it is also posted. After that, set up the tool and launch it afterward.

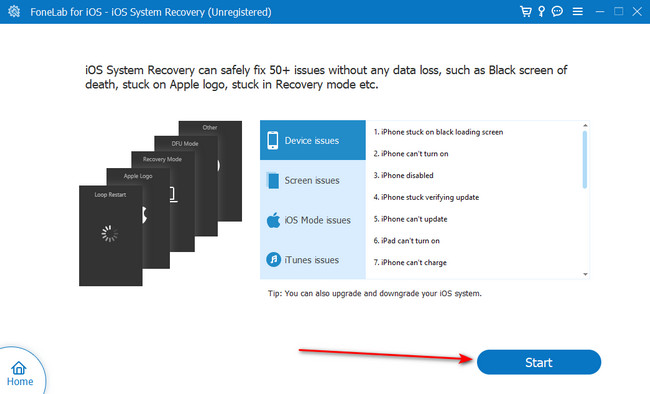
Step 2Select the iOS System Recovery button on the left. Join your iPhone to the computer via a lightning cable or USB cable. The supported issues by the software will appear on the screen. Click the Start button to continue.
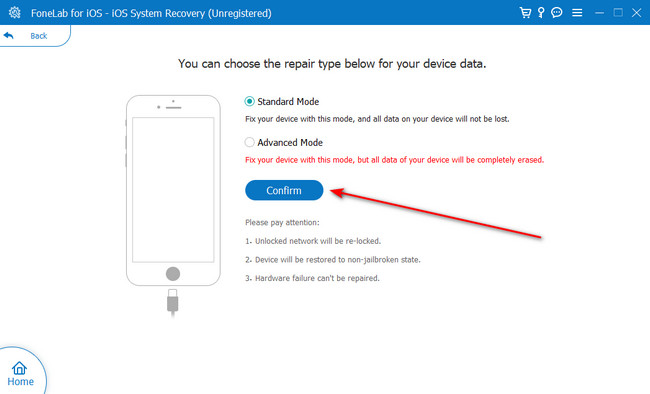
Step 3Choose repair type. Select Standard Mode to not lose even a single piece of data on your iPhone. You can also select Advanced Mode. The iPhone will be put in recovery mode, and all its data will be deleted. Click the Confirm button afterward.
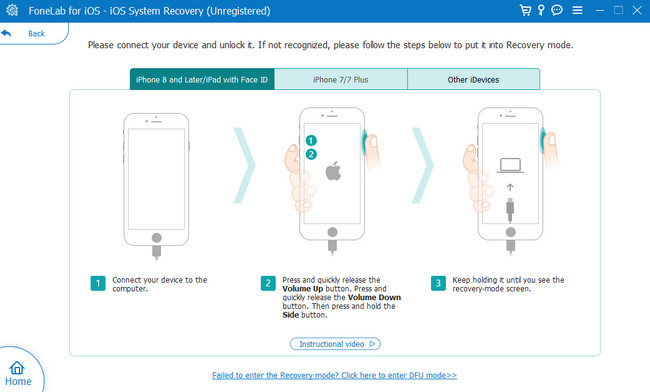
Step 4Imitate the onscreen instructions to put the iPhone in recovery mode. After that, choose the Select button at the bottom and choose the downloaded firmware you prefer. Later, click the Repair button to start the downgrading session.
FoneLab enables you to fix iPhone/iPad/iPod from DFU mode, recovery mode, Apple logo, headphone mode, etc. to normal state without data loss.
- Fix disabled iOS system problems.
- Extract data from disabled iOS devices without data loss.
- It is safe and easy to use.
Part 4. FAQs about How to Downgrade iOS
1. How to downgrade apps on iPhone App Store?
Apple has not yet released a feature to downgrade its apps through the App Store. Your iPhone cannot revert the new version of the app to an older one. However, you can still check on the App Library of the App Store. But for some reason, this method does not apply to all iPhone models. Anyway, to find this location, open the App Store. Tap your Profile Picture and choose the Purchased button. Reinstall the app you want to downgrade if it has an older version.
2. How do I know what iOS version I have?
Use the Settings app of your iPhone to know its current iOS version. Launch it and tap the General button to see more options for your iPhone. After that, tap the About button at the top to see the information on your iPhone. You will notice the iOS version of your iPhone is in the Software Version section.
Did you have a smooth and safe process to downgrade iOS? If yes, that's great! Do you have more issues on your iPhone and other devices? Join our discussion by commenting on them in the comment section below. Also, do not forget to consider FoneLab iOS System Recovery. Thank you!
FoneLab enables you to fix iPhone/iPad/iPod from DFU mode, recovery mode, Apple logo, headphone mode, etc. to normal state without data loss.
- Fix disabled iOS system problems.
- Extract data from disabled iOS devices without data loss.
- It is safe and easy to use.