How to Transfer Photos from iPhone to PC Efficiently
 Posted by Valyn Hua / June 21, 2023 09:00
 At present, taking photos is a big part of our everyday life. We take pictures of ourselves, family members, relatives, and random stuff. On iPhone, it is enjoyable to capture images because they are high quality. You may post them on social media aesthetically. But we unconsciously know that having many pictures on iPhone makes it run out of storage.
What if you do not want to delete even a single photo on your iPhone? Luckily, you can transfer them to your PC and free up space on your iPhone! We are glad you landed on this post because we prepared 3 proven and easy methods for the issue. Please scroll down to know them.


Guide List
Part 1. Transfer Photos from iPhone to PC with FoneTrans for iOS
There are many ways to transfer photos from iPhone to PC. But have you tried to use a third-party tool like FoneTrans for iOS? If not, this is your chance to discover it and instantly transfer files! This software is very safe to utilize because it will not modify the data before and after you transfer them. In addition, it supports uncountable transferrable data, which includes photos, videos, contacts, messages, and more.
With FoneTrans for iOS, you will enjoy freedom to transfer your data from iPhone to computer. You can not only transfer iPhone text messages to computer, but also photos, videos and contacts can be moved to PC easily.
- Transfer photos, videos, contacts, WhatsApp, and more data with ease.
- Preview data before transferring.
- iPhone, iPad and iPod touch are available.
Furthermore, this software takes only a little storage on your computer. It is good if you run out of storage space on your PC. Do you want to transfer pictures from iPhone to PC using this tool? Please follow and act on the steps below.
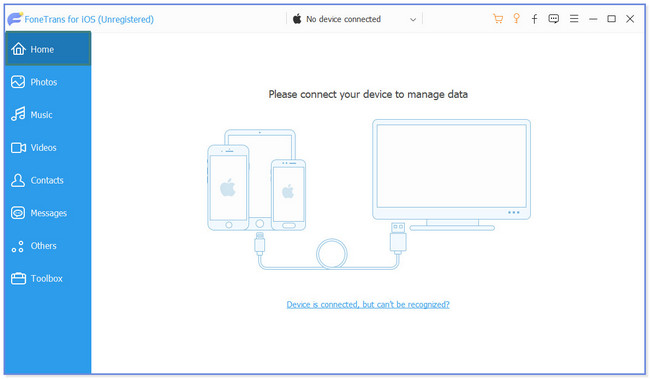
Step 1Download FoneTrans for iOS on your PC. After that, set up its downloaded file and click the Install button to launch it. Click the Home button on the left. The software will require you to connect the iPhone to the computer via a compatible USB cable.
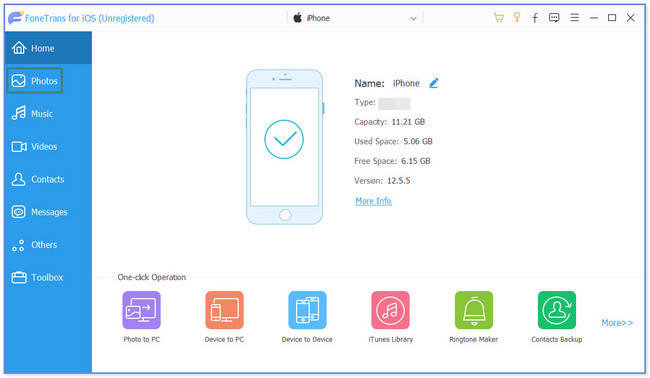
Step 2Tap the Trust button on your iPhone. You will see the name of the iPhone on the right side once you connect it to the software. Click the Photos button on the left. The tool will scan the photos from your iPhone for a while.
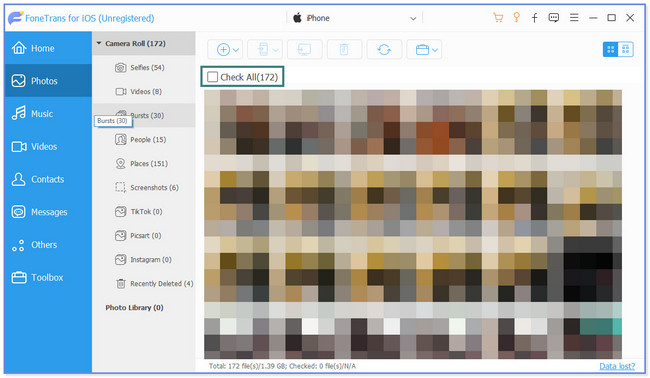
Step 3On the left, you will see the photo albums from your phone. Choose the location of the photos you want to transfer. Their content will appear on the right side.
Note: You can click the Check All button at the top to transfer all the pictures to the PC. If not, filter them.
Step 4Click the Computer icon at the top. After that, the software will require you to choose a folder as a destination for the photos that you will transfer. Click the Select Folder button afterward. The tool will process the images instantly. Once done, the software will notify you by popping out the Check screen or window.
Aside from FoneTrans for iOS, there are other more ways that you can use to transfer photos from iPhone to PC. However, you need to access some of them online. If you have a slow internet connection, it will affect the process and make it slower. Do you want to discover them? Scroll down.
With FoneTrans for iOS, you will enjoy freedom to transfer your data from iPhone to computer. You can not only transfer iPhone text messages to computer, but also photos, videos and contacts can be moved to PC easily.
- Transfer photos, videos, contacts, WhatsApp, and more data with ease.
- Preview data before transferring.
- iPhone, iPad and iPod touch are available.
Part 2. Transfer Photos from iPhone to PC by File Explorer
You can use file explorer to transfer photos from iPhone to PC. You only need to use a compatible lightning cable for data management! It is one of the quickest processes when it comes to transferring files. However, this method may be confusing if you are not tech-savvy. Anyway, we will guide you using the steps below.
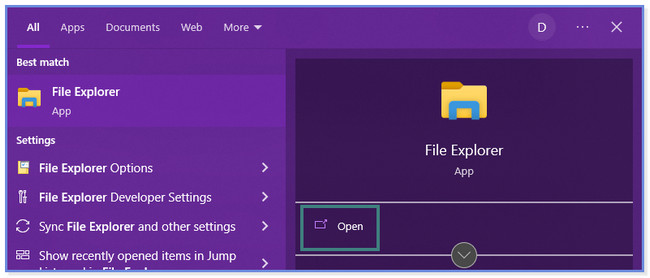
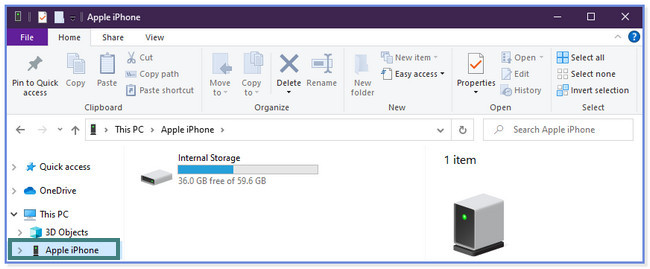
Step 1Get your Apple lightning cable. After that, please connect your iPhone to the PC using it. Please ensure that they are compatible and not broken. On your iPhone, a new window will appear on the main interface. Please tap the Allow or Trust button, depending on the model of your iPhone. Later, locate the File Explorer on the Windows Search Bar by searching it on the search bar. Click the Open button to launch it.
Step 2On the left side, please locate the iPhone Device and click it. You will see the available storage of the phone. Click one of them.
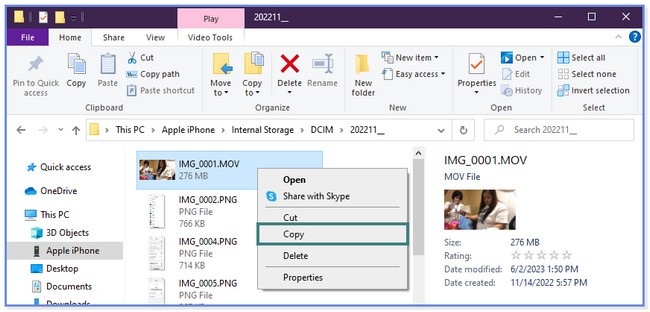
Step 3Locate the folder where you stored the photos you want to transfer. After that, select them and right-click afterward using the computer mouse. A list of options will appear and pop up on the right. Please click the Copy button. Choose the computer album folder where you want to transfer the photos. After that, right-click the computer mouse and choose the Paste button.
With FoneTrans for iOS, you will enjoy freedom to transfer your data from iPhone to computer. You can not only transfer iPhone text messages to computer, but also photos, videos and contacts can be moved to PC easily.
- Transfer photos, videos, contacts, WhatsApp, and more data with ease.
- Preview data before transferring.
- iPhone, iPad and iPod touch are available.
Part 3. Transfer Photos from iPhone to PC by iCloud
Many individuals ask if they can transfer photos from iphone to PC without iTunes. You can! Aside from the 2 methods above, you can use the iCloud account you used for backing up your photos. Do you want to know and learn how to transfer photos from iPhone to PC by iCloud? Scroll down below.
Step 1Search for the icloud.com website on your PC. Log in to the account you use for backing up your photos. After that, click the Drive section.

Step 2Choose the files you want to transfer or download to your computer. After that, click the Cloud Arrow-Down icon at the top.
Please note that you will only have 5GB of free storage for iCloud only. Your photos won’t be backed up if your storage is whole. Then you won’t get all your pictures from your iPhone, either.
Part 4. FAQs about Transferring Photos from iPhone to PC
1. Why can't I transfer or move photos from iPhone to PC using a USB cable?
The first thing you should do is check the USB port. If it is broken, the computer will not read the data of the iPhone you connected. If so, you must change or replace it with a new one. Another reason why you cannot transfer photos from iPhone to PC because your images are stored on iCloud. If that's the case, you can follow the Part 3 method of this article.
2. Why won't my computer recognize my iPhone?
The computer cannot recognize your iPhone because the USB port or USB cable contains debris. If that's the reason, you may clean it using a dry towel or compressed air. In addition, you may be failed to tap the Trust or Allow button on your iPhone. In that case, the computer cannot read the data from your phone. If so, you must unplug and plug in immediately to restart the process.
With FoneTrans for iOS, you will enjoy freedom to transfer your data from iPhone to computer. You can not only transfer iPhone text messages to computer, but also photos, videos and contacts can be moved to PC easily.
- Transfer photos, videos, contacts, WhatsApp, and more data with ease.
- Preview data before transferring.
- iPhone, iPad and iPod touch are available.
We hope we have helped you transfer photos from your iPhone to your PC. FoneTrans for iOS is the safest tool that you can use. It will not modify or erase the images from your iPhone before, during, or after the transfer process. Do you want to explore it? Download the software now!