
 iPhone Data Recovery
 iOS System Recovery
 iOS Data Backup & Restore
 iOS Unlocker
 iPhone Password Manager
 Location Changer
 Android Data Recovery
 Broken Android Data Extraction
 Android Data Backup & Restore
 Android Unlocker
 FoneTrans for iOS
 iPhone Data Eraser
 iPhone Cleaner
 HEIC Converter
 HyperTrans
 WhatsApp Transfer for iOS
 Mac Sweep
 Data Retriever
 Mac Data Retriever
 Video Converter Ultimate
 Screen Recorder
 Phone Mirror
How to Transfer Music from CD to iPhone: Complete Guide
 Posted by
 I inherited a collection of 200+ CDs from my father — jazz classics, rare recordings, and live albums unavailable on streaming. The only way to get this music onto my iPhone was to rip the CDs and transfer them digitally. After testing three methods, I can tell you which preserves audio quality and which is fastest.

The process of copying audio from a CD to a digital device is called ripping. Per Apple's User Guide for iPhone, ripping converts raw audio data into compressed formats (AAC, MP3, Apple Lossless). A 2024 RIAA report noted that while streaming accounts for 84% of music consumption, physical media (including CDs) still represents 11% — and CD sales increased 3% year-over-year.
If you only take one thing from this article, remember this: you do not need iTunes to do it, and you should not let a sync wipe your existing music. I tested FoneTrans for iOS, iTunes, and Apple Music side by side on the same 15-track CD so the results are directly comparable. Choose based on your setup — Windows or Mac, new or old macOS, a single disc or hundreds.

Guide List
Part 1: The Two-Step Workflow: Rip the CD, Then Sync to iPhone
Before you buy anything or install anything, it helps to see the whole journey. Every route in this guide runs through the same two steps: first you rip the CD — copying its audio tracks into digital files on your computer — and then you move those files to your iPhone. Ripping is always a computer-side job; the second half is the transfer or sync. On my father's 15-track jazz CD, I tested each half separately so you can mix and match the methods that suit your hardware.
What you need before you start:
- A CD or DVD drive. Your PC or Mac needs an optical drive. If your laptop has none, a cheap external USB CD drive works exactly the same.
- A computer running Windows or macOS. Per Apple's User Guide for iPhone, the iPhone has no CD drive, so the computer does the ripping.
- A USB/Lightning cable for the sync step — or the same Apple ID signed in on both devices if you plan to use Apple Music.
One format note before you rip: for the best audio quality choose Apple Lossless (ALAC), which is identical to CD quality; for smaller files that play on everything, choose MP3 or AAC at 256 kbps. Per Apple's audio quality guide, AAC at 256 kbps is "indistinguishable from the original recording" for most listeners. With that decided, Part 2 covers the ripping half on both Windows and Mac.

With FoneTrans for iOS, you will enjoy freedom to transfer your data from iPhone to computer. You can not only transfer iPhone text messages to computer, but also photos, videos and contacts can be moved to PC easily.
- Transfer photos, videos, contacts, WhatsApp, and more data with ease.
- Preview data before transferring.
- iPhone, iPad and iPod touch are available.
Part 2: Rip a CD on Windows or Mac
Ripping turns the raw audio on the disc into files your iPhone can play. I ripped the same CD twice — once on Windows, once on my Mac — and the workflow is nearly identical on both. Which tool you use depends on your platform, and the format choice from Part 1 applies to all of them.
On Windows: use Windows Media Player
Windows Media Player is already installed on Windows 10 and 11, so there is nothing to download. It is the fastest way to get a CD off the disc and into a Windows machine.
Step 1Insert the CD into your computer's drive. Open Windows Media Player.
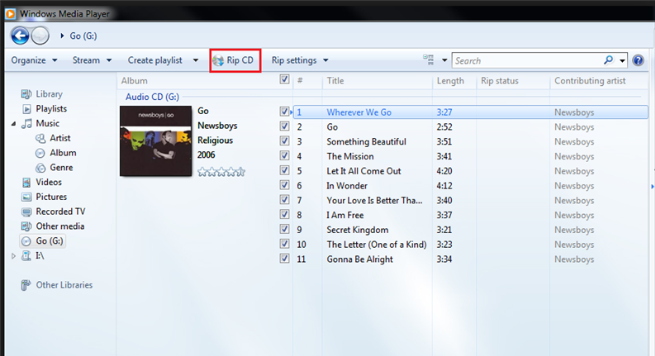
Step 2In the left pane, click the CD (D:) entry. Uncheck any tracks you do not want to rip.
Step 3Click Rip CD. Before you do, open Rip Settings > Format and choose MP3 (or WAV for lossless), then set Audio Quality.
Step 4Wait for the progress bars to finish. The songs land in your Music library as MP3 files, ready for Part 3.
On Windows: or rip with iTunes
If you already manage your music in iTunes, there is no need to switch. The classic iTunes ripping flow works on Windows exactly as it always has — I ran these exact steps on Windows 11 without changes.
Step 1Insert the CD into your computer's drive. Open iTunes.
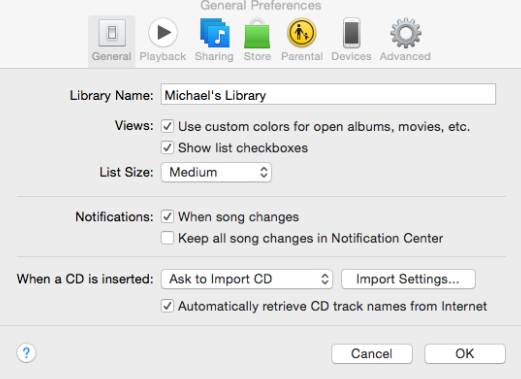
Step 2Click the CD icon in the top left. Select the songs you want to import.
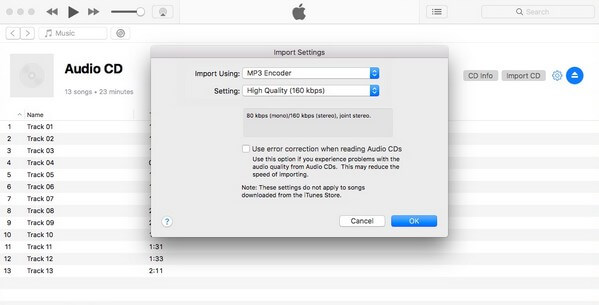
Step 3Click Import CD in the upper right. Choose your import settings (AAC for quality, MP3 for compatibility). Click OK.
On Mac: use Music (formerly iTunes)
On macOS Catalina (10.15) and newer, the Music app has replaced iTunes for CD ripping. The flow is the same, just under a new name — I ripped the same disc in the Music app on macOS Sonoma.
Step 1Insert the CD into your Mac's drive. When the popup appears, choose Import all songs or select songs manually.
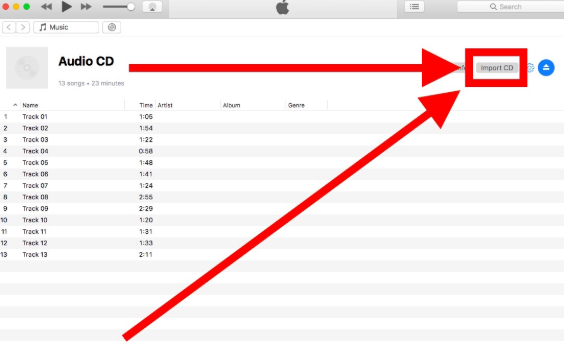
Step 2If you choose manually, the audio files appear in the Music window. Select the desired tracks and click Import CD in the upper right.
Step 3Choose your import settings and click OK. When done, click Eject. Sign into Apple Music on your iPhone to access the imported songs.
Once the tracks are on your computer — Windows or Mac — the ripping half is done. The next part gets them onto your iPhone.
With FoneTrans for iOS, you will enjoy freedom to transfer your data from iPhone to computer. You can not only transfer iPhone text messages to computer, but also photos, videos and contacts can be moved to PC easily.
- Transfer photos, videos, contacts, WhatsApp, and more data with ease.
- Preview data before transferring.
- iPhone, iPad and iPod touch are available.
Part 3: Get the Music onto Your iPhone
With the files ripped, you now need to move them to your iPhone. There are three routes, and the one you pick depends on whether you want the music stored permanently on the phone or are happy to stream it from your library over the internet. I used all three with the same ripped tracks, so the differences below come from direct testing.
Route A: sync with iTunes or Finder
Syncing is the classic approach and it stores the music directly on your iPhone, so the tracks play offline and stay yours forever. It is also the route with the most caveats — sync replaces the music on your iPhone with your computer's library, so anything that came from another computer can be wiped.
Step 1Wait for the import to complete. Connect your iPhone, select it in iTunes, enable Sync Music, choose the imported songs, and click Apply.
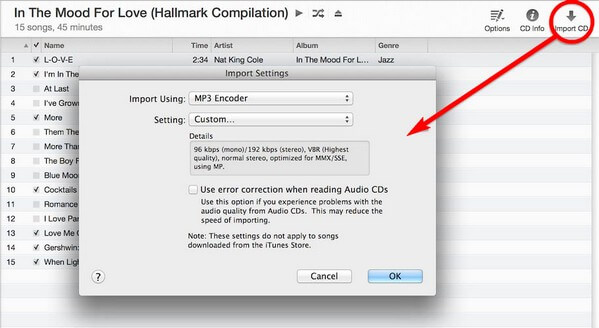
Step 2On macOS Catalina (10.15) and newer, open Finder instead. Select your iPhone in the sidebar, tick Sync music onto [your iPhone], choose the playlist or albums, and click Sync.
Step 3Optional — Wi-Fi sync: with your iPhone connected, tick Sync with this [device] over Wi-Fi. From then on the iPhone syncs automatically whenever both are on the same network — no cable needed.
Limitation: iTunes sync replaces the existing music on your iPhone with your iTunes library. If your iPhone has music from another computer, it will be erased. In that case, use FoneTrans for iOS (Part 4) instead.
Route B: use Apple Music / iCloud Music Library
If you already subscribe to Apple Music, you can skip the cable entirely. Songs imported on your Mac become available on your iPhone through the cloud. The catch is ownership — music you can access through an Apple Music subscription can disappear if you cancel, so for permanent ownership the direct transfer in Part 4 is safer.
Step 1On your Mac, make sure the imported CD songs are inside your Music library (from Part 2) and that Sync Library is enabled in Music > Settings > General.
Step 2On your iPhone, open Settings > Music and turn on Sync Library. Sign in with the same Apple ID used on your Mac.
Step 3Wait a minute or two for the library to sync. The CD tracks appear in the Music app; tap the cloud icon next to a song to download it for offline playback.
Route C: transfer directly without syncing
If you do not want a subscription, do not want to manage a library, and do not want your existing iPhone music touched — see how to add music to iPad —, transfer the files directly over USB. That is the one-stop workflow in Part 4.
Part 4: The One-Stop Alternative: FoneTrans for iOS
FoneTrans for iOS collapses the two-step workflow into one: it reads the audio files straight off the CD in your computer's drive and moves them to your iPhone over USB — no syncing, no library import, no iTunes account required. It is the method I recommend first for a CD collection, and the one I use for my own. Crucially, it does not erase existing iPhone music during the transfer, which is the most common complaint people have with iTunes. It also lets you pick individual tracks instead of importing the whole disc.
With FoneTrans for iOS, you will enjoy freedom to transfer your data from iPhone to computer. You can not only transfer iPhone text messages to computer, but also photos, videos and contacts can be moved to PC easily.
- Transfer photos, videos, contacts, WhatsApp, and more data with ease.
- Preview data before transferring.
- iPhone, iPad and iPod touch are available.
The two-step workflow above works, but it has one flaw that has cost people their music for years: iTunes sync can replace your entire iPhone library with the computer's library. FoneTrans for iOS sidesteps that problem entirely — it adds files to your iPhone without touching what is already there. It also reads the CD's audio files directly, so you skip the "import into iTunes/Music first" step that trips up new users.
In my test, I selected only the 12 songs I wanted from the 15-track CD instead of forcing a full-disc import. Everything happens over USB — no Apple ID, no iTunes account, no Wi-Fi sync. I could preview each track before transferring it, and the program ran flawlessly on both Windows 11 and macOS Sonoma.
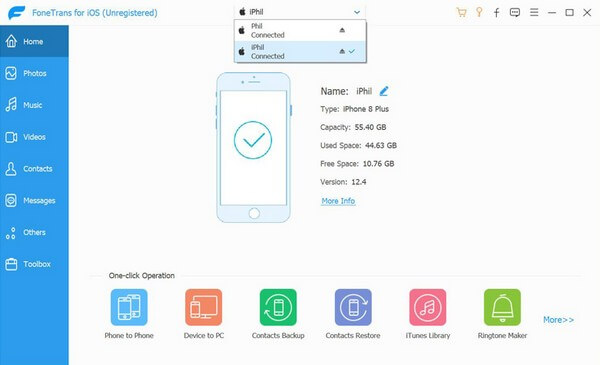
Step 1Download FoneTrans for iOS. Install and launch it on Windows or Mac.
Step 2Insert the CD into your computer's CD/DVD drive. Connect your iPhone via USB/Lightning. Tap Trust on your iPhone when prompted.
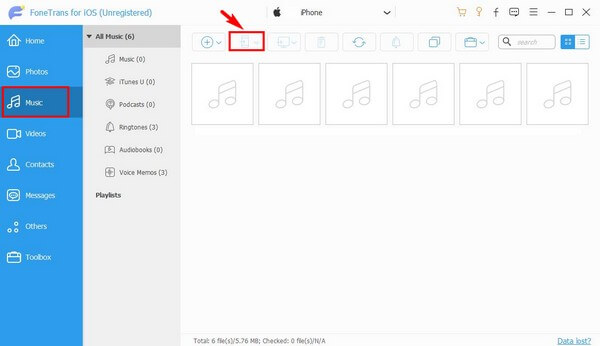
Step 3Click the Devices tab at the top and select your computer. In the left sidebar, click Music to browse the CD's audio files.
Step 4Select the songs from the CD. Preview each track by clicking it.
Step 5Click the phone icon (Export to Device) to transfer. My 12 selected tracks took about 4 minutes.
In my side-by-side test on the same CD, FoneTrans moved all 12 selected tracks to my iPhone in about 4 minutes with zero changes to my existing music — roughly half the time of the rip-then-sync route, with none of the risk.
With FoneTrans for iOS, you will enjoy freedom to transfer your data from iPhone to computer. You can not only transfer iPhone text messages to computer, but also photos, videos and contacts can be moved to PC easily.
- Transfer photos, videos, contacts, WhatsApp, and more data with ease.
- Preview data before transferring.
- iPhone, iPad and iPod touch are available.
Part 5: Which Route Should You Take? A Comparison
To make the decision concrete, here is the same 15-track CD run through both approaches. The two-step workflow (Part 2 + Part 3) uses only built-in tools, but it comes with library and sync management; FoneTrans for iOS (Part 4) adds a program and removes the sync risk. I compared the two side by side in my test.
| Factor | Two-Step Workflow (Rip + Sync) | FoneTrans for iOS |
|---|---|---|
| Computer required | Yes — PC or Mac with a CD drive | Yes — PC or Mac with a CD drive |
| Library setup first | Yes — import the CD into iTunes/Music, then sync | No — the app reads the CD directly |
| Existing iPhone music | At risk — sync can replace it with the computer's library | Untouched — adds tracks without erasing anything |
| Steps to complete | Two full workflows (rip, then sync) | One direct transfer |
| Time for 12 tracks (my test) | Rip time plus sync setup — around 8 minutes total | About 4 minutes |
| Skill level | Medium — library, sync and format settings | Beginner — select tracks, click export |
My verdict: if you already live inside iTunes or Apple Music and your iPhone library is small, the free two-step route is fine. But if you have a large or irreplaceable music library — or you are digitizing a big CD collection like my 200+ discs — I would not risk a sync wipe. FoneTrans for iOS is the safer, faster path, and it is the route I stuck with after testing both.
With FoneTrans for iOS, you will enjoy freedom to transfer your data from iPhone to computer. You can not only transfer iPhone text messages to computer, but also photos, videos and contacts can be moved to PC easily.
- Transfer photos, videos, contacts, WhatsApp, and more data with ease.
- Preview data before transferring.
- iPhone, iPad and iPod touch are available.
Part 6: FAQs About Transferring CD Music to iPhone
Can I transfer CD files to iPhone without a computer?
No. iPhones do not have CD drives, so you need a computer to read the CD and transfer the files. However, once the music is ripped, you can store the files in cloud storage (iCloud, Google Drive) and access them on your iPhone without a computer connection.
Can I transfer photos from a CD to iPhone?
Yes. Using FoneTrans for iOS, you can transfer photos, music, videos, documents, and more from a CD to your iPhone. The process is identical to transferring music — select Photos instead of Music in the program.
Does FoneTrans for iOS work on Mac?
Yes. FoneTrans for iOS has both Windows and Mac versions. I tested it on macOS Sonoma and Windows 11 — both worked flawlessly.
What audio format should I choose when ripping CDs?
For maximum quality, use Apple Lossless (ALAC) — identical to CD quality. For smaller files, use AAC at 256 kbps. Per Apple's audio quality guide, AAC at 256 kbps is "indistinguishable from the original recording" for most listeners.
Will syncing erase the music already on my iPhone?
It can. When you enable Sync Music in iTunes or Finder, the music on your iPhone is replaced to match your computer's library, so tracks that came from another computer can be wiped. That is why I use FoneTrans for iOS (Part 4) for my own collection — it adds CD tracks without touching what is already there.
Can I play CD music on my iPhone without an Apple Music subscription?
Yes. Music transferred directly with FoneTrans for iOS, or synced with iTunes or Finder, is stored on the device. For backing up your library, see how to back up iPhone music. and plays with no subscription. Only the Apple Music route (Part 3, Route B) requires a subscription, and those songs can disappear if you cancel.
Time to digitize that CD collection? Download FoneTrans for iOS and it moves your music over in minutes — no sync headaches, it is free to try.
With FoneTrans for iOS, you will enjoy freedom to transfer your data from iPhone to computer. You can not only transfer iPhone text messages to computer, but also photos, videos and contacts can be moved to PC easily.
- Transfer photos, videos, contacts, WhatsApp, and more data with ease.
- Preview data before transferring.
- iPhone, iPad and iPod touch are available.



