Transfer Data From iPhone, Android, iOS, Computer to Anywhere without Any Loss.
- Transfer Data from One Micro SD Card to Another Android
- How to Transfer Pictures from One Phone to Another
- How to Transfer Photos from Old LG Phone to Computer
- How to Transfer Photos from an Old Samsung to Another Samsung
- Transfer Contacts from Samsung to iPhone
- Transfer Data from LG to Samsung
- Transfer Data from Old Tablet to New
- Transfer Files from Android to Android
- Transfer iCloud Photos to Android
- Transfer iPhone Notes to Android
- Transfer iTunes Music to Android
Helpful Guide on How to Transfer Data to A New iPhone
 Updated by
 How do you transfer data to new iPhone? I recently purchased a new one, but I’m still heavily relying on my old device since it contains all the files I need. I want to transfer them, but I'm only familiar with basic methods. Are there other transfer techniques I can use to switch from my older device to my new iPhone easily? It would be great if I could transfer everything at once.
Having a new iPhone is exciting and helpful in numerous ways. But before you can enjoy all the advantages that come with it, transferring your data from your old phone might be necessary. The good news is that many developers have created various methods to make the transition to a new iPhone smooth. Thus, we gathered the best ones, and you must only maneuver them correctly to switch to your new device seamlessly.

Guide List
Part 1. How to Transfer Data to New iPhone from iPhone
As you know, Apple releases new iPhone models every now and then. Hence, users usually upgrade their devices to newer ones, bringing up the need to transfer from their older iPhones. If you are among them, the following options will be the appropriate methods for your transfer.
Option 1. QuickStart
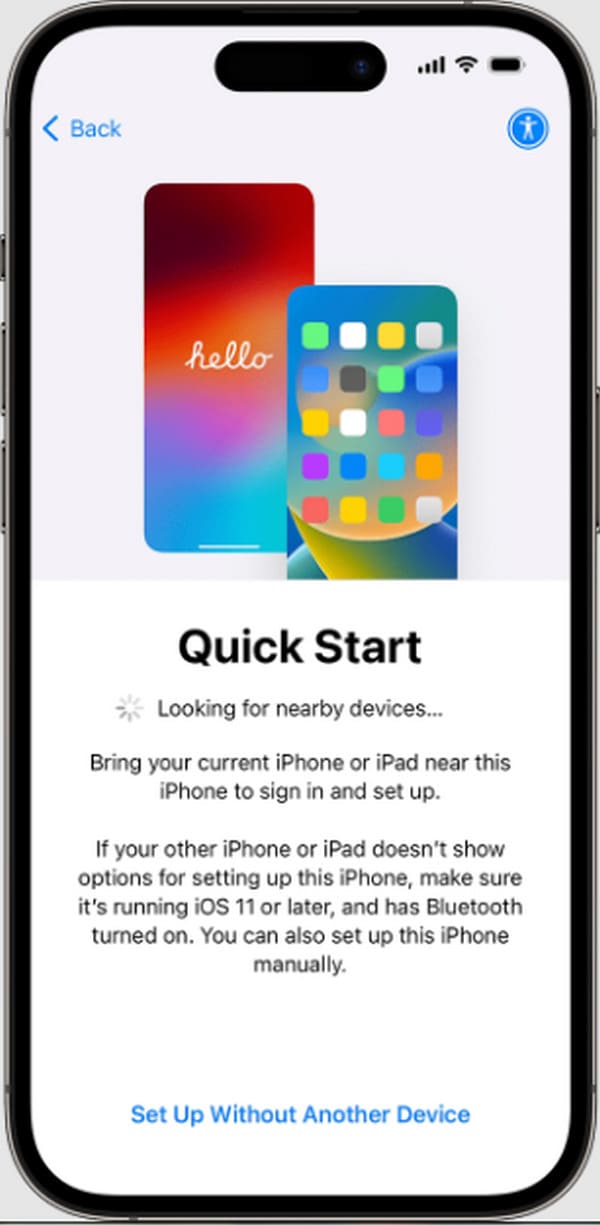
Starting with Apple’s initial and built-in solution, QuickStart. If you notice, the device greets you with the QuickStart iPhone screen during the initial setup. It is Apple’s primary way to let its users switch seamlessly to their new iPhones. Utilizing it will save you from manually transferring the files to your new iPhone from the older one. It can automatically copy almost everything you have, such as media files, documents, settings, customizations, etc. However, your device must be running iOS 11 or later.
Comply with the convenient task below to learn how to transfer data from old iPhone to new iPhone using QuickStart:
Step 1Turn your new iPhone on and place the old one beside it. Once the QuickStart screen materializes, use your old iPhone to scan the swirling animation on your new iPhone's screen, then enter your old device's passcode on the new one.
Step 2Next, follow the on-screen prompts on the new iPhone to set up Face ID or Touch ID. Finally, select Transfer from iPhone to begin migrating all your data, settings, and accounts directly.
Option 2. iCloud
Meanwhile, if you can back up your older iPhone to iCloud, transferring the data will also be hassle-free, as you must only restore it to your new iPhone afterward. After all, the option to restore iPhone from iCloud backup will be available at startup when you’re first setting up the device. Hence, you must only follow along to move the data from your older iPhone’s backup to the new one.
Stick to the simplified process below to grasp how to transfer data from old iPhone to new one via iCloud:
Step 1Ensure your old iPhone is connected to Wi-Fi and has sufficient battery. Go to Settings > [Your Name] > iCloud > iCloud Backup and tap Back Up Now, ensuring the process completes fully.
Step 2Turn on your new iPhone and navigate through setup until Transfer Your Apps & Data appears. Choose Restore from iCloud Backup, sign in to your Apple ID, and select the most recent backup to begin the transfer.
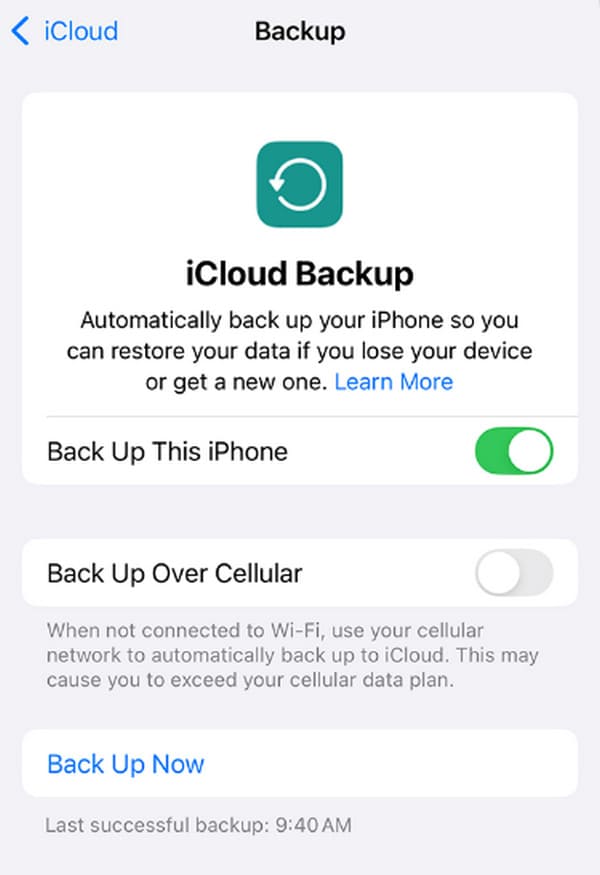
Meanwhile, iCloud also offers a syncing feature, which you can manage in the Settings’ iCloud section. Simply enable the toggle of the data types you wish to sync.
Option 3. iTunes/Finder
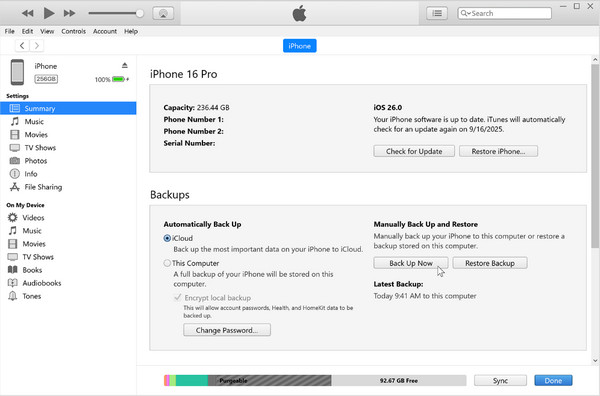
Other than iCloud, Apple also provides iTunes or Finder’s backup and restore feature. It works the same way as the previous option: backing up the older iPhone and restoring it to the new one. The difference will lie in the process, especially since this method will be on your computer running iTunes or Finder. To ensure you won’t get lost, just remember that iTunes is for those using Windows or older macOS versions. Meanwhile, Finder is for those with later macOS versions.
Mirror the user-oriented process below to understand how to transfer iPhone data to new iPhone via iTunes or Finder:
Step 1Attach your old iPhone to your computer and open iTunes (or Finder on a Mac). Select your device symbol or name on the interface and in the Summary or General section, click Back Up Now.
Step 2Once backed up, unlink your old iPhone and connect the new one to the same computer. When it appears in iTunes or Finder, select your device symbol or name again. Then, pick Restore Backup in the Summary or General section to transfer your data.
Part 2. How to Transfer Data to New iPhone from Android
What if you’re switching from an Android instead of an iPhone? That is not a problem because various techniques are also available for transferring data to a new iPhone from an Android. The following options are the most helpful ones for many device users, so don’t hesitate to prove their worth.
Option 1. Move to iOS
Even if your old device is Android and not an iPhone, Apple still has your back, as it developed the Move to iOS app for those switching to iOS devices, like your new iPhone. It is a free app available on the Play Store; thus, accessibility won’t be a problem. It can help you migrate various content, including contacts, media files, message history, calendars, mail accounts, and more. Besides, you can expect the process to be straightforward, as the new iPhone’s startup settings offer the Move Data from Android option, which is automatically done through Move to iOS.
Act according to the convenient guide below to determine how to transfer data to new iPhone using Move to iOS:
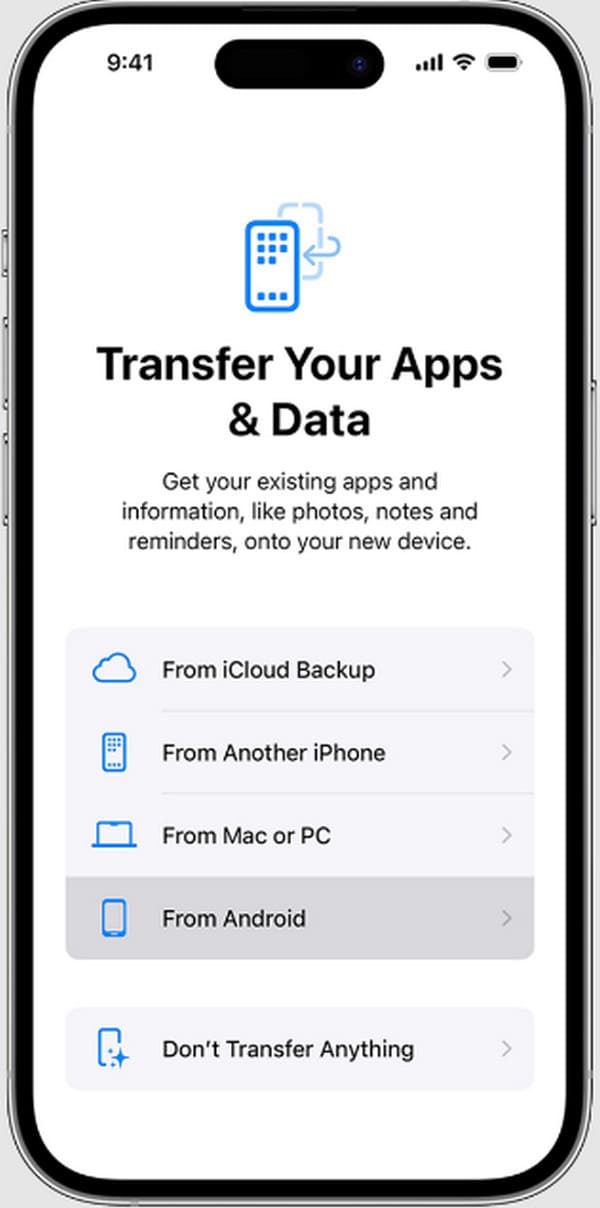
Step 1Sn your new iPhone, proceed through the setup until you reach the Transfer Your Apps & Data screen. Afterward, select the From Android option, which will then display a unique code.
Step 2Meanwhile, on your old Android, obtain Move to iOS from the Google Play Store and open it. Enter the code on the iPhone, then pick the data types you wish to transfer and let the process finish.
Option 2. Google Drive
Since not many strategies exist for switching from an Android to a new iPhone, you can use Google Drive as another way to transfer your desired data. Different from the previous techniques, this won’t transfer all your Android content at once. You will be able to choose from your files manually since the process is not an automatic transfer. Instead, you will manually upload your desired files to the platform and download them to the new iPhone. That said, this transfer option also has limitations. It only supports basic data types, such as photos, music files, documents, videos, etc.
Take to heart the stress-free directions below to learn how transfer data to new iPhone through Google Drive:
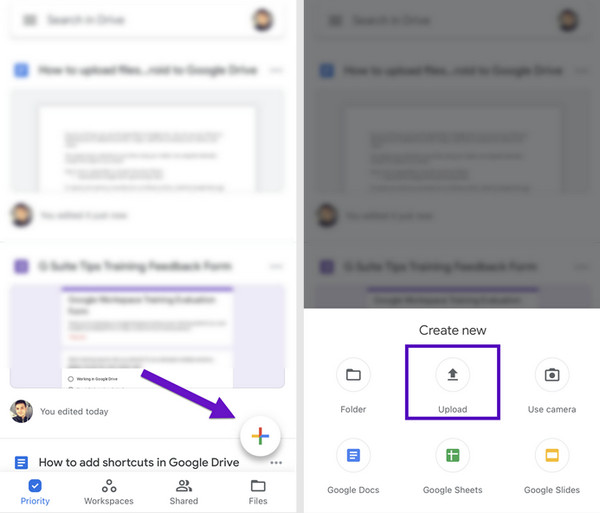
Step 1On your Android phone, launch the Google Drive app and tap the + button. Select Upload and then mark the specific files you want to transfer from your device's storage.
Step 2After that, sign in with the same Google Drive account on your new iPhone. When the files you just uploaded appear, select your desired items and opt for the Download option to finish.
Part 3. How to Transfer Data to New iPhone Using FoneLab HyperTrans
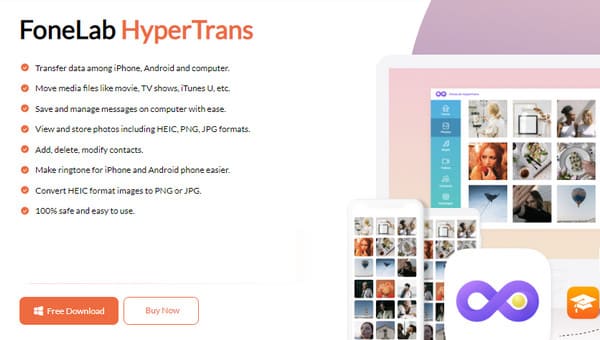
On the other hand, a program that can help you whether you’re transferring data from Android or iOS is FoneLab HyperTrans. It can seamlessly move a wide range of data types between iOS, Android, and computers, and even offers additional features. Hence, if you’re having trouble choosing the best transfer method, this one is the best one we can recommend. You can trust it to transfer your desired music files, images, contacts, videos, messages, and more.
Besides, FoneLab HyperTrans allows you to transfer only your chosen data individually. After all, some get a new iPhone because their old one already has insufficient storage. So, it might be impractical to transfer the entire device or a specific data type if you only want to transfer a few files. Aside from that, attaching your iPhone and Android is hassle-free, especially since it supports wired and wireless connections. You can also enjoy this transfer tool’s bonus functions afterward.
Transfer Data From iPhone, Android, iOS, Computer to Anywhere without Any Loss.
- Move Files between iPhone, iPad, iPod touch and Android.
- Import Files from iOS to iOS or from Android to Android.
- Move Files from iPhone/iPad/iPod/Android to Computer.
- Save Files from Computer to iPhone/iPad/iPod/Android.
Notice the straightforward steps below as a sample of how to transfer data to new iPhone using FoneLab HyperTrans:
Step 1Obtain the FoneLab HyperTrans tool’s installer by selecting Free Download on its site, then run the file to install it. When ready, initialize the program and link your old device and new iPhone through USB cables. Once both are recognized, go to the top menu and select your old device.
Step 2Now, choose from the data categories listed on the left to see and mark the specific items you want to move from your old phone. After making your choices, start the transfer by clicking the phone icon at the top and selecting your new iPhone from the menu.
Part 4. FAQs about How to Transfer Data to New iPhone
How long to transfer data to new iPhone?
Since you’re switching devices and transferring all your data, the process might take several minutes or hours, depending on the amount of data and internet conditions.
Which method is the best for transferring to a new iPhone?
We suggest FoneLab HyperTrans, which lets you leave out unnecessary files from the transfer. It is also offline, making it faster than most techniques.
These strategies are the most acclaimed transfer methods for switching to a new iPhone from Android or another iPhone, especially FoneLab HyperTrans. Thus, feel free to prove its worth by installing it on your computer.