- Empty Trash
- Delete Mail App
- Clear Cache on Mac
- Get More Storage on Mac
- Make Chrome Use Less RAM
- Where is Disk Utility on Mac
- Check History on Mac
- Control + Alt + Delete on Mac
- Check Memory on Mac
- Check History on Mac
- Delete An App on Mac
- Clear Cache Chrome on Mac
- Check Storage on Mac
- Clear Browser Cache on Mac
- Delete Favorite on Mac
- Check RAM on Mac
- Delete Browsing History on Mac
Easy Guide on How to Erase A MacBook with 3 Trusted Ways
 Updated by
 Does your computer need a fresh start? If so, let the content below guide you in learning how to erase MacBook Air or other models. We understand the doubts about performing the deletion process, especially if it’s your first time trying to erase the computer. You must be worrying that something might go wrong, which may put the MacBook in a poor state, but you no longer have to be anxious about that.
Whether you simply want to clean your MacBook for a fresh start, fix some basic to technical issues, prepare to sell it, etc., you can rely on the parts below, as we have prepared the simplified guidelines for the most guaranteed techniques in erasing a MacBook. So, understand the details so that by the end of this article, you'll know exactly which method is right for your situation and how to execute it safely, ensuring your MacBook is ready for its next chapter.

Guide List
Part 1. How to Erase MacBook via Apple Menu
Erasing a MacBook via the Apple menu is the simplest method you can perform. As you may know, this menu contains management options, and among them is the System Settings. If you then explore its section, you will find the designated and official option to erase all the MacBook’s content and settings, letting you restart it afterward with everything wiped out from the computer. You can think of it as the equivalent of resetting on the iPhone and other devices, so if you’re familiar with that, this method will no longer be confusing. Instead, it will be straightforward.
Have regard to the secure navigation below to learn how to erase MacBook before selling or for other reasons via the Apple menu:
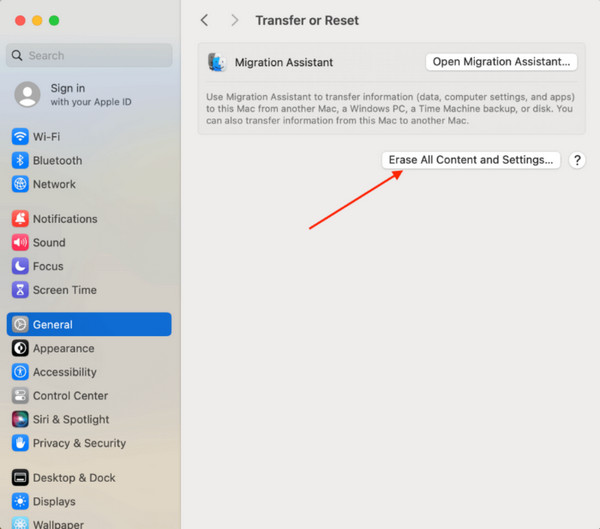
Step 1On the upper left of your MacBook’s desktop, select the Apple menu and click System Settings from the appearing options. When a window appears, pick General in the left column.
Step 2The designated section will then be presented, so choose Transfer or Reset, followed by Erase All Content and Settings. You must then manage the confirmation to erase your MacBook.
As mentioned, this is the official process for erasing a MacBook; thus, it runs smoothly when the computer is in its normal state with its functionalities operating properly. However, if you’re trying to erase the MacBook because of an issue, such as a frozen or unresponsive screen, this won’t be the most suitable method since you might not be able to navigate options.
Part 2. How to Erase A MacBook with macOS Recovery
When your MacBook won't boot normally or requires a deeper level of control over the erase process, macOS Recovery would be a good solution. If the previous method is equivalent to iPhone’s reset, this method is like Recovery mode. It is the computer’s built-in emergency system that Apple developed for troubleshooting or repairing, reinstalling, or restoring the MacBook when it’s facing some issues. In this case, macOS Recovery’s Disk Utility section will provide the option you need, which is erasing the MacBook’s disks to wipe the computer clean.
Comply with the proper operation below to master how to erase MacBook Pro or other models with macOS Recovery:
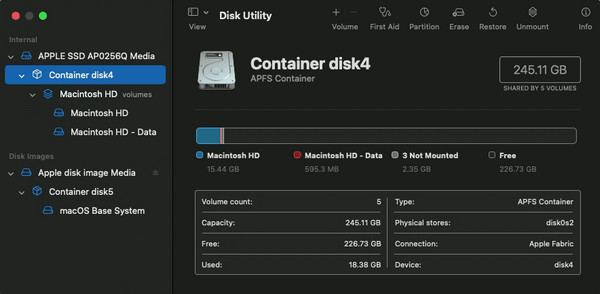
Step 1Opt for the MacBook desktop’s Apple menu and choose Restart. Right after, long-press the Cmd + R keys to view the Recovery window shortly. Then, select Disk Utility > Continue.
Step 2Once the Disk Utility screen materializes, select the volume you intend to erase from the sidebar before hitting the Erase selection. Finally, let the prompts walk you through the confirmation procedure until you successfully erase the MacBook.
While this approach offers powerful flexibility and is supported by nearly every modern Mac, you may find its procedure a bit confusing, especially as a beginner, as it involves a few more technical decisions than the previous method. Don’t worry, though. As long as you stick to the provided guidelines, erasing your MacBook with macOS Recovery would be manageable.
Part 3. How to Erase Your MacBook through iCloud
Meanwhile, if your MacBook is lost, stolen, or physically inaccessible, iCloud provides a last-resort solution to erase it remotely. By logging into icloud.com from any other device, you can easily enter its Find My section to manage the deletion. This method is ideal if your MacBook is experiencing issues, like having an unresponsive screen, since you will be able to erase all its content and settings, even without navigating the process directly on the MacBook. On the other hand, it would also be perfect for those who have their macOS stolen, as it allows you to protect your personal information and data that invaders may see on the computer by erasing everything through iCloud’s erasing process.
Follow the straightforward guide below to grasp how to erase a MacBook Pro or other models through iCloud:
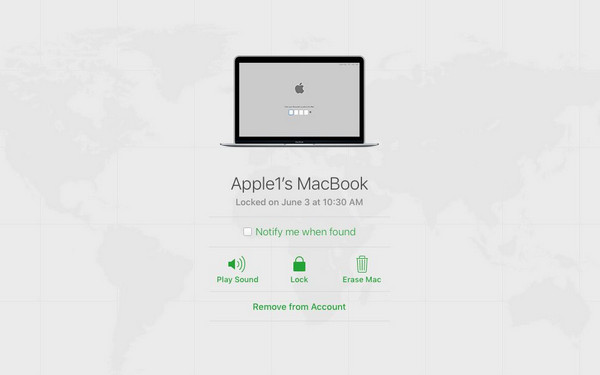
Step 1Begin the process on iCloud’s official webpage by entering your Apple credentials. This way, you can access your account and enter the Find My page once signed in.
Step 2A tab will be available on the top page, so click it and pick the MacBook you wish to erase from the devices. Its options will be displayed afterward; hence, select Erase Mac under the MacBook’s name and confirm your decision to delete it.
Note that this method’s success heavily relies on your device’s internet connection. Both the MacBook and the computer or mobile phone you plan to delete it from must be linked to a stable network since every step of the process requires the internet, especially on the iCloud website.
Part 4. Comparison of MacBook Erasing Methods
| Feature | Apple Menu | macOS Recovery | iCloud |
| Availability | macOS Monterey or later | All Macs | Any Mac with Find My pre-enabled |
| Accessibility | Easiest. Initiated directly from the MacBook’s System Settings menu. | Moderate. Requires restarting and booting into a special mode. | Remote. Accessed via any web browser at icloud.com. |
| Primary Use Case | Selling, donating, or resetting a fully functional MacBook. | Troubleshooting, deep erasure, or when the main OS is corrupted. | Emergency remote wipe of a lost or stolen device. |
| Security Level | Good. Deletes data and reinstalls macOS. | Best. Allows for a certified secure erase via Disk Utility. | Good. Remotely deletes data and activates Activation Lock. |
Part 5. How to Get More Storage on Mac with FoneLab Mac Sweep
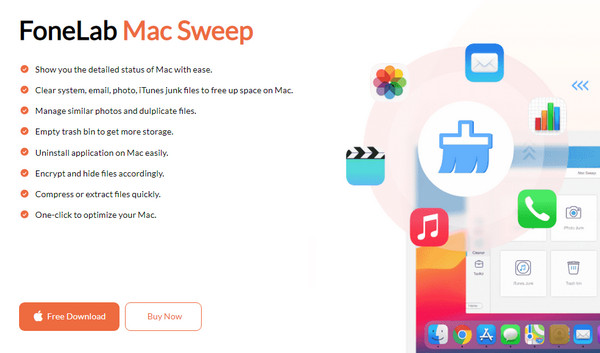
What if you only want to get more storage on Mac? The good news is that you don’t need the deletion methods above, as it’s possible to perform a deep clean using FoneLab Mac Sweep instead. This program is the ideal solution if your goal is only to have more available space on your Mac's storage. After all, you may find that a significant amount of your Mac storage is simply occupied by unnecessary clutter.
As a specialized cleaning tool, it offers an efficient approach in deep scanning your Mac content and displaying them by category to help you identify important and non-valuable files stored in the computer. This way, you can easily find which data to erase, saving you both time and effort while helping you gain more space in your storage. Additionally, among FoneLab Mac Sweep’s assets is its intuitive interface and functions, making it ideal even for first-time users.

With FoneLab Mac Sweep, you will Clear system, email, photo, iTunes junk files to free up space on Mac.
- Manage similar photos and dulplicate files.
- Show you the detailed status of Mac with ease.
- Empty trash bin to get more storage.
Discern the uncomplicated steps below as a sample to get more storage on a Mac with FoneLab Mac Sweep:
Step 1Download FoneLab Mac Sweep’s installation file through its website with the Free Download button. Once ready, open and manage the initial setup to launch the cleaning program afterward. Three key features will be available on the main interface, but start with the Cleaner first.
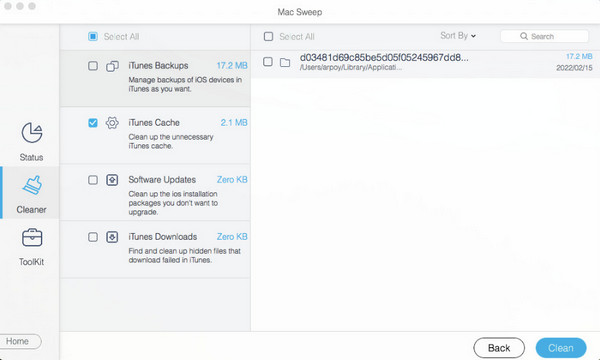
Step 2Data and junk categories will be on the succeeding screen, including System Junk, iPhoto Junk, Email Junk, Similar Photo, iTunes Junk, and more. Hence, select the type of data you want to clean first, then choose Scan when it appears on the following interface.
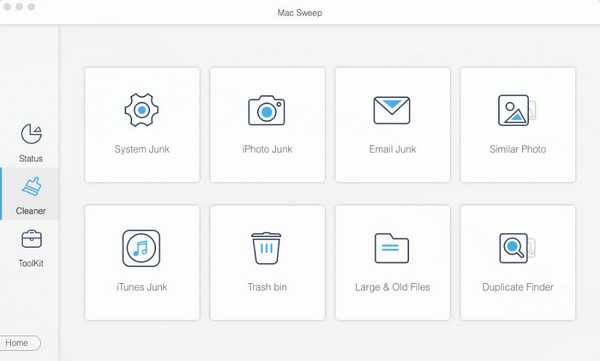
Step 3Your chosen data category’s content will be exhibited next. You must only mark all the items you are ready to remove from your Mac before proceeding to the Clean tab at the bottom right. All the data you have chosen will then be deleted, giving you more storage space.
Part 6. FAQs about How to Erase MacBook
How to erase MacBook without password?
Use the iCloud process in the suggestions above. If you can’t recall your MacBook password, iCloud will still let you erase it since the process will be done remotely without the need to access it. And you can also boot into macOS Recovery (Cmd+R), use the Recovery Assistant > Erase Mac feature (for newer macOS), or use Disk Utility to wipe the drive, then reinstall macOS.
How long will it take to erase my MacBook?
Erasing your MacBook with the standard procedure typically takes only a few minutes, but if it’s a full reset, including reinstallation, the duration may be 30 minutes to a few hours.
Apple offers all MacBook erasing methods above, so we guarantee their safety in erasing your MacBook. On the other hand, please feel free to install FoneLab Mac Sweep as well, as it can help you clean your computer and have more available space anytime.