
 iPhone Data Recovery
 iOS System Recovery
 iOS Data Backup & Restore
 iOS Unlocker
 iPhone Password Manager
 Location Changer
 Android Data Recovery
 Broken Android Data Extraction
 Android Data Backup & Restore
 Android Unlocker
 FoneTrans for iOS
 iPhone Data Eraser
 iPhone Cleaner
 HEIC Converter
 HyperTrans
 WhatsApp Transfer for iOS
 Mac Sweep
 Data Retriever
 Mac Data Retriever
 Video Converter Ultimate
 Screen Recorder
 Phone Mirror
How to Transfer iPhone Purchases to iTunes Effortlessly
 Posted by Boey Wong / June 17, 2022 09:00
 Hello, everyone. I have purchased music on iPhone, and want to listen to them on computer iTunes. How to transfer iPhone purchases to iTunes? Thanks!
Apple released iTunes Store on Mac, iPhone, iPad, iPod Touch, Apple TV, and Windows to purchase music, TV shows, movies, and apps. Well, most iPhone users purchase some songs, movies, and others on device, and want to transfer them to iTunes, how can you do that?
In this post, we will show you detailed steps of transferring iPhone purchases to iTunes with 2 options. As well as a powerful alternative you should not miss. Move on to access them now.


Guide List
Part 1. How to Transfer iPhone Purchases to iTunes
As you know, iTunes is a convenient tool for the computer to manage iOS data, purchases, etc. If you want to transfer items, including photos, videos, voice memos, and purchased items, iTunes can quickly help.

With FoneTrans for iOS, you will enjoy freedom to transfer your data from iPhone to computer. You can not only transfer iPhone text messages to computer, but also photos, videos and contacts can be moved to PC easily.
- Transfer photos, videos, contacts, WhatsApp, and more data with ease.
- Preview data before transferring.
- iPhone, iPad and iPod touch are available.
You have 2 options. First, you should try to transfer iPhone purchases directly with iTunes manually.
Option 1. How to Transfer iPhone Purchases to iTunes with iTunes
This method is also available for iPod Touch and iPad. Below are the demonstrations on both Windows and Mac.
Transferring purchases from iPhone to iTunes on Windows:
Step 1Run iTunes on the computer, and connect iPhone.
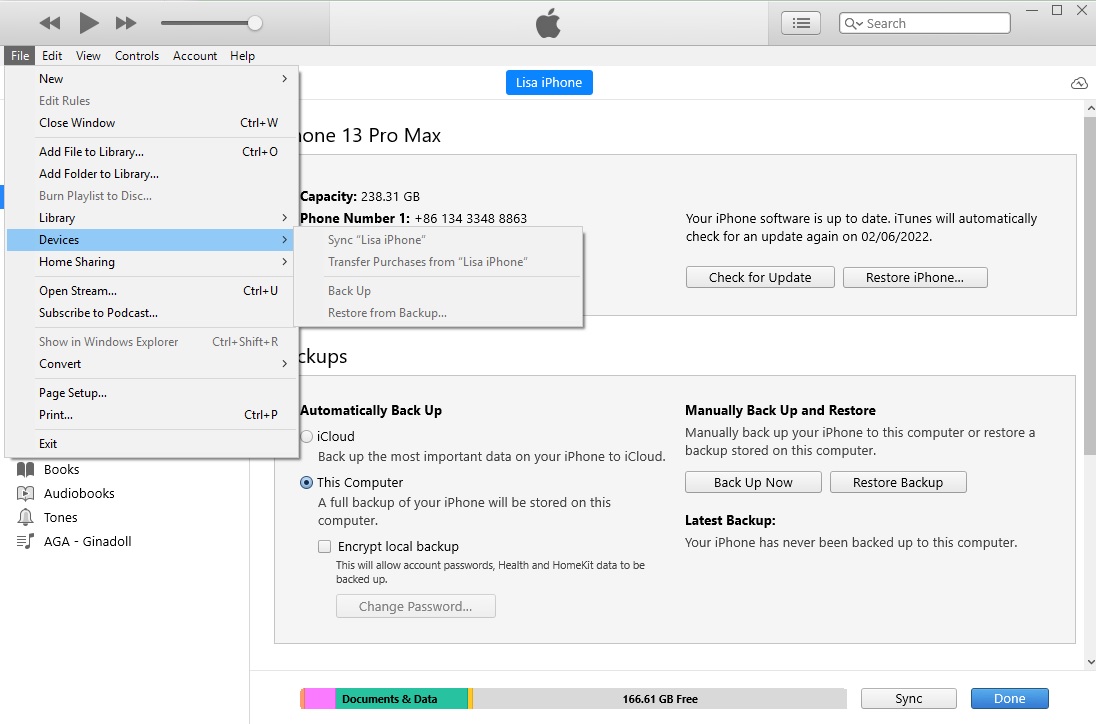
Step 2After detection, click File > Device > Transfer Purchases from iPhone.
Step 3Access your iTunes library and click the download icon if you want to save them offline.
Transferring purchases from iPhone to iTunes on Mac:
Step 1Connect iPhone to Mac. Run Music app or Apple TV app on Mac.
Step 2Click your device on the left side, right-click and select Transfer Purchases.
You might encounter that there are purchased items on the iPhone that have not been transferred. You can find another solution at this time.
With FoneTrans for iOS, you will enjoy freedom to transfer your data from iPhone to computer. You can not only transfer iPhone text messages to computer, but also photos, videos and contacts can be moved to PC easily.
- Transfer photos, videos, contacts, WhatsApp, and more data with ease.
- Preview data before transferring.
- iPhone, iPad and iPod touch are available.
Option 2. How to Transfer iPhone Purchases to iTunes through Apple ID
You can also access your purchased history under the same Apple ID across devices. So, you can sync these purchased histories from iPhone to iTunes. Here is the demonstration.
Step 1Authorize your computer through iTunes > Account > Authorize this computer.
Step 2Open iTunes and click Account > Purchased. You will be asked to log into your Apple account. Enter the Apple ID you used to purchase items on iPhone.
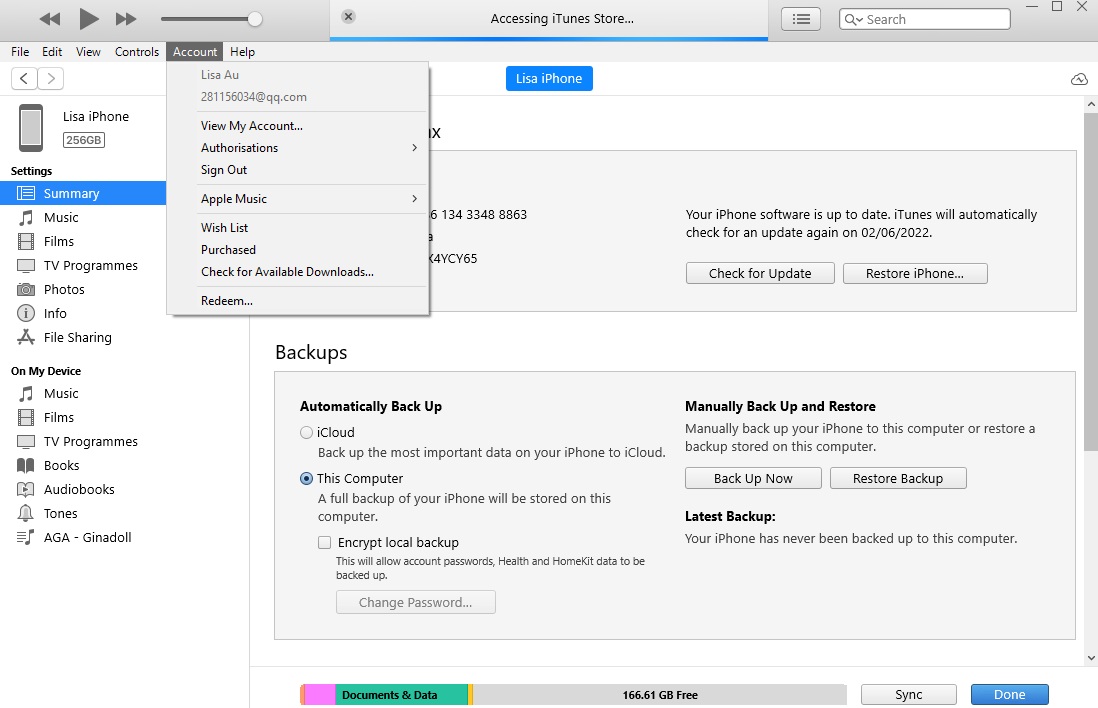
Step 3You can see Purchased History. Click the See All button to check all purchased items.
Step 4Click the download button next to the items you want. The items will be downloaded and saved to your iTunes.
What if you have downloaded them before and want to save them to iTunes library? You will need to transfer data from iPhone or computer to iTunes. There are many ways to do this, here, we will show you the best choice to transfer data to iTunes library in seconds.
Part 2. How to Transfer Purchased Items to iTunes Library from iPhone with FoneTrans for iOS
FoneTrans for iOS is a third-party program on either Windows or Mac computers to manage your iOS data with simple clicks. You can easily transfer photos, videos, contacts, messages, and more data between computer and device. It also enables you to transfer data to the iTunes library quickly without obstacles.
It has many powerful features to help you manage iOS data, but it is easy to use. Not only professionals but also novices can use it through user-friendly guides.
What’s more, this tool is 100% safe to use as it will never save or modify your data or personal information from iPhone or iTunes.
Can’t wait to learn how to do that? Here are the instructions.
How to transfer purchased items to iTunes library:
With FoneTrans for iOS, you will enjoy freedom to transfer your data from iPhone to computer. You can not only transfer iPhone text messages to computer, but also photos, videos and contacts can be moved to PC easily.
- Transfer photos, videos, contacts, WhatsApp, and more data with ease.
- Preview data before transferring.
- iPhone, iPad and iPod touch are available.
Step 1Click the Download button to select the correct version of FoneTrans for iOS. Then click on it and follow the on-screen instructions to install it on the computer.
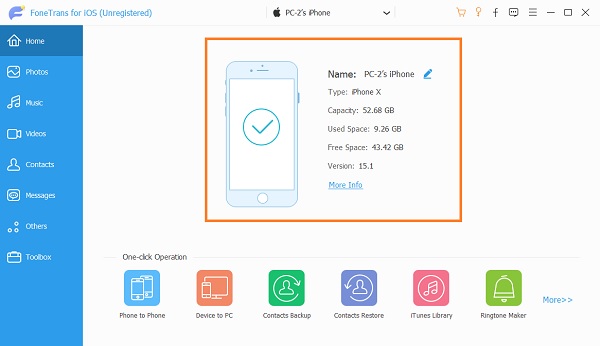
Step 2It will be launched automatically after that. On the main interface, choose the Toolbox tab.
Step 3You can see all available features, and select iTunes Library.
Step 4Select Sync Device to iTunes if you have items on iPhone. And you can also choose View iTunes Library instead and manage data manually.
Step 5Choose all items you want to transfer to iTunes, and click One-Click to iTunes button.
So easy, right? With FoneTrans for iOS, you don’t need to find data from various folders and enable different features on a computer. You can also easily move media files like images, songs, movies and more. Download and follow the steps to try now!
Step 1Connect iPhone with a USB cable, and choose data type from the left panel. If you want to transfer photos, select the Photos tab here.
Step 2You can find all the available items on the right side, check the box of them.
Step 3Click the export icon and chooses a folder on the computer to save them.
Part 3. FAQs about Transferring iTunes Purchases
Can you still buy from iTunes Store?
Yes, you can. You can still access and buy from iTunes Store on Mac, iPhone, iPad, iPod Touch, Apple TV and Windows.
Can you access iTunes Store on iPhone?
Yes. You can search iTunes Store on the spotlight and tap to open it on iPhone.
Where are iTunes and app store purchases on iPhone?
Open Settings app on iPhone, tap your name > Media & Purchases > View Account. You will be asked to log in. Do it and select Purchased history after that.
How do I purchase from iTunes Store?
Open iTunes Store anywhere you like, and choose the items you want to buy. Select the price button, sign in to your Apple account and complete the purchase.
Why can't I buy music on iTunes anymore?
Purchasing on iTunes requires the latest operating system, stable internet and available Apple ID. To prevent transferring purchases from iPhone to iTunes not working and similar issues, make sure your iTunes, Music app, iOS, macOS, or tvOS is updated. And also, ensure your account, payment, internet connection is available.
How to download previous iTunes Store purchases on Mac?
Firstly, you should authorize computer through Music app on Mac > Account > Authorize this Mac. Then open Music app and click iTunes Store on the left side > Purchased. Finally, click the Download button next to the item you want to download.
Transferring purchased items to iTunes library can be done through simple operations, and you can always find different solutions on the internet. The methods in this post are proven and you can choose whatever you like.
With FoneTrans for iOS, you will enjoy freedom to transfer your data from iPhone to computer. You can not only transfer iPhone text messages to computer, but also photos, videos and contacts can be moved to PC easily.
- Transfer photos, videos, contacts, WhatsApp, and more data with ease.
- Preview data before transferring.
- iPhone, iPad and iPod touch are available.
And FoneTrans for iOS is highly recommended to you, because it allows you to access and transfer data from or to iTunes library with ease. Thus, you don’t need to download or install additional tools or complicated operations.
If you have more questions about how to transfer purchases from iPhone to iTunes library, please leave comments below.



