iPhone Data Recovery
 iOS System Recovery
 iOS Data Backup & Restore
 iOS Unlocker
 iPhone Password Manager
 Location Changer
 Android Data Recovery
 Broken Android Data Extraction
 Android Data Backup & Restore
 Android Unlocker
 FoneTrans for iOS
 iPhone Data Eraser
 iPhone Cleaner
 HEIC Converter
 HyperTrans
 WhatsApp Transfer for iOS
 Mac Sweep
 Data Retriever
 Mac Data Retriever
 Video Converter Ultimate
 Screen Recorder
 Phone Mirror
 Get Mac Data Recovery Now
Recover the lost/deleted data from computer, hard drive, flash drive, memory card, digital camera and more.
What Is macOS Recovery Mode and How to Use It Effectively
 Updated by
 Good day! I have been facing a major issue on my Mac right now. I want to use a macOS recovery mode. My son mentioned this method after I told him about the issue on my Mac. However, I do not know anything about it. Can you help me? Thanks!
It is important to first understand what Mac Recovery Mode is. It is an advanced method that might be overwhelming for beginners. In this article, you will know its main purpose and also be introduced to a tool that can recover lost or deleted files after using recovery mode. Scroll down for full details.


Guide List
Part 1. What Is Mac Recovery Mode
Mac Recovery Mode (also called macOS Recovery) is a built-in feature on Apple Mac computers. It is commonly used for troubleshooting, restoring Mac backups, reinstalling macOS, and more. In short, it is different from a normal macOS startup. This mode is still accessible even when the Mac does not start properly.
However, this method is not recommended for beginners, as it is typically used by more experienced users.
Part 2. What You Can Do With Mac Recovery Mode
The Mac recovery mode is more than just a feature. It supports different operations that can be applied to your Mac. We will list down the operations it can perform for your reference.
1. Reinstalling macOS
Normally, reinstalling macOS from Apple servers requires a USB installer. However, with Recovery Mode, you do not need one. This is one of the convenient features Recovery Mode offers.
2. Recover Trash Data on Mac
Your deleted files on your Mac go directly to its Trash Bin. Using recovery mode, you can recover trash data on Mac, typically within 30 days.
3. Restore Backups from Time Machine
Mac users can create automatic backups using Time Machine. Recovery mode can restore these backups for you, allowing you to recover data that was lost.
4. Access Disk Utility
Recovery mode provides access to Disk Utility. This tool can perform various operations, such as repairing corrupted drives, erasing disks, mounting or unmounting drives, and partitioning the storage.
5. Access Safari
Recovery mode allows access to Safari, though only a basic version. In this case, you are allowed to search for troubleshooting methods to fix the issue your Mac currently faces. It happens when you boot Mac in recovery mode.
6. You Can Access Terminal
Terminal, like recovery mode, is a professional tool that can be used to make commands to your Mac. It also requires professional skills to use, as it relies on command-line coding.
Part 3. How to Start Up in macOS Recovery
How to enter recovery mode on Mac? The process can be completed in a few minutes if you are knowledgeable about it. However, there are 2 methods for entering the Mac recovery, depending on whether your Mac has Apple Silicon or an Intel processor. Please see their separate method with the instructions below.
- For Macs with Apple Silicon: Shut down the Mac by clicking the Apple menu and choosing the Shut Down button. Pressing and holding the Power button will help you see the Apple logo. Click the Options button. Later, choose the Continue button. Enter the authentication needed for your Mac. Finally, it will enter the recovery mode afterward.
- For Macs with Intel Processors: Please shut down the Mac by pressing and holding the Power button. When it is turning on, press and hold the Command + R key combination. Wait for the Apple logo to be prompted. Wait for the process to end. Finally, your Mac will enter its recovery mode.
Part 4. How to Recover Lost/Deleted Files on Mac With FoneLab Data Retriever
Using Mac Recovery Mode may sometimes lead to data loss. In that case, you may want to recover the important data from your Mac. Besides that, you can also use it for recovering data on your Windows. This tool supports different data types that can be recovered on the mentioned devices, including photos, videos, music, documents, and more.
The tool has a simple interface that novices will find convenient. Also, it does not require an internet connection to function. Please use the steps below if you want to use the Mac data recovery tool to recover your data on your Mac.
FoneLab Data Retriever - recover the lost/deleted data from computer, hard drive, flash drive, memory card, digital camera and more.
- Recover photos, videos, documents and more data with ease.
- Preview data before recovery.
Step 1Click the Free Download button to get FoneLab Data Retriever on your Mac. Then, locate the downloaded file to set it up. Later, please drag and drop it to the Application folder to install it. The tool will be accessed on your Mac afterward.
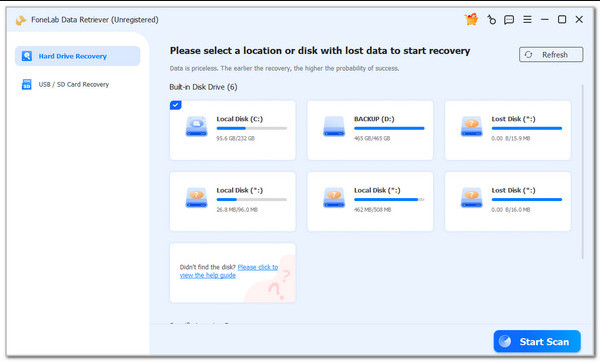
Step 2Please select the location where you think you lost the data. Later, click the Start Scan button at the bottom right of the screen. Wait for the scanning process to be completed. The results will be prompted on the next interface.
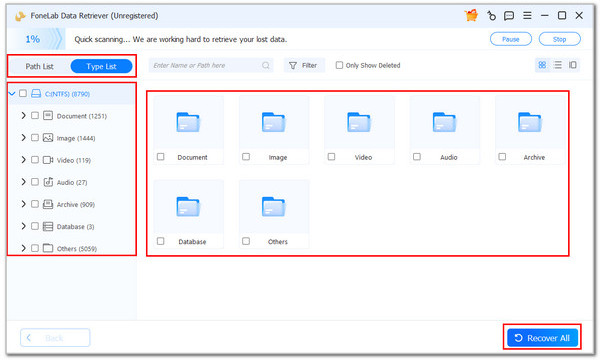
Step 3Choose the files you want to add to the recovery process. Finally, click the Recover All button in the bottom corner. This way, the recovery process will start. Please do not interrupt the process. Wait for it to end to prevent it from missing data.
Part 5. FAQs about Mac Recovery Mode
How do I get out of recovery mode on a Mac?
If you enter the macOS recovery mode accidentally, you can easily get out of it. You only need to click the Restart or Shut Down button from the Apple menu bar. Then, wait for the process to be completed.
What to do if the Mac is stuck in recovery mode?
Once the Mac is stuck in recovery mode, you need to force restart it. To do that, press and hold the Power key for 10 seconds. Wait until it is turned back on.
This article has helped you learn more about Mac recovery mode. It includes the procedure on how to use it. FoneLab Data Retriever is also here to help you retrieve any data you lost from your Mac after the recovery mode. It can retrieve your images, videos, documents, and more data types. Download the tool now to explore it even more!