Transfer Photos from PC to iPad: Top 6 Proven Ways to Do It
 Posted by Lisa Ou / Dec 30, 2021 09:00
 People tend to keep photos as memories from a place, of food, of a moment, and a lot more. Over and over again, we look at our pictures and remember what we have felt during that time. Actually, we want to view these images on a portable device with a bigger screen, not just sitting in front of a PC. That is why people love to have or buy an iPad, which has become an entertainment utility and office helper. However, if these photos are from the computer, there will always be a need to download them first if you want to view them on your iPad.
Instead of that way, we look for methods to just transfer your photos from PC to your iPad. Well, this post may have been prepared for you, for here, we will show you how to transfer photos from PC.


Guide List
If you have a batch of photos on your Windows PC that you make plans to move to iPad, you are at the right place. You can rely on the iTunes sync way to copy images from computer to iPad. However, most iOS users don’t like the Apple data transferring way.
Considering that, we share 3 simple ways to help you easily transfer photos from PC to iPad.
With FoneTrans for iOS, you will enjoy freedom to transfer your data from iPhone to computer. You can not only transfer iPhone text messages to computer, but also photos, videos and contacts can be moved to PC easily.
- Transfer photos, videos, contacts, WhatsApp, and more data with ease.
- Preview data before transferring.
- iPhone, iPad and iPod touch are available.
Part 1. Transfer Photos from PC to iPad with iCloud
One way to transfer your photos from PC to iPad is with your iCloud. And, there are two ways under this method or iCloud that you can do on your Windows PC. The first thing is transferring your photos from PC using iCloud.com and the next one is the Windows iCloud program. Find out how you can do the transferring upon using these two and their steps.
Method 1. How to Transfer Photos from PC to iPad with iCloud.com:
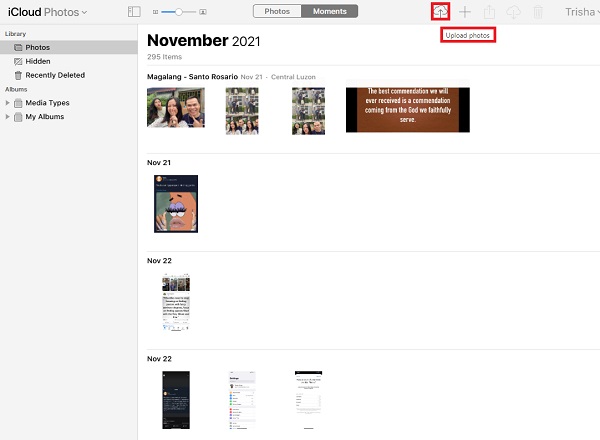
Step 1First, on your search browser, find and visit iCloud.com. And sign in to your Apple ID.
Step 2Then, on the main interface, choose the Photos icon.
Step 3Afterward, on the top-left corner, click the Upload Photos icon.
Step 4Finally, select the photos you want to upload on your computer from your PC.
So, when you look at your Photos app on your iPad, you will see these pictures. The pictures you have transferred from your computer will be synced because of your iCloud.
Another thing, iCloud also allows you to sync your photos or files across Apple and non-Apple devices. So, you can also download an iCloud application on your computer. Take note that, in the following method, you have to make sure that you have enabled the iCloud Photos on your iPad.
Method 2. Transfer Photos from PC to iPad with the iCloud app on Windows:
Step 1The first thing you need to do is get the iCloud for Windows on the Microsoft Store to be downloaded on your PC.
Step 2After that, the app will be automatically launched. And just sign in to your Apple ID that you are using on your iPad.
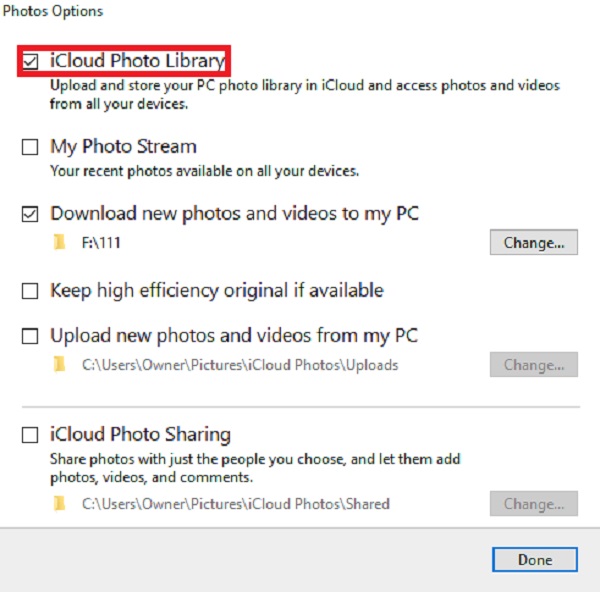
Step 3Next, click the Options next to the Photos icon and turn on the iCloud Photos Library by clicking the box beside it.
Step 4Then, ensure that the Upload new photos and videos from my PC are enabled. Under this option, click Change to select the folder containing the photos you wish to transfer from your PC to your iPad.
Step 5After the photos have been synced, you can now view them in the Photos app on your iPad.
And, that’s it! You will be able to view or see the pictures on your iPad that you have transferred from your PC. Next, you can also transfer your photos from your PC or Mac using iTunes or Finder. Want to know how? See the next part of this post.
With FoneTrans for iOS, you will enjoy freedom to transfer your data from iPhone to computer. You can not only transfer iPhone text messages to computer, but also photos, videos and contacts can be moved to PC easily.
- Transfer photos, videos, contacts, WhatsApp, and more data with ease.
- Preview data before transferring.
- iPhone, iPad and iPod touch are available.
Part 2. Transfer Photos from PC to iPad with iTunes/Finder
When it comes to data transfer, iTunes could be the first thing and be your first option that will come into your mind because you know that this program allows users to make a copy of their iPhone or iPad and manage iOS files and data. But, you have to keep in mind that it will get your photos from your iPad and exchange them with the newly synced pictures. Nonetheless, these are the steps to transfer your photos from PC to iPad with iTunes or Finder.
Steps on How to Transfer Photos from PC to iPad with iTunes/Finder:
Step 1First and foremost, download and install iTunes on your PC.
Step 2When iTunes opens automatically after the installation process, connect your iPad to the computer using a USB cable when it opens.
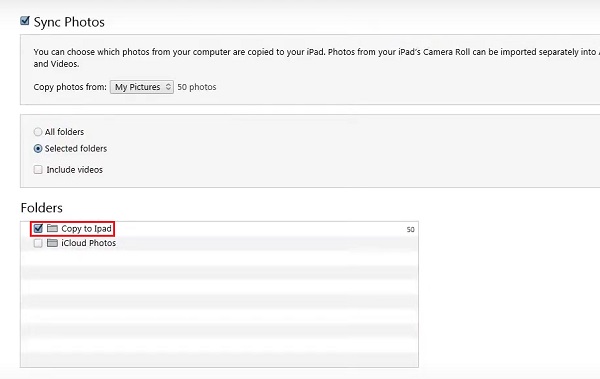
Step 3Then, click the iPhone device icon on the main interface of iTunes. Then, select Photos on the left-column corner.
Step 4After that, check the Sync Photos and check the box beside the Selected Folder. Where your photos are that you want to transfer.
Step 5Finally, click the Apply and wait. That’s it!
Same thing and procedure that you will do to the Finder app on your Mac. That’s how you can transfer, or to be specific, copy your photos from your PC or computer using the iTunes app. In the next part, we have one of the best alternatives you can use to transfer your pictures from a PC to your computer.
With FoneTrans for iOS, you will enjoy freedom to transfer your data from iPhone to computer. You can not only transfer iPhone text messages to computer, but also photos, videos and contacts can be moved to PC easily.
- Transfer photos, videos, contacts, WhatsApp, and more data with ease.
- Preview data before transferring.
- iPhone, iPad and iPod touch are available.
Part 3. Transfer Photos from PC to iPad with FoneTrans for iOS
Are you looking for the best alternative to transfer photos from PC to iPad instead? This tool must be for you, FoneTrans for iOS. FoneTrans for iOS is a powerful and reliable program that you can depend on when transferring data from your devices. Not just that, this tool is available for both Mac and Windows. You can selectively move data among computers, iOS devices, Finder, and iTunes Library. As well as, it supports data from different devices. With this tool, you can definitely transfer your photos from PC to iPad. Discover how by following the instructions below.
Steps on How to Transfer Photos from PC to iPad with FoneTrans for iOS:
Step 1First of all, go to the official website of FoneTrans for iOS to download and install it on your computer.
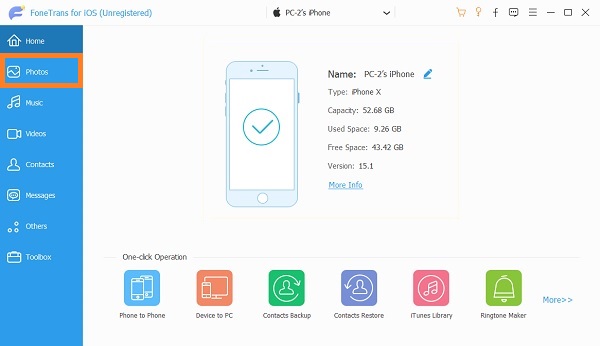
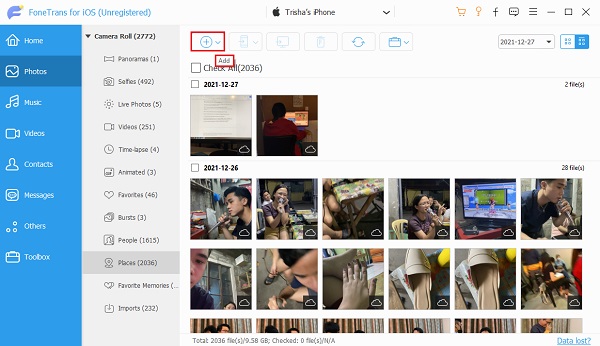
Step 2After the installation process is through, it will automatically open, connect your iPad to your computer. And you will see the details of your iPad. Then, click the Photos option on the left column corner.
Step 3Next, it will start to load your pictures from your iPad. Then, click the Add button, and choose Add File.
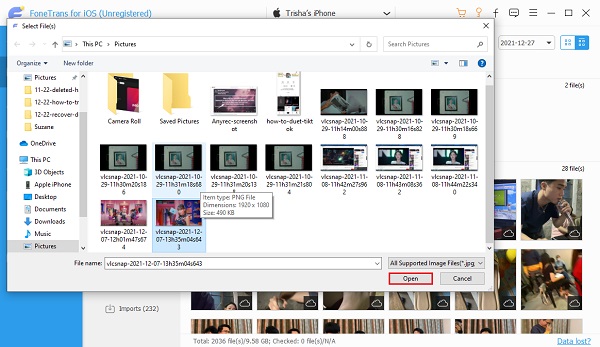
Step 4Afterward, find the folder from your computer where the photos you want to transfer are. Then, select the pictures. And click Open.
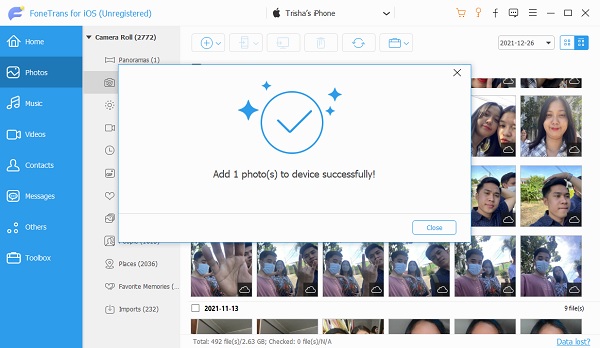
Step 5Wait for the photos to be transferred, and that’s it!
Finally, have successfully added or transferred your photos from your PC to your iPad, you can view and access them on your iPad. Indeed, with the help of this tool, you will be able to transfer your photos with much ease. Plus, it didn’t require lots of things, you can just connect your phone and start transferring. In the fourth part of this post, you will also learn to share pictures with Google Drive.
Part 4. Transfer Photos from PC to iPad with Google Photos
Google Photos is another online data storage that will let you sync and store your photos throughout several PCs, smartphones, and tablets. However, you need to keep in mind that it will only give you a 15GB free storage limit in storing your data. So, if you are to transfer more than that storage space, you will be needing to increase or upgrade your plan. And, here are the steps to get photos from your PC to transfer to iPad using Google Photos.
Steps on How to Transfer Photos from PC to iPad with Google Photos:
Step 1First, go to the Google Photos site and sign in to your Google Account.
Step 2Then, on the left column corner, click the Upload button. Then, click Computer. Next, select the photos you want to transfer or copy from your PC to your iPad.
Step 3After that, there will be a notification that will pop up, then Choose your upload size. Then, click Continue. Then, it will be uploaded on Google Photos. You can also click the Add to Album, where you can easily find your photos when you see them on your iPad.
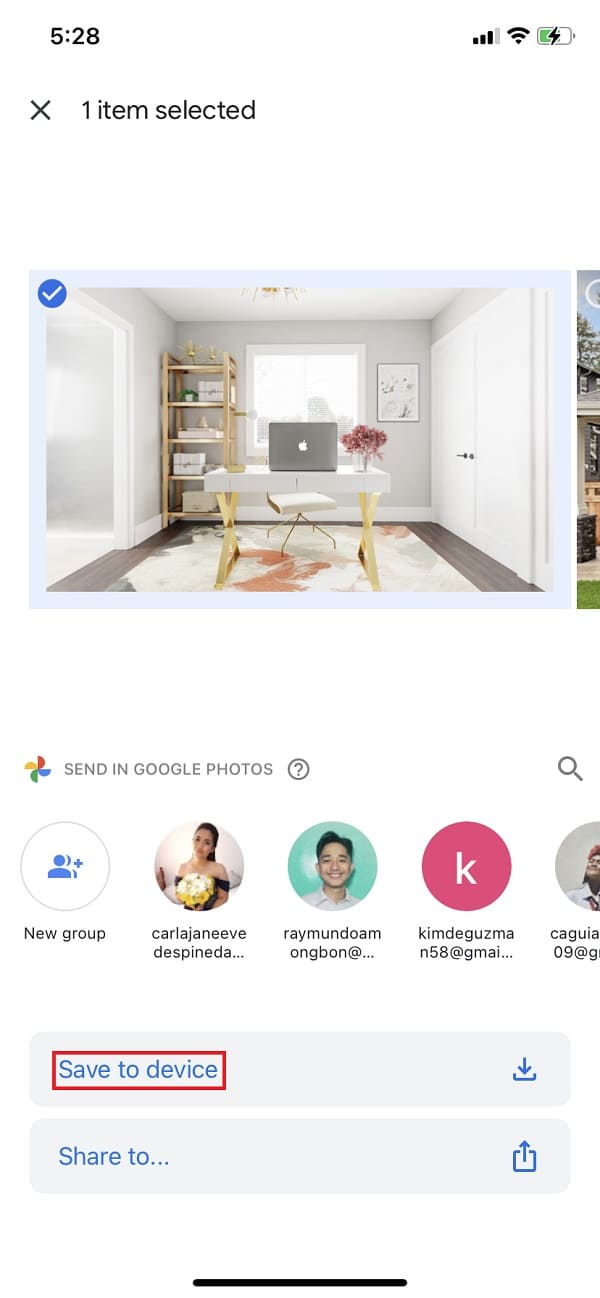
Step 4Next, on your iPad, open Google Photos. Then, find the album where the uploaded photos are to move them on your iPad.
Step 5Afterward, choose the photos, then click the Share icon. Finally, tap the Save to device. And, that’s it!
That’s how you can transfer your photos from PC to your iPad with Google Photos. However, there are many processes right, unlike the previously introduced methods. Nevertheless, it is possible to share your pictures from PC to iPad using this application.
Part 5. FAQs Transfer Photos from PC to iPad
1. Does transferring photos from PC to iPad affect the pictures' quality?
It can be a yes or a no because it depends on what method you used to transfer will affect the quality of your pictures.
2. Can I transfer a folder that contains photos from a PC to an iPad?
Of course, it is possible! With the help of FoneTrans for iOS discussed above, you can not only transfer or copy photos selectively or only choose pictures, there is an option where you click the Add button, you will be selecting to Add File or Add Folder. When you click the Add File button, all the images inside the chosen folder will also be added to your iPad Photos app.
Conclusion
To wrap this up, these are the top 6 proven methods that you can use if you want to transfer your photos from PC to your iPad. In addition, you can definitely depend on these ways for we have picked the best approaches to your problem. Yet, among these methods, this tool is remarkable because of its features and best performance, FoneTrans for iOS. Even so, it will always be your decision what way to use.
With FoneTrans for iOS, you will enjoy freedom to transfer your data from iPhone to computer. You can not only transfer iPhone text messages to computer, but also photos, videos and contacts can be moved to PC easily.
- Transfer photos, videos, contacts, WhatsApp, and more data with ease.
- Preview data before transferring.
- iPhone, iPad and iPod touch are available.